Welcome to the SR20 Community Forum - The Dash.
Register
SR20 forum logo

Thread: B-14 Panhard bar conversion (lots of pics)

+ Reply To Thread
Posts: 21-30 of 47
2012-07-27 21:29:17
#21
Originally Posted by Vadim

I was wondering about this, but there is a good reason for why to mount it on the right, it's explained in your link.

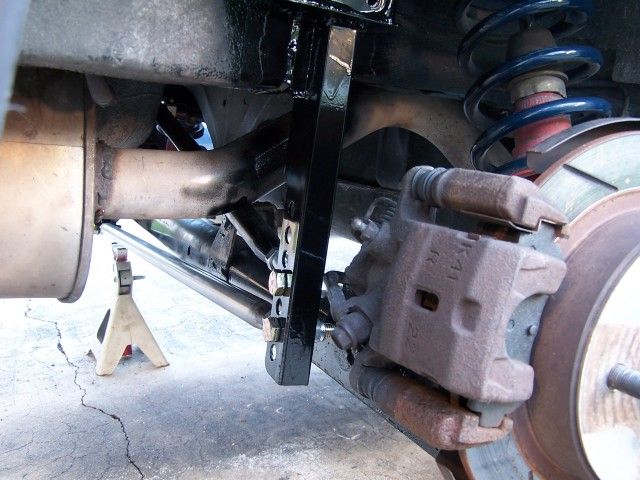
Frame Mount Location
A panhard bar that is attached to the right side of the frame lowers during chassis roll. However, a panhard bar that is attached to the left side of the frame raises during chassis roll. However, the effects on handling of a right side versus a left side frame mounting are not always predictable. The location of the panhard's axle mount can counteract any predictable handling effects. The current tendency is to mount the panhard to the left side of the dirt car chassis and to the right side of asphalt chassis.


Vadim,

Keep in mind that the article I linked to with that panhard bar information was written by circle track racers for circle track racers. So when they say that the right side of the car lowers during chassis roll, they are only talking about left hand turns. In a right hand turn the opposite is true, i.e. the right side of the chassis raises. So for what we are doing with our cars, the choice is really six to one half dozen to the other. All that matters is which side is it easier to attach to. And the answer to that question seems to be the right side.

Do not discount the article because they are referring specifically to roundy-round racers. The information provided still applies. Just keep in mind the context from which it was written and extrapolate from there. The panhard bar is a proven suspension set up on many race cars with a straight axle, not just oval track cars.
Last edited by Russell on 2012-07-27 at 21-30-27.
2012-07-27 21:42:12
#22
Originally Posted by nissanboi
Ideally but the angle would change more radically because of the use of a shorter bar. For the downfalls of our chassis the main benefit is to reduce the roll couple without exerting to aggressive of a force on the axle. A short bar would unload the opposite wheel harder due to the angle that the shorter bar has to travel. Longer is more important than it being centrally located (the reduction of the travel angle has more benefit in stability than the car turning slightly better in one side than the other as with the longer bar the car is overall more stable) I can't wait to see the outcome.


You nailed it nissanboi!!!

The best way to keep the loads on the axle equal is to go with the Watts Linkage. But it is more complex to set up. Take a peek under the back of a Chevy Cruze, the have a watts linkage back there. There are a couple of pics that have been posted in vadim's thread.

The panhard bar is way easier to set up and it is such a big improvement over stock that you don't really need to sweat the semantics of it all.
2012-07-27 22:14:54
#23
The next part of this process is to locate the chassis mount for the diagonal brace. The best place is going to be the frame rail on the left side of the chassis. The diagonal brace is needed to reinforce the right side chassis mount and keep the panhard bar pickup point from flexing around when it is loaded. Remember that most of the side loads that the chassis will place on the panhard bar during cornering will all go into this one attachment point near or at the bottom of the right side chassis mount. The further that point is from the upper attachment point, the more leverage the panhard bar will have to move the mount around and possibly break something. The diagonal brace creates a nice triangle that will stiffen up the right side chassis mount considerably.

The challenge here lies in findnig a spot on the left side frame rail that does not interfere wiht the fuel filler and evap stuff in that area. If you have a pre 98 car, you probably have less stuff in the area because the charcoal canister is in the engine bay. The position of this diagonal mount also needs to have a straight line of sight to the right side chassis mount without any interference. The spare tire well is an issue here.

I did not take a picture of the chosen mounting location before I installed the mount. Sorry. So this picture shows the area where the mount was placed. You can see how tight the diagonal brace is to the spare tire well. I had to use an "adjustment device" to clearance the spare tire well a bit.


Since all of the fuel gack is in the way, and it is really tight up in that corner of the car, I did not feel like trying to get a grinder up there to clean off the paint and undercoat and then try to weld. I was told by an instructor once that "if you cannot get in to the area well enough to put a proper weld in place, then you are better off not welding it". The reason for this is two fold, for one, a crappy weld is a crappy weld and nobody likes a crappy weld especially weld inspectors. Two, if it is that difficult to get to in the first place, how much fun will it be to have to go in there and grind out the offending weld and replace it with a proper weld that was not possible from the get go. Granted we were talking about structural stuff at the time, but I feel it also applies in this case. Plus I had a full tank of gas and did not want to weld around that. Etc...

So here is my bolt on solution to the left side diagonal brace chassis mount.


2012-07-27 22:41:22
#24
I used the piece of angle iron so that the mount would be supported on two sides of the frame rail. The bolt is welded to the inside of the clevis which will pick up the rod end.

With that done, I had to drill a hole through the frame rail in just the right location. I had to be careful to keep the drill bit straight as I drilled the hole. I did not want the second hole on the inside of the frame rail to be out of position. This was not easy as Nissan saw fit to add a few bits and pieces inside the frame rail in that location. Here are a couple of pictures of where I drilled the hole.


Once the hole was drilled then I could install the mount with one of the rod ends attached. I then placed a rod end in the lowest location for the diagonal brace on the right side chassis mount. I extended the rod ends on the bungs and measured the distance between them. Then I was able to cut my 1" .065wall tubing that would make my diagonal brace. Here is what it all looked like after welding and grinding and before paint. You can also see the backing plate I made for the outside of the frame rail.

2012-07-27 22:47:04
#25
Here is the diagonal brace with the chassis mount all painted and ready to install.


Here is a close up of the clevis end of the mount with the rod end bolted in place. You can see the 4 spacers that were installed.


And here it is installed on the car.


Almost there! Only one more piece of this puzzle to go!
2012-07-27 23:28:58
#26
I forgot to mention that one of the added benefits of the adjustable diagonal brace is pletnty of room for the exhaust system.


Now that all of that is done, time for the star of the show, the panhard bar! To be sure I made it the correct length, I had to set the car down so the weight was on the axle. I then installed the rod ends on the axle mount and chassis mount. The rod ends were threaded 3/4s of the way into the bungs. The goal here was to set the panhard bar as close to level and shorten the rod ends within reason to end up with my length. I set it up this way as a level bar would be the shortest and setting up the panhard bar on a diagonal would require the bar to be lengthened. Once the measurement was taken, the tubing was cut and the bungs welded on. I wanted the panhard bar to be seen from behind the car so I sanded it and then painted it with a clear coat. I think it turned out nice.


2012-07-27 23:37:13
#27
The final step now was to remove the Scott Russell Linkage. Make sure you hit up the nuts and bolts with some PB Blaster before you start this whole process. I did and it was still a pain in the ass to break the nuts loose! I also had to disconnect the right side shock to get the axle to drop down enough to get the stupid link out of there!!

And here it is!


In these pictures you can see the open area where the SRL was.


I set the bar up according to what I read the team at 2J racing did. They set the bar a bit higher on the chassis mount side so that as the car rolls the panhard bar levels out. Seemed like a good idea and they have track time so I went with it.


So there you have it. That is how you install a panhard bar on a B-14. I hope you appreciate the time I spent writing this post.
2012-07-27 23:40:41
#28
But how does it handle now you say???

Well, I have only driven to work and back twice now and all I can say is...

Holy Shit!!! BIG DIFERENCE!!! The car stays VERY flat in the turns. It is really smooth over bumps and the solid linkage only adds a small amount of road noise to the interior. I am very happy with it so far.

I will have to take it back to Sebring to give you a really fair assesment. But I will say that this is a great mod!

Enjoy!!!
2012-07-28 02:14:04
#29
Awesome write up! I'll have to get my bro to help me someday to this since he fabricates. Really does not look that bad to do.
2012-07-28 06:09:37
#30
Amazing work man! Do you want this thread moved to the How To section?

What about doing reenforcing it like MotoIQ did, think it would be more feasible to preserve the emission components, I believe B15/P11 got even worse with emissions parts on the driver side of the car.


Originally Posted by Russell
Vadim,

Keep in mind that the article I linked to with that panhard bar information was written by circle track racers for circle track racers. So when they say that the right side of the car lowers during chassis roll, they are only talking about left hand turns. In a right hand turn the opposite is true, i.e. the right side of the chassis raises. So for what we are doing with our cars, the choice is really six to one half dozen to the other. All that matters is which side is it easier to attach to. And the answer to that question seems to be the right side.

Do not discount the article because they are referring specifically to roundy-round racers. The information provided still applies. Just keep in mind the context from which it was written and extrapolate from there. The panhard bar is a proven suspension set up on many race cars with a straight axle, not just oval track cars.


I gotcha, that makes a lot of sense now, I mainly skimmed through the article, thus I missed the driving style they were building on.
+ Reply To Thread
  • [Type to search users.]
  • Quick Reply
    Thread Information
    There are currently ? users browsing this thread. (? members & ? guests)
    StubUserName

    Back to top