Well I wanted to contribute to the new forum write up section.
This has been on Gnet for quite awhile but it should serve a purpose here also.
First step that I did was take the front tire/rim off. Way easier to access.
Then of course, disconnected the battery and take it out along with the tray and the radiator overflow tank.
Then I proceded back to the wheel well and took apart the inner fender, splash guard thing. a few screws later and some of those push-in clips and this is what you have.
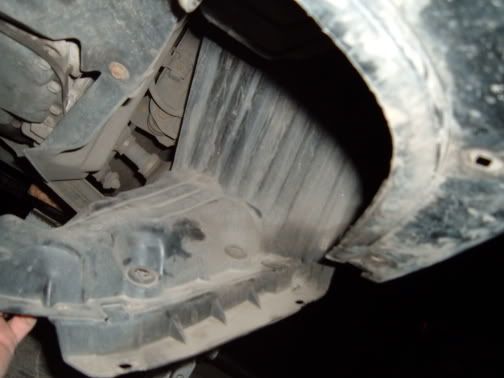
I know I know, its a bit dirty but it's still winter so whatever. Then it was time to take the old stuff out.
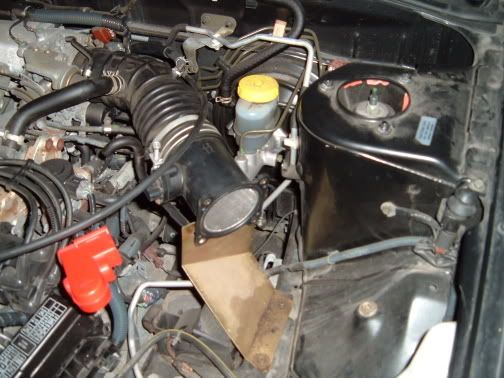
I took the hoses off then the MAF and the plastic pipe and I was ready to roll.
So, after a few more minutes and a couple of shots of Crown Royal(it was cold out) voila!!!
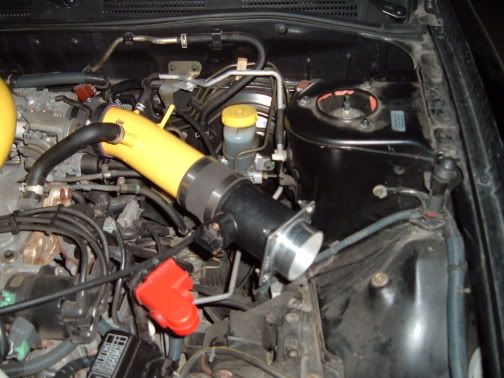
Lookin good so far huh, well what you cant see is that I had to modify the holes in the MAF flange adapter. UGH, so out comes the die grinder, after hogging out the holes it was good to go. So, the next step and probably what most are interested in is cutting the hole. well, I had everything out of the way. I used the exhisting hole as my starting point and started the cut with a flex dremel and a wheel, 2 wheels later I was ready for the die grinder again. I cut pretty much only what I needed out then did a test fit, PERFECT!!! I put the rubber piece around the hole so the pipe wouldnt get scratched, then I put the pipe thru the hole. One trick I did was too slide the coupler all the way on the pipe then line it up with the maf adapter and slide it over. That way I had more room to work with the pipe to line it up. after I got it in and attached I was extremley happy to see that the over flow tank fit back in.
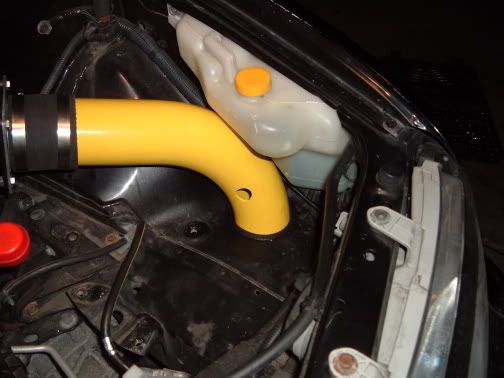
I know, clean huh!!! Then I put the battery tray back and put the sensor in the hole in the pipe. I wasnt sure if the battery tray was going to fit without modding it but check it out!
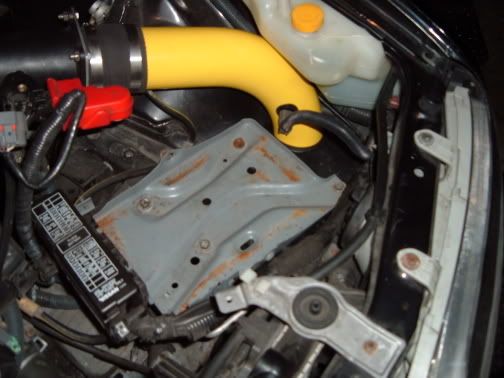
Like a glove! Then it was time to see if the battery would fit. I was worried about it hitting the sensor but.......
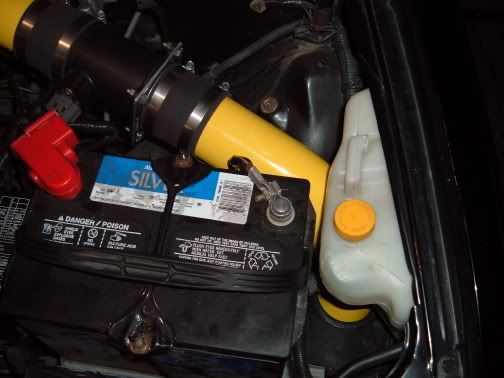
Not a factor at all. So at this point I am pretty happy. A few more shots of Crown and I was ready to get underneath the car. heres what I saw.
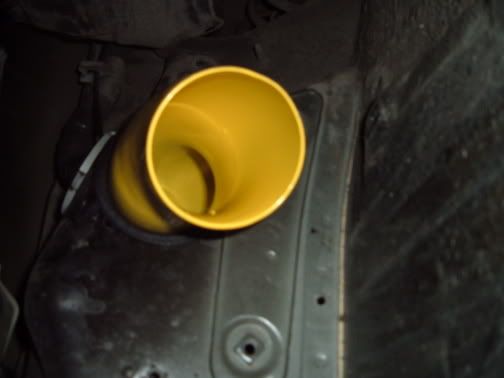
Next step was to put the self modified maf adapter on then the pop-charger and filter. Heres what it looks like after doing that. The filter was a bit big but I got it in.
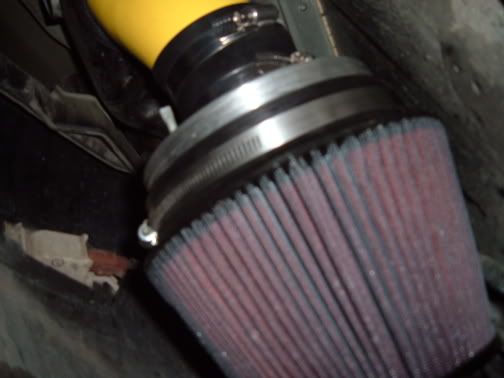
and heres one from the front.
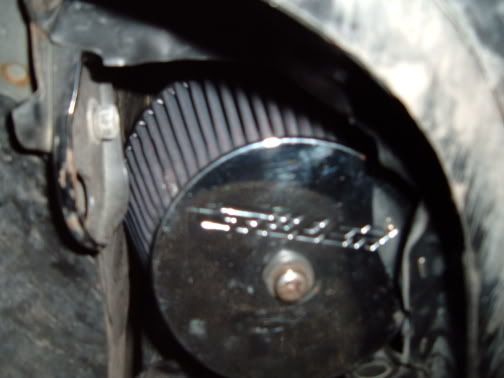
So after all that it was time to button everything back up. No problem right? Well sort of, I had to cut the bottom of the splash guard out due to the fact that it sort of goes up and it was hitting the oversized filter. So a little trimming with the razor blade and it was good to go. Then back with the screws and push-in clips and the it was all done. I would have to say that it wasnt difficult at all. Having to re do the holes in the flanges was a pain but wasnt a big deal and the hole that the pipe went thru is the cleanest that I have seen. There isnt anything that would make a person think that it wasnt factory installed. It sounds nice but I havent driven it enuf to see what difference it makes. But I do know I like the yellow and once I get the VC painted to match I think it will be pretty cool. Thanks to my friend Brad for helping and thanks mostly to my wife for being incredibly patient and not blowing my cell phone up. Happy viewing and if anyone has any questions please feel free. Uncle Dave
This has been on Gnet for quite awhile but it should serve a purpose here also.
First step that I did was take the front tire/rim off. Way easier to access.
Then of course, disconnected the battery and take it out along with the tray and the radiator overflow tank.
Then I proceded back to the wheel well and took apart the inner fender, splash guard thing. a few screws later and some of those push-in clips and this is what you have.

I know I know, its a bit dirty but it's still winter so whatever. Then it was time to take the old stuff out.

I took the hoses off then the MAF and the plastic pipe and I was ready to roll.
So, after a few more minutes and a couple of shots of Crown Royal(it was cold out) voila!!!

Lookin good so far huh, well what you cant see is that I had to modify the holes in the MAF flange adapter. UGH, so out comes the die grinder, after hogging out the holes it was good to go. So, the next step and probably what most are interested in is cutting the hole. well, I had everything out of the way. I used the exhisting hole as my starting point and started the cut with a flex dremel and a wheel, 2 wheels later I was ready for the die grinder again. I cut pretty much only what I needed out then did a test fit, PERFECT!!! I put the rubber piece around the hole so the pipe wouldnt get scratched, then I put the pipe thru the hole. One trick I did was too slide the coupler all the way on the pipe then line it up with the maf adapter and slide it over. That way I had more room to work with the pipe to line it up. after I got it in and attached I was extremley happy to see that the over flow tank fit back in.

I know, clean huh!!!
 Then I put the battery tray back and put the sensor in the hole in the pipe. I wasnt sure if the battery tray was going to fit without modding it but check it out!
Like a glove! Then it was time to see if the battery would fit. I was worried about it hitting the sensor but.......

Not a factor at all. So at this point I am pretty happy. A few more shots of Crown and I was ready to get underneath the car. heres what I saw.

Next step was to put the self modified maf adapter on then the pop-charger and filter. Heres what it looks like after doing that. The filter was a bit big but I got it in.

and heres one from the front.

So after all that it was time to button everything back up. No problem right? Well sort of, I had to cut the bottom of the splash guard out due to the fact that it sort of goes up and it was hitting the oversized filter. So a little trimming with the razor blade and it was good to go. Then back with the screws and push-in clips and the it was all done. I would have to say that it wasnt difficult at all. Having to re do the holes in the flanges was a pain but wasnt a big deal and the hole that the pipe went thru is the cleanest that I have seen. There isnt anything that would make a person think that it wasnt factory installed. It sounds nice but I havent driven it enuf to see what difference it makes. But I do know I like the yellow and once I get the VC painted to match I think it will be pretty cool. Thanks to my friend Brad for helping and thanks mostly to my wife for being incredibly patient and not blowing my cell phone up. Happy viewing and if anyone has any questions please feel free.
 Uncle Dave


 Be the first to like this post.


 Back to top
