I didn't see a writeup on this so I figured I would make an attempt.
Materials:
OEM looking grey headliner material from JoAnn's Fabric (pic at bottom) - ~$25
3M Heavy Duty Spray Adhesive ~$10
Duct tape
Tools:
Pocket screwdriver
10mm on a ratchet
Phillips head
Panel popper
Wire brushes
12mm on a ratchet (optional)
Hope I remembered everything
First you need to remove the headliner. To do this several other things need to be removed first. In no particular order, remove the rear view mirror, sun visors, "oh crap" handles, dome light, if you have a sunroof like me then remove the controls and the trim piece around the sunroof opening. Remove the A-pillar trim pieces as well as the any other trim pieces that will prevent you from removing the headliner. And you might as well take out the front seats...it's only 8 more bolts and a plug.
") It's not totally necessary but it sure makes removal of the headliner a lot easier. It can also be accomplished by putting the seat backs down as far as they will go ...but of course why not just go ahead and vacuum under the seats when you're done.
It's not totally necessary but it sure makes removal of the headliner a lot easier. It can also be accomplished by putting the seat backs down as far as they will go ...but of course why not just go ahead and vacuum under the seats when you're done. 
The 4 clips at the rear of the liner can be tricky to get out without messing them up. A great tool for this is to use a panel popper. This is a tool everyone should have...makes many jobs much easier!

This tool is also the best tool for getting off fuel filter hoses and other misc vacuum hoses....but that's another story.
Now for some good stuff...
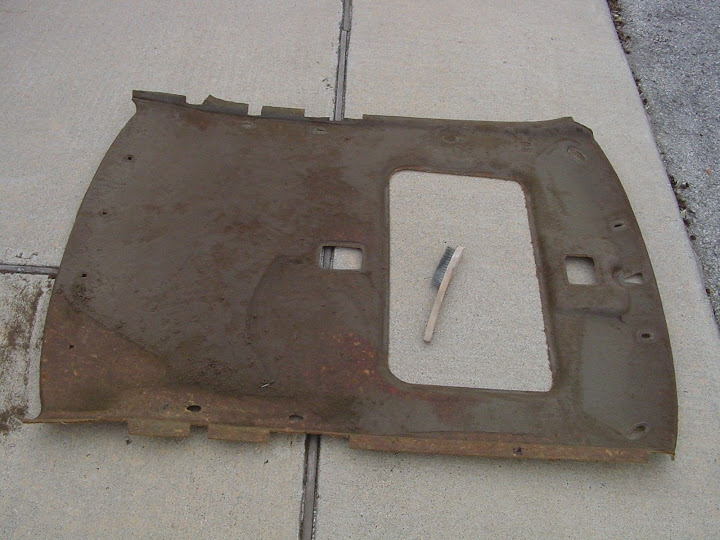
Now that you've removed the headliner from the car you need to remove the old liner...should be easy if it's not already off. Next, you need to remove all that deteriorated foam that's stuck to your pressed piece of cardboard that will soon be a thing of beauty! The old foam can be removed with a large wire brush and some elbow grease.") A smaller wire brush is good for the nooks and crannies.
A smaller wire brush is good for the nooks and crannies.

Be aggressive but gentle...it gets everywhere so don't do it in the garage, go outside! I wish I woulda wore a mask so that's probably a good idea to have, too.
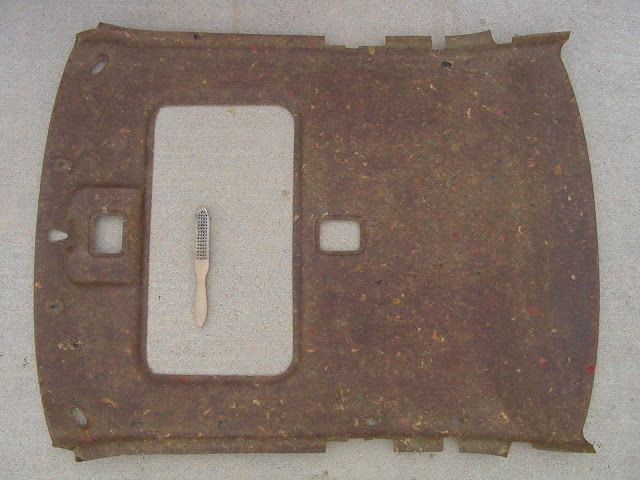
Make sure you do a good job on this...the life of your NEW headliner depends on it!


My sun visors were jacked up too so I took a seam ripper to them and removed the old material. I hoped I would be able to do these but I was wrong so I had them done at an upholstery shop for $25 each. I don't think removing the old material saved me any money.


Before you lay your new headliner material on the sticky surface you may want to move back inside unless there is no wind and it's a clean surface.
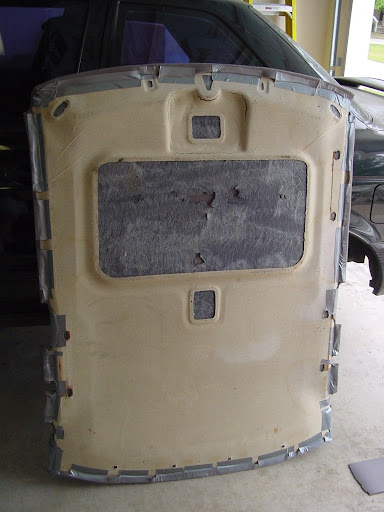
I didn't get a pic of the spray glue on the headliner cardboard but follow the directions on the can. I believe 3M Heavy Duty Spray Adhesive holds the best. Don't use too much in one spot or it may seep through (I've never had this happen and can't truly confirm this but don't test it). There may be a waiting period before applying your new liner...again, read the instructions on the can. Make sure you DON'T stretch the material when laying it. I started at the front and worked to the back, making sure to press and work the fabric into all the nooks and crannies you took care to scrape clean. Here's a shot of the newly glued liner after some trimming.

When trimming those notches on the sides, I made a 45* cut with scissors at each inside corner and trimmed the outside corners close. On the first liner I recovered, I didn't think about spraying some glue on the opposite side so I had used it all on the other side. I chose to use duct tape to hold down the pieces you fold over...as seen below.


Take care when trimming out the 'holes' and getting close to corners...don't get too close. I trimmed the excess to about an inch of material expect at inside corners where it's much closer.
Almost all trimmed...

Installed...do it right, I got my eye on you.

...with newly recoverd sun visors:

Color is very close to OEM. Also, the material is different on the visors because the upholstery shop used their own stock...but it is also very close...most wouldn't notice. Luckily, the sun roof was in good condition...would probably have to have that done at an upholstery shop, too.

I didn't trim out the rear view mirror hole because I'm installing a GM unit that incorporates some map lights and attaches to the windshield...another writeup maybe?
Here's a pic of the material I got from JoAnn's Fabrics.

Have fun!
Materials:
OEM looking grey headliner material from JoAnn's Fabric (pic at bottom) - ~$25
3M Heavy Duty Spray Adhesive ~$10
Duct tape
Tools:
Pocket screwdriver
10mm on a ratchet
Phillips head
Panel popper
Wire brushes
12mm on a ratchet (optional)
Hope I remembered everything
First you need to remove the headliner. To do this several other things need to be removed first. In no particular order, remove the rear view mirror, sun visors, "oh crap" handles, dome light, if you have a sunroof like me then remove the controls and the trim piece around the sunroof opening. Remove the A-pillar trim pieces as well as the any other trim pieces that will prevent you from removing the headliner.
And you might as well take out the front seats...it's only 8 more bolts and a plug. It's not totally necessary but it sure makes removal of the headliner a lot easier. It can also be accomplished by putting the seat backs down as far as they will go ...but of course why not just go ahead and vacuum under the seats when you're done. The 4 clips at the rear of the liner can be tricky to get out without messing them up. A great tool for this is to use a panel popper. This is a tool everyone should have...makes many jobs much easier!
This tool is also the best tool for getting off fuel filter hoses and other misc vacuum hoses....but that's another story.
Now for some good stuff...
Now that you've removed the headliner from the car you need to remove the old liner...should be easy if it's not already off. Next, you need to remove all that deteriorated foam that's stuck to your pressed piece of cardboard that will soon be a thing of beauty! The old foam can be removed with a large wire brush and some elbow grease.
A smaller wire brush is good for the nooks and crannies. Be aggressive but gentle...it gets everywhere so don't do it in the garage, go outside! I wish I woulda wore a mask so that's probably a good idea to have, too.
Make sure you do a good job on this...the life of your NEW headliner depends on it!
My sun visors were jacked up too so I took a seam ripper to them and removed the old material. I hoped I would be able to do these but I was wrong so I had them done at an upholstery shop for $25 each. I don't think removing the old material saved me any money.
Before you lay your new headliner material on the sticky surface you may want to move back inside unless there is no wind and it's a clean surface.
I didn't get a pic of the spray glue on the headliner cardboard but follow the directions on the can. I believe 3M Heavy Duty Spray Adhesive holds the best. Don't use too much in one spot or it may seep through (I've never had this happen and can't truly confirm this but don't test it). There may be a waiting period before applying your new liner...again, read the instructions on the can. Make sure you DON'T stretch the material when laying it. I started at the front and worked to the back, making sure to press and work the fabric into all the nooks and crannies you took care to scrape clean. Here's a shot of the newly glued liner after some trimming.
When trimming those notches on the sides, I made a 45* cut with scissors at each inside corner and trimmed the outside corners close. On the first liner I recovered, I didn't think about spraying some glue on the opposite side so I had used it all on the other side. I chose to use duct tape to hold down the pieces you fold over...as seen below.
Take care when trimming out the 'holes' and getting close to corners...don't get too close. I trimmed the excess to about an inch of material expect at inside corners where it's much closer.
Almost all trimmed...
Installed...do it right, I got my eye on you.
...with newly recoverd sun visors:
Color is very close to OEM. Also, the material is different on the visors because the upholstery shop used their own stock...but it is also very close...most wouldn't notice. Luckily, the sun roof was in good condition...would probably have to have that done at an upholstery shop, too.
I didn't trim out the rear view mirror hole because I'm installing a GM unit that incorporates some map lights and attaches to the windshield...another writeup maybe?
Here's a pic of the material I got from JoAnn's Fabrics.
Have fun!
Last edited by 1fastser
on 2012-09-14
at 03-53-34.
Reason: adding stuff