


by the great : XxToKeSxX
Disclaimer: This is what I did... This may not work for you... Painting the header and downpipe were completely optional for me and I just did them because I was bored. If hot parts aren't prepped well they can tend to blister or peel. Please understand that exhaust temperatures can reach up to 1000*F to 2000*F. Please be aware of the previous and don't paint your header or downpipe unless you fully understand that there is a possibility that it can chip, crack, peel, or just plain look ugly. Thanks!
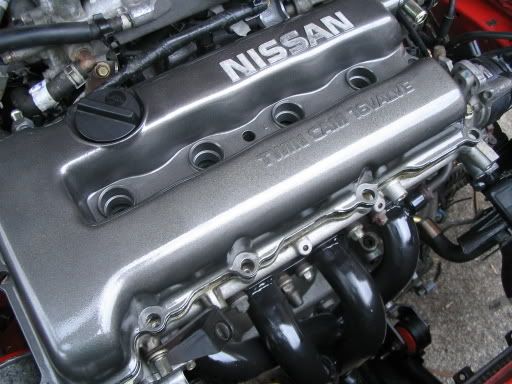
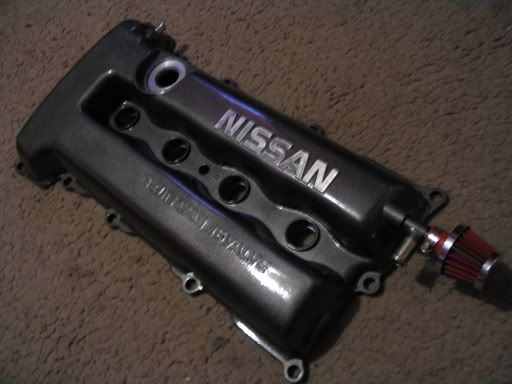
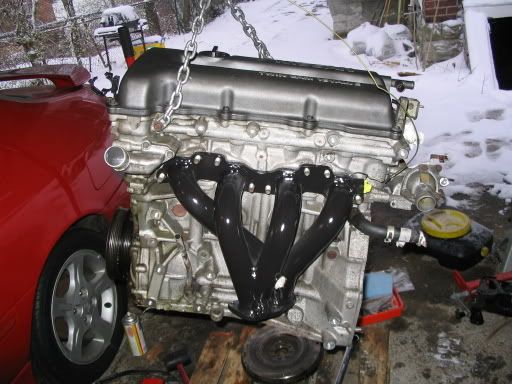
The Above is my Example of My Painted VC & Header
One of the members on the forum asked me how I took care of some of the recent painting that I did to my VC and my Header. I figured why not just make a quick how to about it? I apologize if its a little vague. Usually, if you know me, I get really in depth in things like this but bear with me.
Thanks Mandanga,
Here's what I did , I have to go all out on this one because I'm a nerd!
List of Materials
-Duplicolor Engine Enamel Grey Primer (500*F)
-Duplicolor Wheel Paint - Graphite
-Duplicolor Engine Enamel Clear (500*F)
-VHT Flameproof Ceramic Paint (2000*F)
-Sanding Sponges - (Can find at Odd Lots for $0.99)
-Some Masking Tape or Electric Tape for Masking Off....
-Rag for Cleaning
-Some Type of Degreaser Cleaner for inside of valve cover
-Prep Wipes (if you would like)
-Either Sanding Block and Paper or Dremel w/ Wire brush (letters)
-Oven for Curing if you choose to do so...
Painting Valve Cover
Pictures of the process can be found here: (check all the pages)
http://photobucket.com/albums/f254/xxtokesxx/1998%20Nissan%20200SX%20SE-R/JDM%20Lowport%20RR%20SR20DE/Swap%2004%20-%20Renew%20and%20Install/?start=0
http://photobucket.com/albums/f254/xxtokesxx/1998%20Nissan%20200SX%20SE-R/JDM%20Lowport%20RR%20SR20DE/Swap%2003%20-%20Swap%20Accessories/?start=20
1) I actually cleaned the interior of the Valve Cover with simple green to get rid of the oil, I cleaned the outside as well... I wiped it down and allowed it to dry after a while...
2) I used some of the sanding sponges (not too deep of a grit) to scratch the surface pretty good all over... I then wiped off the excess with a rag...
3) Before Painting I used a little bit of alcohol based paint prep wipes (not sure if they help but oh well)...
4) I got a hanger and bent it so I was able to hang the cover in the basement... I put the hanger through two small holes at the passenger side of the cover.
5) I then used Dupilicolor Engine Enamel Grey Primer.. followed the directions on the can... painting 2 small coats in intervals of 10-15 minutes. Then a little thicker coat on the last interval... from about 10 inches away. I definitely advise using primer, it makes it easy to see where you have covered with paint.
6) After the cover was flush with a few 'thin' coats, and there was primer all over (and it dried) I started with the wheel paint. That wheel paint is magnificent... Metal flakes really make a difference. Follow the same directions for the primer. Don't use heavy coats as the paint will run. If you mess up it will look sh*tty... so be patient. Light coats should be used, and I probably put about 3-4 of them on there, tried to make sure everything was covered.
7) When the VC Dried, it looked AMAZING... I allowed it to sit for while, I think a day because I was busy. I then brought it upstairs and busted out the dremel to sand the letters down. I have used a sanding block and a dremel to sand letters and a dremel is MUCH easier.... Believe me! Be careful with it though.
8) After done with the letters I took a soft rag/paper towels and wiped down the cover again to get all the dirt off... You can use those preps here if you want, but I didn't bother.
9) I hung the cover back up in the basement and busted out the clear enamel. This stuff is very good, but you HAVE to use light coats or else it will be very cloudy and thck, and will look bad. Just be patient and use the same judgement as you did with the other paint. Try and finish the clearcoating in about 60-90 minutes total.
10) Allow it to dry and Blam your done!!!!
Painting Header
Pictures of the process can be found here: (check all pages, they're there!)
http://photobucket.com/albums/f254/xxtokesxx/1998%20Nissan%20200SX%20SE-R/Hotshot%20G3%20Header/
http://photobucket.com/albums/f254/xxtokesxx/1998%20Nissan%20200SX%20SE-R/JDM%20Lowport%20RR%20SR20DE/Swap%2003%20-%20Swap%20Accessories/?start=20
Disclaimer: A lot of people actually told me not to paint the Header, I didn't care, some said it would peel. Some people said it wouldn't... It doesn't matter to me, if it peels it peels... I will have to learn if the process fails me... As I know I did as much prepping as possible. I would wait until I test mine out before you start though! Feel free to ask me in about a month from now (Ask me after 04/27/06)
1) Prepping the header is pretty similar to how the VC was prepped. First thing you want to do is get rid of that nasty surface rust... Get you some sanding sponges in multiple grit... I made a day out of sanding this thing...
2) You will have metal dust everywhere, and on your hands so after your done with this you'll want to wash them with some fast orange or something. Get a rag and wipe down the header.
3) This step is optional... But i used come throttle body cleaner to clean the loose soot out of the header primaries... I then found some small shop towels annd pulled it through all four of the port holes. I wiped it down again.
4) I didn't prime the headers even though I should have, but I couldn't find any primer that was made for 2000*F+++.
5) I used VHT Flameproof Flat black for the headers... you can use the process for the valve cover above... again light coats and patience. After the header was coated I let it sit for a few hours...
6) Curing Process: You can follow the curing process on the can... I followed the can process directly and added a few more minutes of heatin and cooling. Not sure if this helps or not but it is advised... Don't burn your house down... So set timers/alarms... or your house will be filled with smoke ***cough***
7) After the Header was fully primed I had a lot of things to do, so I Stored it in an open box for a couple of weeks.. you don't need to do this, but this is just what I did.
The following steps are optional... You don't have to clearcoat your header! I kind of wish that I didn't because the clearcoat I used only has a temperature rating of 500*F... If you didn't know I think the SR20 exhaust temperatures can reach up to 1900*F depending on driving habits... Oh well
DO NOT, I repeat, DO NOT Clearcoat your Header.... Unless its a clear ceramic base MEANT for headers. If there is any concern, just disregard the steps after step 7).
8) After the header sat, I hung it back up with a hanger in the basement and prepped it for clearcoating... I prepped the header just like I did up above on the valve cover for clearcoating on step #9.
9) After a few coats I let it sit for the rest of the day before I handled it... Mine will be sitting for 7+ days or so only because i was in the middle of a swap...
Well, as you can see... I took more steps then I probably should have, but I am a stickler for doing things slowly and surely... Thats the way I am... I have always recieved the best results with what I have done in my past life because of this burden I possess.. he he, but it gives me piece of mind & peace of mind... :tee hee:
I hope this is in depth enough, I usually incorporate more pictures for each step, but I wrote this in 45 minutes... I will add pictures later and make a thread in the how-to section... look fo rit... Peace Mandanga!
Ameen Dawg... aka Tokes
How to Paint your Valve Cover (& Other Misc. Items) Yourself :biggthump
Disclaimer: This is what I did... This may not work for you... Painting the header and downpipe were completely optional for me and I just did them because I was bored. If hot parts aren't prepped well they can tend to blister or peel. Please understand that exhaust temperatures can reach up to 1000*F to 2000*F. Please be aware of the previous and don't paint your header or downpipe unless you fully understand that there is a possibility that it can chip, crack, peel, or just plain look ugly. Thanks!
The Above is my Example of My Painted VC & Header
One of the members on the forum asked me how I took care of some of the recent painting that I did to my VC and my Header. I figured why not just make a quick how to about it? I apologize if its a little vague. Usually, if you know me, I get really in depth in things like this but bear with me.
Thanks Mandanga,
Here's what I did , I have to go all out on this one because I'm a nerd!
List of Materials
-Duplicolor Engine Enamel Grey Primer (500*F)
-Duplicolor Wheel Paint - Graphite
-Duplicolor Engine Enamel Clear (500*F)
-VHT Flameproof Ceramic Paint (2000*F)
-Sanding Sponges - (Can find at Odd Lots for $0.99)
-Some Masking Tape or Electric Tape for Masking Off....
-Rag for Cleaning
-Some Type of Degreaser Cleaner for inside of valve cover
-Prep Wipes (if you would like)
-Either Sanding Block and Paper or Dremel w/ Wire brush (letters)
-Oven for Curing if you choose to do so...
Painting Valve Cover
Pictures of the process can be found here: (check all the pages)
http://photobucket.com/albums/f254/xxtokesxx/1998%20Nissan%20200SX%20SE-R/JDM%20Lowport%20RR%20SR20DE/Swap%2004%20-%20Renew%20and%20Install/?start=0
http://photobucket.com/albums/f254/xxtokesxx/1998%20Nissan%20200SX%20SE-R/JDM%20Lowport%20RR%20SR20DE/Swap%2003%20-%20Swap%20Accessories/?start=20
1) I actually cleaned the interior of the Valve Cover with simple green to get rid of the oil, I cleaned the outside as well... I wiped it down and allowed it to dry after a while...
2) I used some of the sanding sponges (not too deep of a grit) to scratch the surface pretty good all over... I then wiped off the excess with a rag...
3) Before Painting I used a little bit of alcohol based paint prep wipes (not sure if they help but oh well)...
4) I got a hanger and bent it so I was able to hang the cover in the basement... I put the hanger through two small holes at the passenger side of the cover.
5) I then used Dupilicolor Engine Enamel Grey Primer.. followed the directions on the can... painting 2 small coats in intervals of 10-15 minutes. Then a little thicker coat on the last interval... from about 10 inches away. I definitely advise using primer, it makes it easy to see where you have covered with paint.
6) After the cover was flush with a few 'thin' coats, and there was primer all over (and it dried) I started with the wheel paint. That wheel paint is magnificent... Metal flakes really make a difference. Follow the same directions for the primer. Don't use heavy coats as the paint will run. If you mess up it will look sh*tty... so be patient. Light coats should be used, and I probably put about 3-4 of them on there, tried to make sure everything was covered.
7) When the VC Dried, it looked AMAZING... I allowed it to sit for while, I think a day because I was busy. I then brought it upstairs and busted out the dremel to sand the letters down. I have used a sanding block and a dremel to sand letters and a dremel is MUCH easier.... Believe me! Be careful with it though.
8) After done with the letters I took a soft rag/paper towels and wiped down the cover again to get all the dirt off... You can use those preps here if you want, but I didn't bother.
9) I hung the cover back up in the basement and busted out the clear enamel. This stuff is very good, but you HAVE to use light coats or else it will be very cloudy and thck, and will look bad. Just be patient and use the same judgement as you did with the other paint. Try and finish the clearcoating in about 60-90 minutes total.
10) Allow it to dry and Blam your done!!!!
Painting Header
Pictures of the process can be found here: (check all pages, they're there!)
http://photobucket.com/albums/f254/xxtokesxx/1998%20Nissan%20200SX%20SE-R/Hotshot%20G3%20Header/
http://photobucket.com/albums/f254/xxtokesxx/1998%20Nissan%20200SX%20SE-R/JDM%20Lowport%20RR%20SR20DE/Swap%2003%20-%20Swap%20Accessories/?start=20
Disclaimer: A lot of people actually told me not to paint the Header, I didn't care, some said it would peel. Some people said it wouldn't... It doesn't matter to me, if it peels it peels... I will have to learn if the process fails me... As I know I did as much prepping as possible. I would wait until I test mine out before you start though! Feel free to ask me in about a month from now (Ask me after 04/27/06)
1) Prepping the header is pretty similar to how the VC was prepped. First thing you want to do is get rid of that nasty surface rust... Get you some sanding sponges in multiple grit... I made a day out of sanding this thing...
2) You will have metal dust everywhere, and on your hands so after your done with this you'll want to wash them with some fast orange or something. Get a rag and wipe down the header.
3) This step is optional... But i used come throttle body cleaner to clean the loose soot out of the header primaries... I then found some small shop towels annd pulled it through all four of the port holes. I wiped it down again.
4) I didn't prime the headers even though I should have, but I couldn't find any primer that was made for 2000*F+++.
5) I used VHT Flameproof Flat black for the headers... you can use the process for the valve cover above... again light coats and patience. After the header was coated I let it sit for a few hours...
6) Curing Process: You can follow the curing process on the can... I followed the can process directly and added a few more minutes of heatin and cooling. Not sure if this helps or not but it is advised... Don't burn your house down... So set timers/alarms... or your house will be filled with smoke ***cough***
7) After the Header was fully primed I had a lot of things to do, so I Stored it in an open box for a couple of weeks.. you don't need to do this, but this is just what I did.
The following steps are optional... You don't have to clearcoat your header! I kind of wish that I didn't because the clearcoat I used only has a temperature rating of 500*F... If you didn't know I think the SR20 exhaust temperatures can reach up to 1900*F depending on driving habits... Oh well
DO NOT, I repeat, DO NOT Clearcoat your Header.... Unless its a clear ceramic base MEANT for headers. If there is any concern, just disregard the steps after step 7).
8) After the header sat, I hung it back up with a hanger in the basement and prepped it for clearcoating... I prepped the header just like I did up above on the valve cover for clearcoating on step #9.
9) After a few coats I let it sit for the rest of the day before I handled it... Mine will be sitting for 7+ days or so only because i was in the middle of a swap...
Well, as you can see... I took more steps then I probably should have, but I am a stickler for doing things slowly and surely... Thats the way I am... I have always recieved the best results with what I have done in my past life because of this burden I possess.. he he, but it gives me piece of mind & peace of mind... :tee hee:
I hope this is in depth enough, I usually incorporate more pictures for each step, but I wrote this in 45 minutes... I will add pictures later and make a thread in the how-to section... look fo rit... Peace Mandanga!
Ameen Dawg... aka Tokes
 Be the first to like this post.

")

