


Hello good people. I am new to this forum and this is my first post. I joined so I could share my knowledge with you because I found absolutely no helpful information anywhere I looked for a particular annoying problem.
The issue is in the headlights and some of you may have had this problem or may still have it while reading at this very moment. So one or both of your headlights are not working or perhaps one (or both) of your high-beams are not coming on. No problem, just a globe you thought in all your eternal wisdom. Hmm, globe didn't seem to do the trick. ..Perhaps a fuse. You replace these and still nothing. Cleverly, you bring your multimeter into the mix and see if it's the circuit. Everything seems to be fine. WTF? Still frustrated you speak to Google. Google delivers various clumps of information that seems to lean to the switch on the steering column as the culprit. Chances are it probably is and even more likely is that your switch is suffering the same as both of mine did. (Yes I have two. Reason: I foolishly bought another one believing an article that describes a common defect with these units where some minor plastic parts inside "wear out". As it turns out, that article was a crock of shit so I believe I was right in stealing some of his pictures from his article [The first four]). Unless something is clearly broken i.e snapped, you should not have to buy another unit. They are very simple in mechanics and under normal operation should outlive the vehicle itself. If you feel your unit is completely beyond repair or is definitely fucked then you can buy my spare. PM for details.
Q. So what is the problem with the switch Sean? A. DIRT. Yep, dirt. See over time the points of contact within the switch become clogged with debris and this is enough to stop the circuit from completing. How do I know this to be true? I have two that I successfully treated. My original and the one I bought from Nisswreck (Apparently they think it's ok to sell parts that don't work)
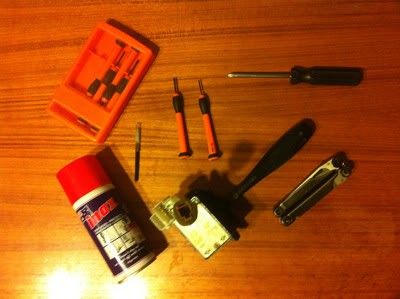
So here is what you will need. (Or close enough) The thing on the right is a Leatherman multi-tool. It is the best quality you can get and the best $120 I have ever spent:
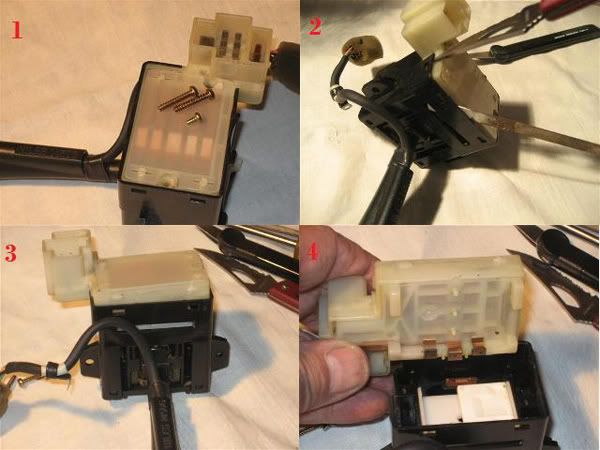
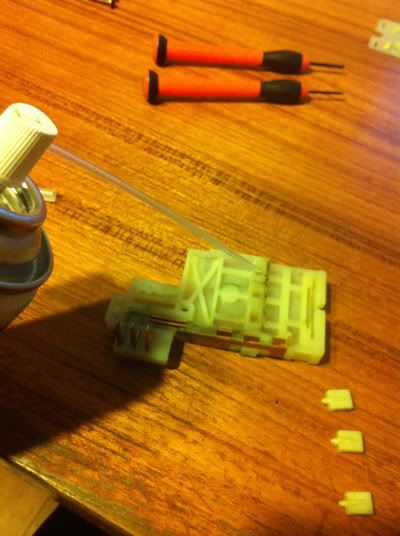
So do the following. I will assume you know how to remove the headlight/indicator stalk from the steering column. It's very easy and takes about 2 minutes if you're good. It's a little tricky disconnecting the two plugs at the back but persist and you will reap. The small plug is for the raising and lowering of the headlight while the fatter one is for the indicators and headlights/Highbeams. Now with this unit it hand, you need to remove the three small screws at the back. Next step is a little bit tricky. You need to pry the clips apart around the white unit while applying some pressure to the white part. I tend to hold it like a banana using my index (pointer) finger to apply some upward pressure to the socket part that hangs over the edge. Work your way around with the clips and it should pop out. See diagram.
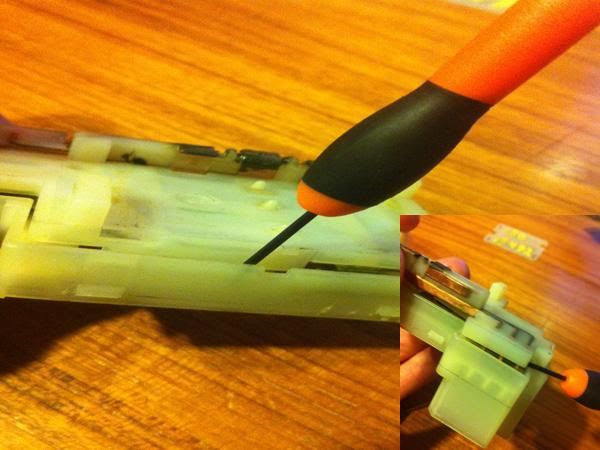
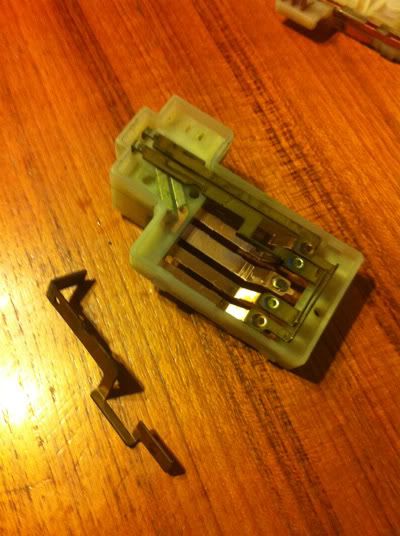
Now that this white sub-unit is removed we can begin dismantling this. Using a small flat head screwdriver or similar tool work your way around the edges prying up where the notches are. I recommend starting on the socket part because it is usually the stiffest. Pull it straight out, don't angle it otherwise you'll bend the pins in the socket. See picture again.
You now have two pieces.
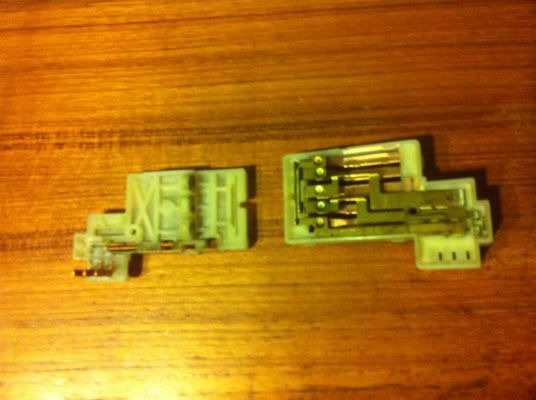
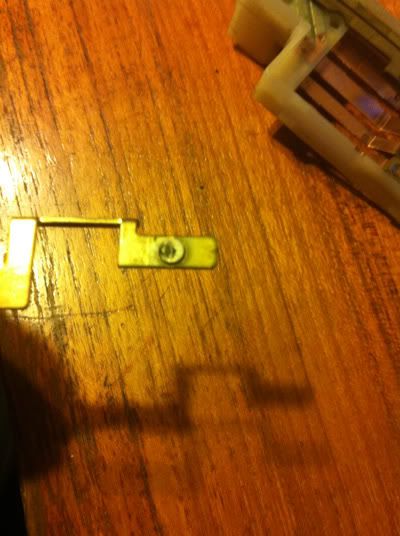
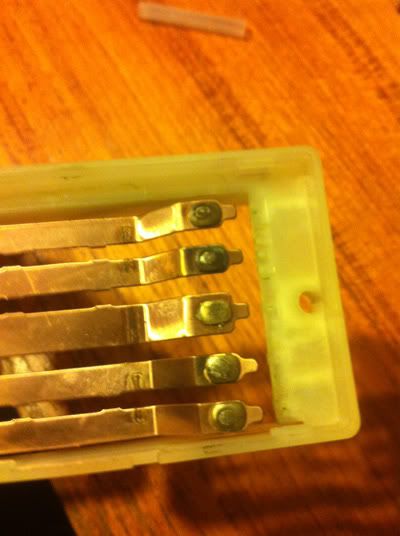
The piece on the right is the one we will be working with. Remove each copper piece, there is three.
The contacts will be coated in nearly two decades of shit and need to be cleaned THOROUGHLY. Don't make the mistake I did of doing a half ass job the first time to only have to pull it apart all over again. I pinched a corner off my mothers cleaning scourer for this job (the plastic green stuff) After you have cleaned it use your small flat head screwdriver to lightly scratch away the old layer of the contact point (just do it). See before and after pictures. Repeat for every contact on each strip.
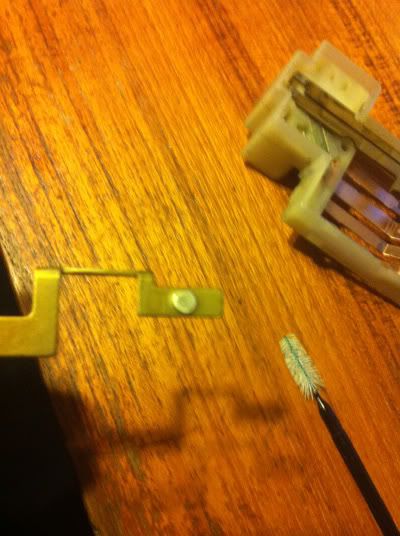
Ignore that little brush. Its a gum cleaner and was utterly useless in this application
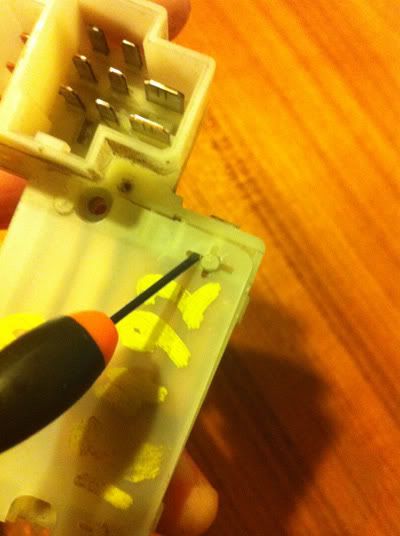
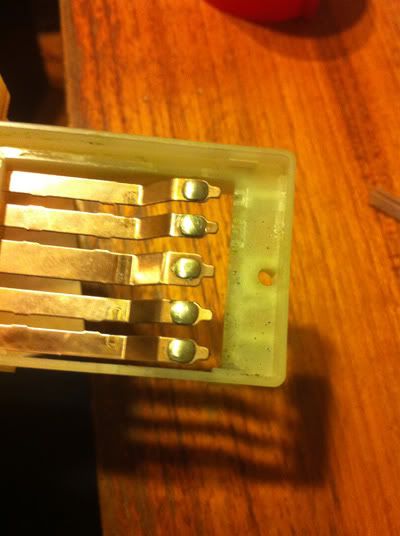
Next we will clean the opposite sides of the switch that are retained within the plastic and cannot be removed. To get my fingers behind them so I didn't bend them while cleaning I removed that plastic strip from the back using my small flat head once again. Again, clean these VERY WELL scratching a new layer into the metal (just enough to make it shiny again) See images.
The switch should now be cleaned enough to return it back to proper functioning. However, I recommend while you are inside it you should take a little moment to clean up around the plastic nodes in the other white piece that we haven't touched yet. Just pull them out, scrub the little guys and return them back to their sockets after applying a little bit of INOX or similar NON CONDUCTIVE lube. DO NOT get inox on your copper contacts. It is non conductive and will hinder the circuit from operating correctly.

Thats about all there is to it. To put back together simply reverse the steps. Don't be shy with the clips. When reconnecting the white parts together make sure you align the copper strips otherwise it wont go together. Hold the piece with the removable copper strips on the bottom and bring the other piece on top clicking it back in place. Also, be sure the flat while component inside the black part has not been moved. You shouldn't be touching this part anyway. After you are done you can skip out to your s13 and test it out. If it doesn't work then you didn't clean it enough, otherwise, it's not your switch. Dont screw everything back together until you have it working. Bear in mind, this document is only intended for those who have STRINGENTLY tested everything else and who KNOW that the problem resides within the switch. Don't just guess. Take the time to check the globes, fuses and test the lines with a multimeter. If you don't know how to do this, ask nicely and I might do a write up for you with pictures
Thank you all and I hope this has helped at least one of you. It took some time to do this much to my girlfriends disgust who has been waiting for me to come to bed. Before completing these steps my original switch had absolutely no highbeams while the one I bought to replace it with had only one headlight and only one highbeam working. Now they both work perfectly and I couldnt be fucking happier.
The issue is in the headlights and some of you may have had this problem or may still have it while reading at this very moment. So one or both of your headlights are not working or perhaps one (or both) of your high-beams are not coming on. No problem, just a globe you thought in all your eternal wisdom. Hmm, globe didn't seem to do the trick. ..Perhaps a fuse. You replace these and still nothing. Cleverly, you bring your multimeter into the mix and see if it's the circuit. Everything seems to be fine. WTF? Still frustrated you speak to Google. Google delivers various clumps of information that seems to lean to the switch on the steering column as the culprit. Chances are it probably is and even more likely is that your switch is suffering the same as both of mine did. (Yes I have two. Reason: I foolishly bought another one believing an article that describes a common defect with these units where some minor plastic parts inside "wear out". As it turns out, that article was a crock of shit so I believe I was right in stealing some of his pictures from his article [The first four]). Unless something is clearly broken i.e snapped, you should not have to buy another unit. They are very simple in mechanics and under normal operation should outlive the vehicle itself. If you feel your unit is completely beyond repair or is definitely fucked then you can buy my spare. PM for details.
Q. So what is the problem with the switch Sean? A. DIRT. Yep, dirt. See over time the points of contact within the switch become clogged with debris and this is enough to stop the circuit from completing. How do I know this to be true? I have two that I successfully treated. My original and the one I bought from Nisswreck (Apparently they think it's ok to sell parts that don't work)
So here is what you will need. (Or close enough) The thing on the right is a Leatherman multi-tool. It is the best quality you can get and the best $120 I have ever spent:
So do the following. I will assume you know how to remove the headlight/indicator stalk from the steering column. It's very easy and takes about 2 minutes if you're good. It's a little tricky disconnecting the two plugs at the back but persist and you will reap. The small plug is for the raising and lowering of the headlight while the fatter one is for the indicators and headlights/Highbeams. Now with this unit it hand, you need to remove the three small screws at the back. Next step is a little bit tricky. You need to pry the clips apart around the white unit while applying some pressure to the white part. I tend to hold it like a banana using my index (pointer) finger to apply some upward pressure to the socket part that hangs over the edge. Work your way around with the clips and it should pop out. See diagram.
Now that this white sub-unit is removed we can begin dismantling this. Using a small flat head screwdriver or similar tool work your way around the edges prying up where the notches are. I recommend starting on the socket part because it is usually the stiffest. Pull it straight out, don't angle it otherwise you'll bend the pins in the socket. See picture again.
You now have two pieces.
The piece on the right is the one we will be working with. Remove each copper piece, there is three.
The contacts will be coated in nearly two decades of shit and need to be cleaned THOROUGHLY. Don't make the mistake I did of doing a half ass job the first time to only have to pull it apart all over again. I pinched a corner off my mothers cleaning scourer for this job (the plastic green stuff) After you have cleaned it use your small flat head screwdriver to lightly scratch away the old layer of the contact point (just do it). See before and after pictures. Repeat for every contact on each strip.
Ignore that little brush. Its a gum cleaner and was utterly useless in this application
Next we will clean the opposite sides of the switch that are retained within the plastic and cannot be removed. To get my fingers behind them so I didn't bend them while cleaning I removed that plastic strip from the back using my small flat head once again. Again, clean these VERY WELL scratching a new layer into the metal (just enough to make it shiny again) See images.
The switch should now be cleaned enough to return it back to proper functioning. However, I recommend while you are inside it you should take a little moment to clean up around the plastic nodes in the other white piece that we haven't touched yet. Just pull them out, scrub the little guys and return them back to their sockets after applying a little bit of INOX or similar NON CONDUCTIVE lube. DO NOT get inox on your copper contacts. It is non conductive and will hinder the circuit from operating correctly.
Thats about all there is to it. To put back together simply reverse the steps. Don't be shy with the clips. When reconnecting the white parts together make sure you align the copper strips otherwise it wont go together. Hold the piece with the removable copper strips on the bottom and bring the other piece on top clicking it back in place. Also, be sure the flat while component inside the black part has not been moved. You shouldn't be touching this part anyway. After you are done you can skip out to your s13 and test it out. If it doesn't work then you didn't clean it enough, otherwise, it's not your switch. Dont screw everything back together until you have it working. Bear in mind, this document is only intended for those who have STRINGENTLY tested everything else and who KNOW that the problem resides within the switch. Don't just guess. Take the time to check the globes, fuses and test the lines with a multimeter. If you don't know how to do this, ask nicely and I might do a write up for you with pictures
Thank you all and I hope this has helped at least one of you. It took some time to do this much to my girlfriends disgust who has been waiting for me to come to bed. Before completing these steps my original switch had absolutely no highbeams while the one I bought to replace it with had only one headlight and only one highbeam working. Now they both work perfectly and I couldnt be fucking happier.
 Be the first to like this post.


 ...and unsafe as hell at night

