Here's the general idea of shortening Koni inserts and installing them into stock-like strut bodies. You will regain about an inch of suspension travel, preventing the damper piston from bottoming out prematurely.
(I should say, this is done on the front of our cars, but is almost never required on the back. Shortening the Koni damper is almost always done on the front only.)
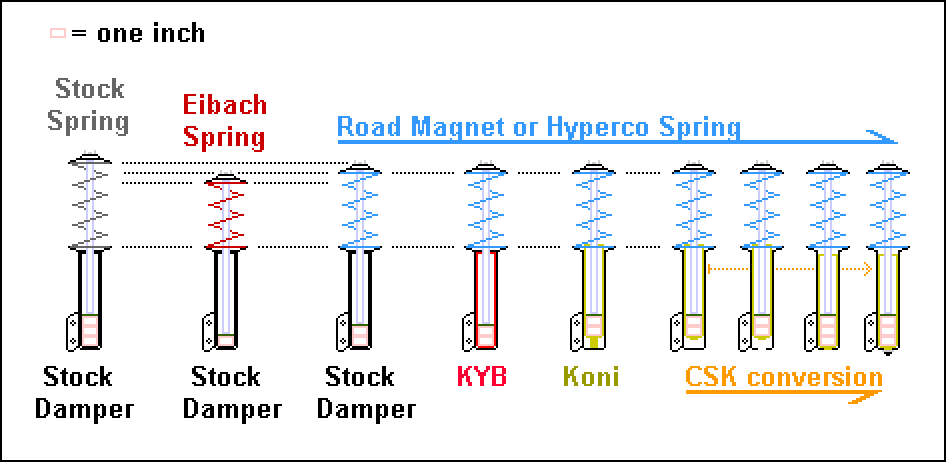
The picture shows the stock setup on the left. Look closely at how much compression travel exists before the piston bottoms out in the shaft. You have about 3 inches of travel.
Next is a stock strut with an overly-low spring such as the eibach springs that lower the car around 2 inches. See how little compression travel is left? There is only about one inch before the piston bottoms out. This is bad, especially with weak springs like the Eibach units.
Next is a stock strut with a Road Magnet or Hyperco spring. These springs lower the car about an inch, so only two inches of compression travel are left. With a stiff spring like the RM or Hyperco this is acceptable. You should not experience any problems with bottoming out. (However, keep in mind that the stock strut is not up to the task of damping these strong springs. You will want a better/stronger damper for sure. This brings us to the next setup.)
Next is a RM or Hyperco spring on a KYB strut (AGX or GR2) which is basically the same as with the stock damper for travel. This is an extremely popular solution because it is basically the minimum you can spend and have an "okay" lowered setup.
Next is a Koni insert installed into a stock-like strut body without any modifications. Again, things are the same for travel here. (You will still benefit from the superior damping of the Koni here, but there is one thing you can do to make things better. That brings us to the next setup.)
Finally, we have the shortening modification done to the Koni insert, and the stock 3 inches of travel is retained even though the spring lowers about an inch. You could drop another inch (with a stiff spring) and still be decently okay. This is the reason for shortening a Koni insert.

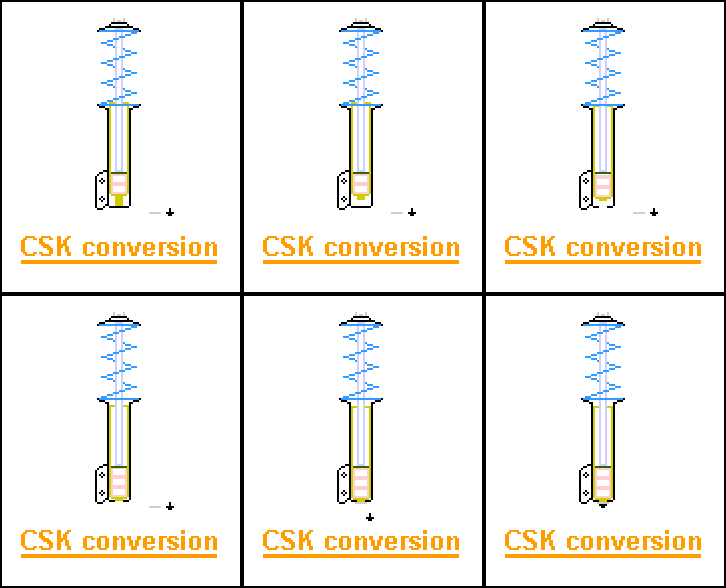
This animation shows how shortening the Koni insert is done, and how it gives back some of the travel that is lost by going with a shorter spring.

Note: I tried to get most of the dimensions to scale and as accurate as I could, but some things are not perfect. For example, the Koni insert is a bit shorter in general than what I have in my diagrams. Expect the insert to sink farther down into the strut housing when you modify your own. vqman has pics showing this in post #24 of this thread.
Keywords:
Custom Shortened Koni Custom Shortened Konis CSK CSK's CSKs
Lowering Suspension Shortened Strut Koni Inserts Stock Struts
Koni Dampers
(I should say, this is done on the front of our cars, but is almost never required on the back. Shortening the Koni damper is almost always done on the front only.)
The picture shows the stock setup on the left. Look closely at how much compression travel exists before the piston bottoms out in the shaft. You have about 3 inches of travel.
Next is a stock strut with an overly-low spring such as the eibach springs that lower the car around 2 inches. See how little compression travel is left? There is only about one inch before the piston bottoms out. This is bad, especially with weak springs like the Eibach units.
Next is a stock strut with a Road Magnet or Hyperco spring. These springs lower the car about an inch, so only two inches of compression travel are left. With a stiff spring like the RM or Hyperco this is acceptable. You should not experience any problems with bottoming out. (However, keep in mind that the stock strut is not up to the task of damping these strong springs. You will want a better/stronger damper for sure. This brings us to the next setup.)
Next is a RM or Hyperco spring on a KYB strut (AGX or GR2) which is basically the same as with the stock damper for travel. This is an extremely popular solution because it is basically the minimum you can spend and have an "okay" lowered setup.
Next is a Koni insert installed into a stock-like strut body without any modifications. Again, things are the same for travel here. (You will still benefit from the superior damping of the Koni here, but there is one thing you can do to make things better. That brings us to the next setup.)
Finally, we have the shortening modification done to the Koni insert, and the stock 3 inches of travel is retained even though the spring lowers about an inch. You could drop another inch (with a stiff spring) and still be decently okay. This is the reason for shortening a Koni insert.

This animation shows how shortening the Koni insert is done, and how it gives back some of the travel that is lost by going with a shorter spring.

Note: I tried to get most of the dimensions to scale and as accurate as I could, but some things are not perfect. For example, the Koni insert is a bit shorter in general than what I have in my diagrams. Expect the insert to sink farther down into the strut housing when you modify your own. vqman has pics showing this in post #24 of this thread.
Keywords:
Custom Shortened Koni Custom Shortened Konis CSK CSK's CSKs
Lowering Suspension Shortened Strut Koni Inserts Stock Struts
Koni Dampers
Last edited by BenFenner
on 2012-05-09
at 11-26-05.


 Be the first to like this post.
 Back to top
