Welcome to the SR20 Community Forum - The Dash.
Register
SR20 forum logo

Thread: Door striker woes

+ Reply To Thread
Posts: 1-10 of 18
2009-04-30 06:23:35
#1
Door striker woes
I'm not entirely sure how to fix my door. The metal around the striker is completely ripped apart. Luckily my door still closes and stays shut, I dont have an actual picture of my door but here's one that looked like mine till it completely broke off.


Anyone have any idea how I would fix this problem?
2009-04-30 06:56:55
#2
haha thats nothin compared to my gf's b13 :P her's is cracked all the way around that whole thing.. one of these days that door is gonna fail im just going to have it welded as soon as my friend has time.. its been previously welded before an it held for a while but the p.o had it done by god knows who.. my friend will doit right..

i suggest cuttin that whole area out in a reqtangle an havin some new material welded in or its bound to fail again, i think it may have something to do with sagging doors that causes that but im not sure.. by chance do your doors sag? my gf's b13's do..
2009-04-30 06:57:55
#3
FIX THIS IMMEDIATELY,

Think about it. You're door could literally come unlatched in a crash, your SEAT BELT is attached to the door. You end up as road kill because of some weak metal...

The problem lies in extremely weak sheet metal with no bracing to support. This is how door sag in all B13's occurs IMO.

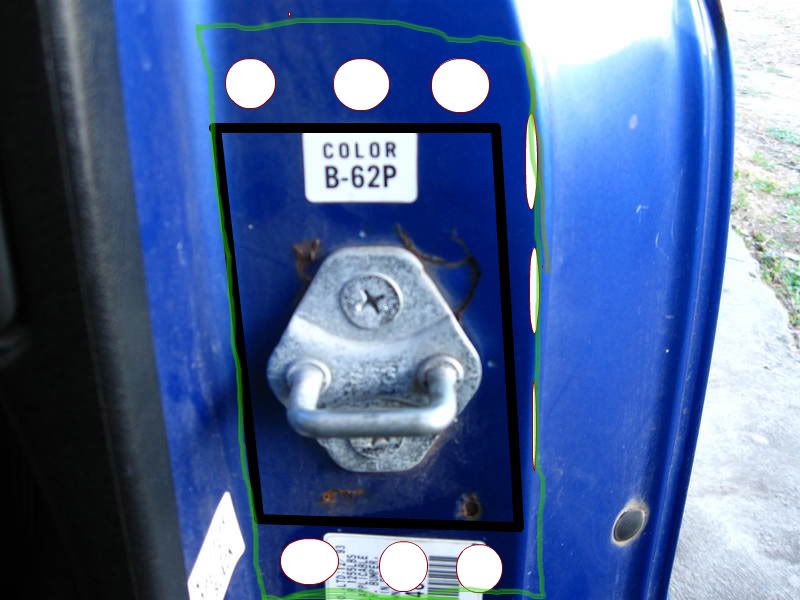
I edited the pic real quick to give you an idea of what to do.

Black - Amount of actual car sheet metal removed. Once removed get latch out of ****ty tin foil excuse of sheet metal. Tack this in with a mig a first.
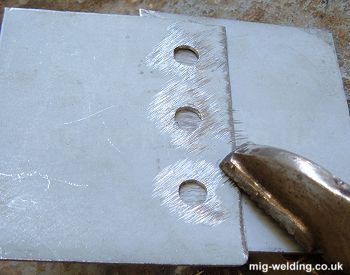
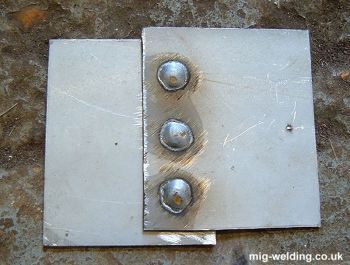
White - These will be holes in existing sheet metal. These are intended as reinforcement points for above stated tin foil. Start in the middle of the coin (you'd be hitting the 1/4 plate) and circle your way out to the existing sheet.
Green - Estimated extending area of 1/4 plate that has been put in.


1. Completely remove affected sheet metal in a patch similar to picture.
2. Weld 1/4 in. sheet steel in.
3. Reinforce as best you can.
4. Prime or por-15 it.
5. Reattach latch into threaded holes made with thread borer.
6. Solid latches the way they shoulda come from the factory.

This is just a guess how to fix it. I haven't messed with mine cause they don't sag soo... follow at your own risk.
2009-04-30 15:20:57
#4
It took me a sec to figure out what you meant with the white holes...but what I gather is in the holes you would weld from the center to the out of the holes? Sounds like a pretty good idea I'm going to have find someone with a mig welder now. :P

Thanks JakeB
2009-04-30 15:44:19
#5
http://www.mig-welding.co.uk/plug-weld.htm This is an example picture of what it should look like.

Before Welding


After Welding


Also in the above picture I would highly recommend making a welding seam along the black line as well. The black line should be the first thing to be welded in. Just tack welded at first tho. IT will be very ease to overweld/burn through the existing sheet so be careful and take your time.

To me this seems like the only true way to 100% fix the door sagging problems. Make sure you measure the exact distances that the latch is away from the door, and other reference marks so that you get a proper fitting door.
2009-04-30 15:45:24
#6
Holy**** Guy This Is What You Meant?
2009-04-30 16:30:19
#7
Originally Posted by HKS
Holy**** Guy This Is What You Meant?

Yes sir abit messy...I'll get an actual picture of my car today.
2009-04-30 16:31:33
#8
Thanks for pointing me in the right direction Jake hopefully I'll have this all sorted out this weekend. Someone here at work is going to cut me some steel tomorow with the plasma cutter.
2009-05-01 00:53:44
#9
Ok here is a picture of my B13.


2009-05-01 00:58:18
#10
ouch!!!! good luck with the alignment post pics when done
+ Reply To Thread
  • [Type to search users.]
  • Quick Reply
    Thread Information
    There are currently ? users browsing this thread. (? members & ? guests)
    StubUserName

    Back to top