Not sure how many people will need to read this simply because SE-L's are so rare, but I wrote this up anyway for a forum member who is about to do it and decided I may as well post it here too once I realized how much I had written. This is from my recent experience on how to remove the wiring harness from a 1999 SE-L. It is somewhat difficult and time consuming primarily because the '99 SE-L has the most things in the engine bay of all the B14's, all have A/C and many have ABS, there's lots of extra emissions stuff on top of the intake manifold etc. On a level of "annoyance" from 1 to 10, if installing a header is a 4, installing JWT S4 cams is a 6, this is probably around a 7. It is extremely time consuming too especially if you do it alone (especially for the one part we'll get to later). I want to stress that when I pulled the wiring from my 1999 SE-L the car was already going to be junked once it had been parted out. I pulled this wiring for a person who has a B14 with a GA16DE motor and needed this to do an SR20DE swap. If you are pulling the wiring from your 1999 SE-L to do a SR20VE swap or whatever, of course be more careful in all ways, if you remove the fender don't scratch it etc (you get what I mean).
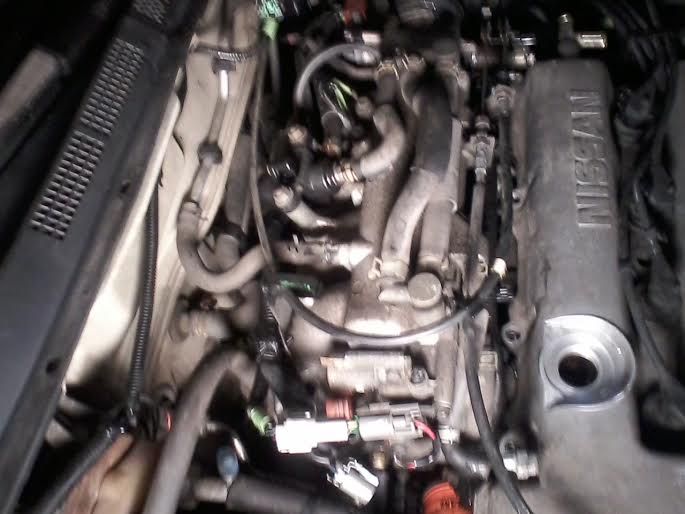
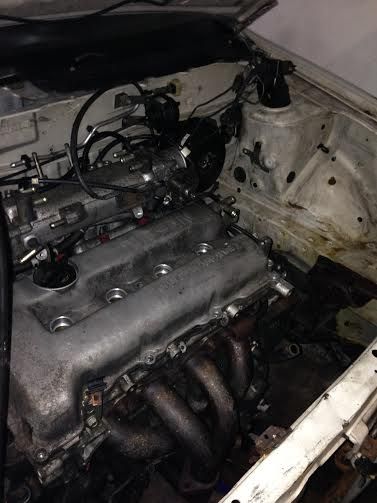
Here is an example why this is a pain. The 98 SE and the 99 SE-L have all this extra crap on top of the intake manifold:
.
.
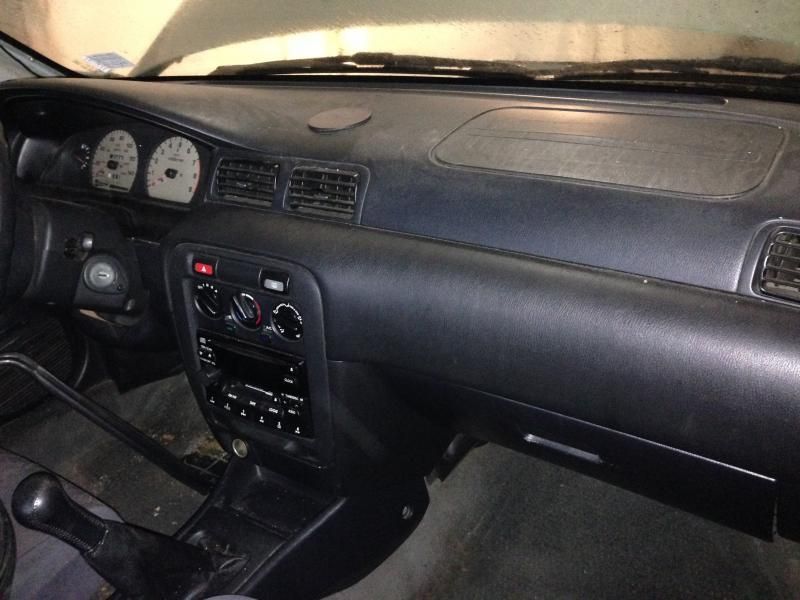
1) FIRST, pull the fuel pump fuse in the cabin and start the car, let it idle until it stalls. Then completely remove the battery from the car, like store no where near you, 20 feet away. Too many chances of messing shit up with an accidental touch of something. Remove the intake/stock airbox if its still there. I'd also suggest removing the alternator too, if you have time. Replace the fuel pumpe fuse and take keys out of the ignition. Start removing the dash panels in the interior. Some of it is held in by screws some stuff just pulls/pops out. Pull everything around the gauge cluster and fuse box area. Everything you can, because you need the wires that travel from the driver's side fuse box thru the driver's fender AND the ECU harness wires of course and random other stuff. They are all over the place. The ECU is easy to access sorta but still a pain in a B14. Remove everything you can.
What starts off looking like this:
.
.
Will likely end up looking like some version of this!!
.
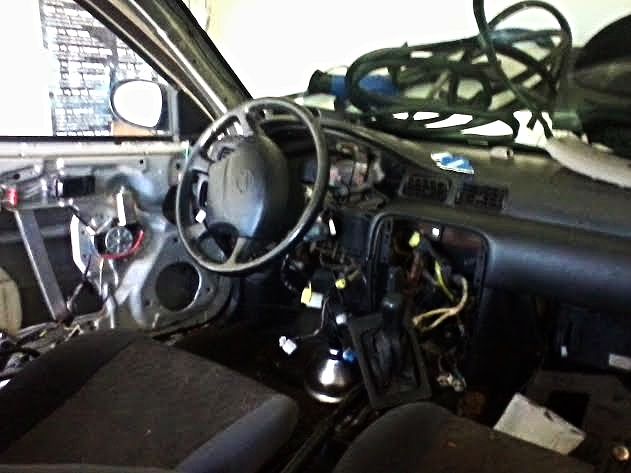
(Okay okay, only about half of that is related to removing the wiring harness (check out all the weather stripping on the windshield") but some of it is) .
but some of it is) .
2) Disconnect every wiring harness you see in the interior, it helps so you can move stuff out of the way (example: remove the radio and trim, glove box etc) You don't have to disconnect the obviously non related ones, but if they are connected to something that inhibits access to something you do need to get at, its a good idea to do it. Remove body panels that are going to be an obvious issue.
3) I highly recommend getting 2-4 cans of Autozone engine degreaser (Autozone brand b/c it's cheaper) and going to town on the engine bay. This depends on how dirty your engine bay is. Mine was a 9/10 on the FILTHY scale. Horrible. This will make things much easier when your looking for certain harness connections, looking for where a certain wire/hose is going or coming from etc. Just get rid of all the gunk. I personally used 4 full cans of degreaser over the course of the time it took me to do this in my garage then sprayed it down with the hose connection I have in there. Use a full can, walk around the bay and hit it from all different angles, then hose off with high pressure water. Repeat. If rust is an issue in also get a can of PB blaster and nail the engine bay in the obvious areas and keep it on hand for later.
4) Once you can see things better, go around the engine bay and disconnect all wiring you see- but like I said my harnesses were all a pain, even just removing the TPS was a pain, they just don't want to release or something. At least for my car. Unbolt the relay boxes (should be 1 large 1 on the passenger side, and 2 smaller ones on the driver's side).
5) Remove the driver's side inner splash shield and the lining under the fender.
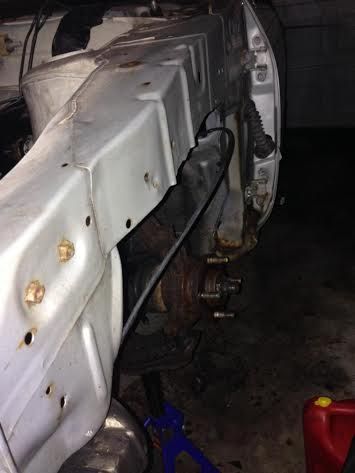
6) Remove/loosen the bolts holding the driver's side front fender on. Once it's loose the wires that you need will keep it from moving around too much and then later on you will have lots of slack to get them out and the option of simply removing the fender instead of more pulling things through holes. Remove the drivers' side corner light, you may want to also remove the driver's side-view mirror as well.
Here is a shot of the driver's front fender removed AFTER the wires were taken out. Notice the only "wire" is the hood open latch now. Trust me, this makes it easier:
.
7) Now to get to the injectors: first, remove the spark plug wires and then the valve cover unless your hands are REALLY tiny or you have some crazy tools. For me, removing it was just easier and frees up a lot of space where you need it. Once it's off, mind the gasket(s) and make sure you lay a lint-free clean towel over the exposed engine bay, or if you have time make a cardboard cutout that will catch anything you almost drop down there. Remove the metal pieces of PAIN (that's what I call them, lol) that are still in the way of accessing the fuel injectors (on a lowport DE these are a real pain especially if rusted) - almost everything is either a 10, 12, or a 14mm bolt.
8) You want to pull every harness that has anything to do with the motor running. It's easy if you know what your looking at. If it has something to do with fuel delivery, air intake, metering etc. pull it. It's good to have the Nissan schematic out too. Rule of thumb: if it's your car, when in doubt, unhook it. The 1999 SE-L as I mentioned earlier is really really cramped in the engine bay and many of needed connections are hidden. You just have to be resilient and keep finding them. Some you will need semi-long pliers to get at, some are right there. There will be a lot of cursing when it comes to the ones around and behind the intake manifold.
9) So now, there may be some connections you can't access b/c there are hoses of all kinds in the way. It is easier to remove some. Now remember in step #1 when I said to pull the fuel pump fuse, let the car idle and stall? This is why, so you can remove hoses with (relatively) little fuel spillage if you need to. Warning: In most Nissans including the B13/B14, any hose that has a second hose covering it for portions that has holes means it has something to do with FUEL. That means you could possibly cut or remove a hose (most are held down with small shiny Phillips head screw clamps) and spill fuel. Which we don't want. Do not let any fuel get near anything hot like your work light or heater etc. nor don't do anything stupid like smoke cigarettes or have a lit one hanging from your mouth while messing with a hose in the engine bay (I know that sounds ridiculous to even mention but I've seen ppl do worse)
10) By now you should have most things disconnected. Again if you don't, take a day off or two. I got so sick of doing this crap I never want to sit in a B14 again..
11) Did you remove the plastic panel(s) that block access to the ECU in step #2? If not do that, and disconnect the harness from the ECU (10mm bolt) and get the ECU itself outta the way. (P.S. at this point you can put the valve cover back on, or at least set it on there. I even did a quick sweep with a magnet tool around the cams/rockers to make sure nothing metallic had fallen into the engine bay and inspected everything visually).
12) Next you can try to physically push the ECU wiring harness through the firewall into the engine bay to remove it from the car. You will most definitely need a friend for this step. I found out the hard way by attempting to do this myself for 2 hours and failing, then begging my girlfriend to help me and we got it done in less than 10 minutes. Doing it by yourself is almost impossible because you can't see what's going on in the engine bay. Trust me, I sat/laid there for 2 hours total doing everything top get it through. Nissan made the hole very small, so I tried cutting carefully, still couldn't get it.
So ask a friend or your wife or whatever to lay on the front passenger seat of the car and have them try to push the harness thru, while you stand over the engine bay and grab at it and pull. If you are standing straight on center, facing the engine bay, this hole is located sort of between the #1 and #2 injector if you went in a line at an angle straight back. So when person #2 is holding the plastic harness, tell them to twist it to the sides horizontally and PUSH, as you stand on the other end in the engine bay and PULL. Pull and twist. Try it from different angles. It's easier to access the wiring from the driver side of the car as the strut tower part of the chassis gets in the way.
13) Keep trying. Eventually, if you've disconnected everything you should have, it will pop through. With your helper person pushing and twisting it from one end and you pulling and twisting it from another, eventually it will come through. REJOICE!
14) Now you need to get the wiring that's runs through the driver's side fender. The small interior cabin fuses are connected to relays etc. on the driver's side of the car in some form which spiral out from that large hole that exists there for this purpose, then they "spider web" out to their location(s). If you loosened the driver's side fender like suggested in step #6 this will be a lot easier because you will be able to move it around to get the wires out. In the end, I completely removed the entire fender and removing the wiring was easy. But remember, this entire car was getting junked due to rust. Sometimes when you remove a body piece on a car and put it back on, it doesn't seem to sit just quite right. So be aware of that if you are OCD like myself and something of that nature could potentially bother you.
15) REJOICE you've done it.
and your engine bay should looking somewhat similar to this:
.
P.S. of course if you pulled the wires for a SR20VE swap etc. leave everything loose because much of it has to go back IN the same way.
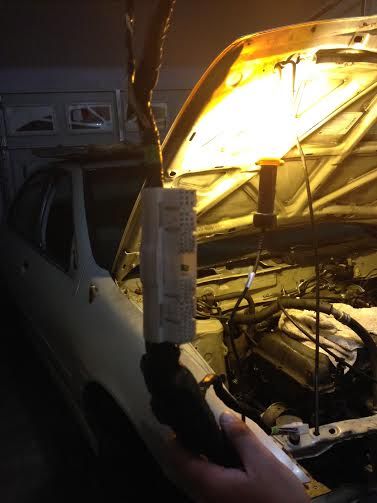
I hope this helps someone. Here is me holding the ECU harness with the car in the background, wanting to destroy it or make it explode, but someone had paid their hard earned $ for that so into the shipping box it went:
Here is an example why this is a pain. The 98 SE and the 99 SE-L have all this extra crap on top of the intake manifold:
.
.
1) FIRST, pull the fuel pump fuse in the cabin and start the car, let it idle until it stalls. Then completely remove the battery from the car, like store no where near you, 20 feet away. Too many chances of messing shit up with an accidental touch of something. Remove the intake/stock airbox if its still there. I'd also suggest removing the alternator too, if you have time. Replace the fuel pumpe fuse and take keys out of the ignition. Start removing the dash panels in the interior. Some of it is held in by screws some stuff just pulls/pops out. Pull everything around the gauge cluster and fuse box area. Everything you can, because you need the wires that travel from the driver's side fuse box thru the driver's fender AND the ECU harness wires of course and random other stuff. They are all over the place. The ECU is easy to access sorta but still a pain in a B14. Remove everything you can.
What starts off looking like this:
.
.
Will likely end up looking like some version of this!!
.
(Okay okay, only about half of that is related to removing the wiring harness (check out all the weather stripping on the windshield
but some of it is) .2) Disconnect every wiring harness you see in the interior, it helps so you can move stuff out of the way (example: remove the radio and trim, glove box etc) You don't have to disconnect the obviously non related ones, but if they are connected to something that inhibits access to something you do need to get at, its a good idea to do it. Remove body panels that are going to be an obvious issue.
3) I highly recommend getting 2-4 cans of Autozone engine degreaser (Autozone brand b/c it's cheaper) and going to town on the engine bay. This depends on how dirty your engine bay is. Mine was a 9/10 on the FILTHY scale. Horrible. This will make things much easier when your looking for certain harness connections, looking for where a certain wire/hose is going or coming from etc. Just get rid of all the gunk. I personally used 4 full cans of degreaser over the course of the time it took me to do this in my garage then sprayed it down with the hose connection I have in there. Use a full can, walk around the bay and hit it from all different angles, then hose off with high pressure water. Repeat. If rust is an issue in also get a can of PB blaster and nail the engine bay in the obvious areas and keep it on hand for later.
4) Once you can see things better, go around the engine bay and disconnect all wiring you see- but like I said my harnesses were all a pain, even just removing the TPS was a pain, they just don't want to release or something. At least for my car. Unbolt the relay boxes (should be 1 large 1 on the passenger side, and 2 smaller ones on the driver's side).
5) Remove the driver's side inner splash shield and the lining under the fender.
6) Remove/loosen the bolts holding the driver's side front fender on. Once it's loose the wires that you need will keep it from moving around too much and then later on you will have lots of slack to get them out and the option of simply removing the fender instead of more pulling things through holes. Remove the drivers' side corner light, you may want to also remove the driver's side-view mirror as well.
Here is a shot of the driver's front fender removed AFTER the wires were taken out. Notice the only "wire" is the hood open latch now. Trust me, this makes it easier:
.
7) Now to get to the injectors: first, remove the spark plug wires and then the valve cover unless your hands are REALLY tiny or you have some crazy tools. For me, removing it was just easier and frees up a lot of space where you need it. Once it's off, mind the gasket(s) and make sure you lay a lint-free clean towel over the exposed engine bay, or if you have time make a cardboard cutout that will catch anything you almost drop down there. Remove the metal pieces of PAIN (that's what I call them, lol) that are still in the way of accessing the fuel injectors (on a lowport DE these are a real pain especially if rusted) - almost everything is either a 10, 12, or a 14mm bolt.
8) You want to pull every harness that has anything to do with the motor running. It's easy if you know what your looking at. If it has something to do with fuel delivery, air intake, metering etc. pull it. It's good to have the Nissan schematic out too. Rule of thumb: if it's your car, when in doubt, unhook it. The 1999 SE-L as I mentioned earlier is really really cramped in the engine bay and many of needed connections are hidden. You just have to be resilient and keep finding them. Some you will need semi-long pliers to get at, some are right there. There will be a lot of cursing when it comes to the ones around and behind the intake manifold.
9) So now, there may be some connections you can't access b/c there are hoses of all kinds in the way. It is easier to remove some. Now remember in step #1 when I said to pull the fuel pump fuse, let the car idle and stall? This is why, so you can remove hoses with (relatively) little fuel spillage if you need to. Warning: In most Nissans including the B13/B14, any hose that has a second hose covering it for portions that has holes means it has something to do with FUEL. That means you could possibly cut or remove a hose (most are held down with small shiny Phillips head screw clamps) and spill fuel. Which we don't want. Do not let any fuel get near anything hot like your work light or heater etc. nor don't do anything stupid like smoke cigarettes or have a lit one hanging from your mouth while messing with a hose in the engine bay (I know that sounds ridiculous to even mention but I've seen ppl do worse)
10) By now you should have most things disconnected. Again if you don't, take a day off or two. I got so sick of doing this crap I never want to sit in a B14 again..
11) Did you remove the plastic panel(s) that block access to the ECU in step #2? If not do that, and disconnect the harness from the ECU (10mm bolt) and get the ECU itself outta the way. (P.S. at this point you can put the valve cover back on, or at least set it on there. I even did a quick sweep with a magnet tool around the cams/rockers to make sure nothing metallic had fallen into the engine bay and inspected everything visually).
12) Next you can try to physically push the ECU wiring harness through the firewall into the engine bay to remove it from the car. You will most definitely need a friend for this step. I found out the hard way by attempting to do this myself for 2 hours and failing, then begging my girlfriend to help me and we got it done in less than 10 minutes. Doing it by yourself is almost impossible because you can't see what's going on in the engine bay. Trust me, I sat/laid there for 2 hours total doing everything top get it through. Nissan made the hole very small, so I tried cutting carefully, still couldn't get it.
So ask a friend or your wife or whatever to lay on the front passenger seat of the car and have them try to push the harness thru, while you stand over the engine bay and grab at it and pull. If you are standing straight on center, facing the engine bay, this hole is located sort of between the #1 and #2 injector if you went in a line at an angle straight back. So when person #2 is holding the plastic harness, tell them to twist it to the sides horizontally and PUSH, as you stand on the other end in the engine bay and PULL. Pull and twist. Try it from different angles. It's easier to access the wiring from the driver side of the car as the strut tower part of the chassis gets in the way.
13) Keep trying. Eventually, if you've disconnected everything you should have, it will pop through. With your helper person pushing and twisting it from one end and you pulling and twisting it from another, eventually it will come through. REJOICE!
14) Now you need to get the wiring that's runs through the driver's side fender. The small interior cabin fuses are connected to relays etc. on the driver's side of the car in some form which spiral out from that large hole that exists there for this purpose, then they "spider web" out to their location(s). If you loosened the driver's side fender like suggested in step #6 this will be a lot easier because you will be able to move it around to get the wires out. In the end, I completely removed the entire fender and removing the wiring was easy. But remember, this entire car was getting junked due to rust. Sometimes when you remove a body piece on a car and put it back on, it doesn't seem to sit just quite right. So be aware of that if you are OCD like myself and something of that nature could potentially bother you.
15) REJOICE you've done it.
and your engine bay should looking somewhat similar to this:
.
P.S. of course if you pulled the wires for a SR20VE swap etc. leave everything loose because much of it has to go back IN the same way.
I hope this helps someone. Here is me holding the ECU harness with the car in the background, wanting to destroy it or make it explode, but someone had paid their hard earned $ for that so into the shipping box it went:
Last edited by Storm88000
on 2014-05-11
at 15-00-56.