


keywords: Dash warning lights, Brake light, and Battery Light
(Reprinted from a previous post of mine a few years ago on the other board).
---------
Last night when I went out to start up my '96 SE-R, my Battery Light and Brake Light on my dash stayed on. Many of you already know what this means, but in case you don't... I created a write-up for you.
My SE-R started up fine, which was good... but the 2 lights on the dash meant that I had a problem that I needed to get fixed ASAP unless I wanted to be left stranded. The alternator was most likely no longer putting out enough power to charge the battery. I got the car home, broke out my multimeter and found that... sure enough... with the car running and all the accessories off, I was only getting around 12.3 volts. It should have been in the 13-15 volts range (I usually get around 14.3). That meant that the battery was not getting enough of a charge from the alternator. So I checked all the wires from the alternator just to make sure that they were in good repair and connected properly and then I called it a night.
As you know, a car needs electricity to run. Since the alternator was dead, my SE-R was using the electricity stored in the battery as its power supply. If I had continued to drive further, my battery would have eventually had its power drained and my SE-R would of shut down and left me stranded (probably while I was driving it ). So you don't want to ignore these two important dash-warning lights.
The alternator on our cars is kind of hard to get to... but it really looks worse than it is. With only some basic hand tools, anyone can change out the alternator. Here's what you'll need:
- 17mm Wrench (the longer the better).
- 8mm socket.
- 10mm socket.
- 12mm socket.
- A 12in socket extension.
- A suitable Ratchet for your sockets (3/8th is probably best).
- Something to pry with (a Pry bar if you have one).
- A good Hammer (dead blow hammer or a rubber mallet is nice).
Optional: Not absolutely needed, but raising the car does make the job easier.
- Floor Jack and 2 jack stands to support the car. You can substitute Ramps if you don't have the jack/jack stands. As always, level ground and safety is the key. Use blocks behind the rear wheels if you want added safety. ***Never get underneath a car that's only supported with a floor jack.*** Jack stands are a must. People have died making this mistake.
1) The first step is to remove the battery cables from the battery. You always want to remove the Negative (Black) first and then the positive (Red) last. This is so that if there is a short (spark), it travels down the negative (ground) cable and not down your positive cable and through your entire electrical system (which can cause damage, especially to onboard computers). The battery cable nuts take a 10mm socket or wrench.
Now that the battery is safely disconnected, it’s a good time to check that your battery is clean and that the battery posts/cables are free of corrosion. If there is any dirt or water on top of the battery, take a paper towel and wipe it clean. If there is any battery corrosion, clean it up with baking soda or battery cleaner. Remember to clean your hands after you touch the battery… you wouldn’t want to have any battery acid on your hands and then say… wipe your eyes.
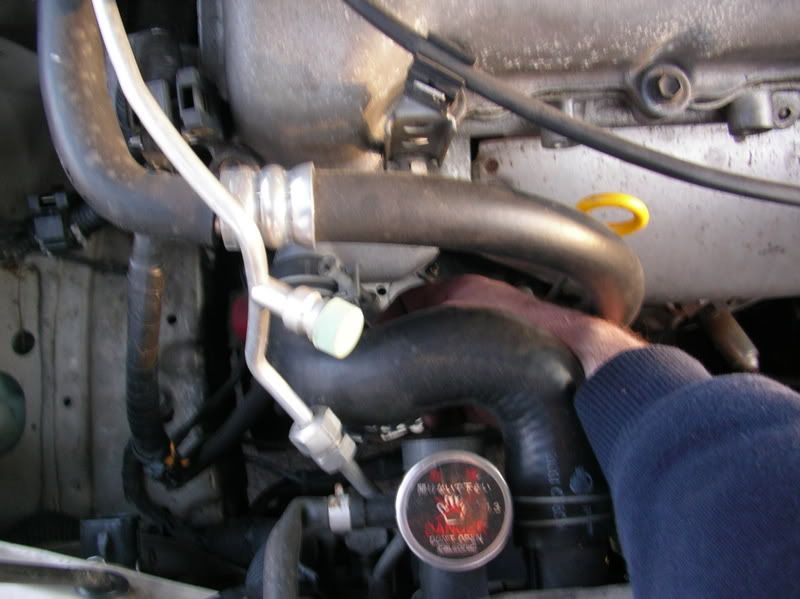
2) To gain access to the alternator from above, remove the coolant overflow tank and place it aside. There’s no need to fully disconnect it, simply lift it out of its holding bracket and place it out of your way. The holding bracket must now be removed. Use a 10mm socket to remove the bolt holding the bracket down. You now *may* want to remove the splash guards on the passenger side of the car so you can access the area from below. It's not absolutly necessary but it helps if you have trouble getting the belt on/off the crank pully. To do this, simply use the same 10mm socket to remove the bolts holding these panels on. You now have enough access from above and below that you can get to the alternator and belt. This is also a good time to remove the headlight bulb or at least remove the plug. It'll buy you a little extra room when you are removing/inserting the new alternator. It'll also protect your bulb from being damaged.
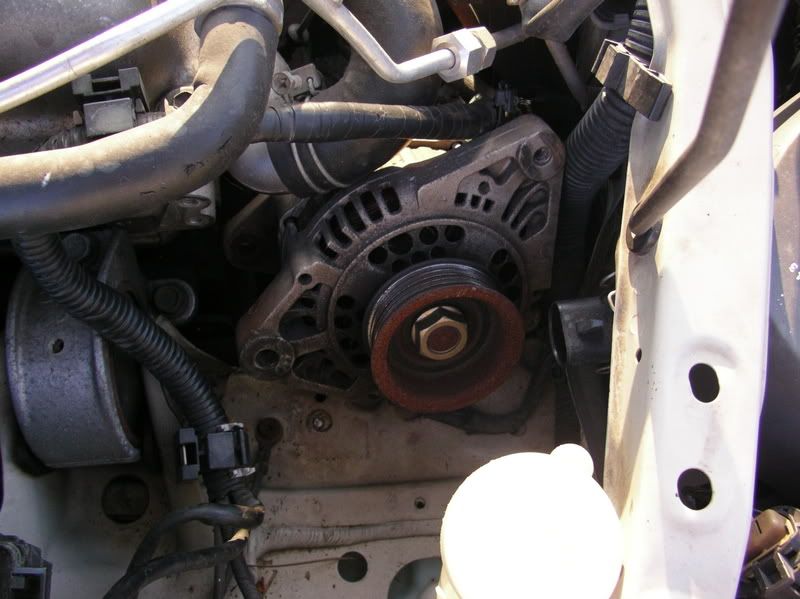
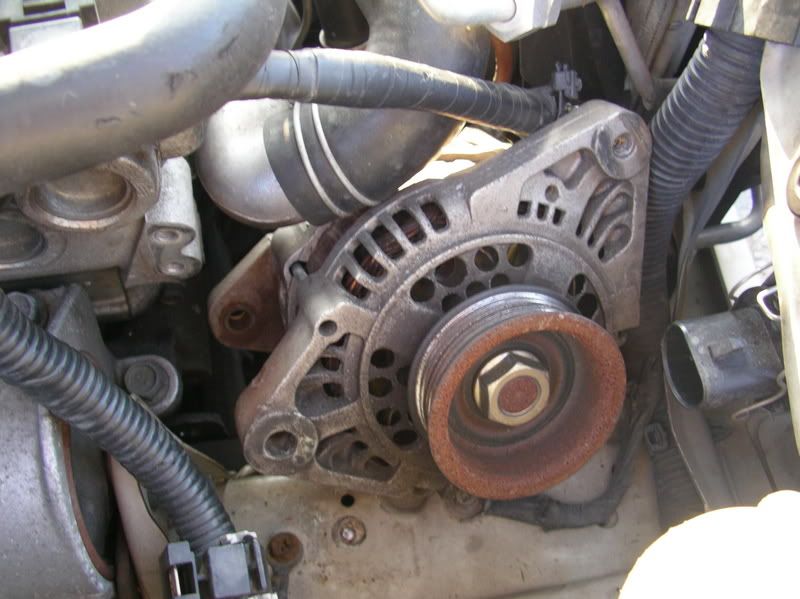
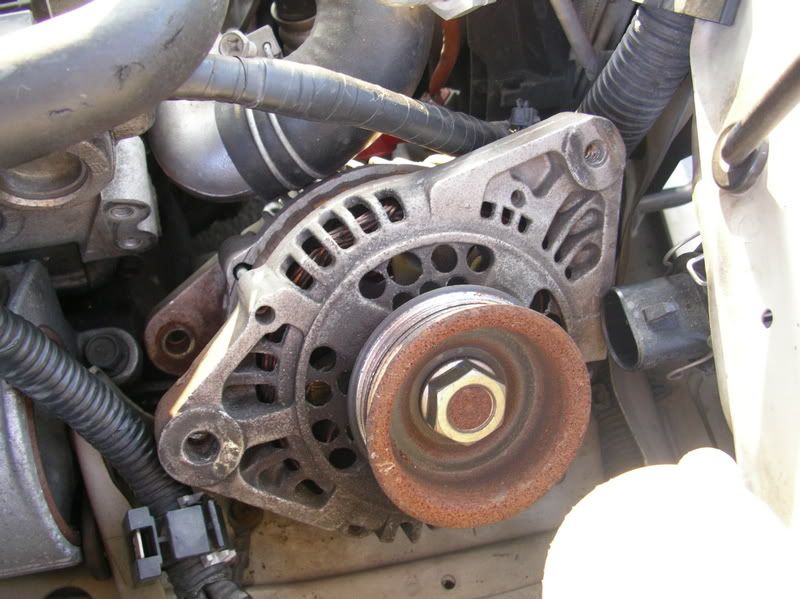
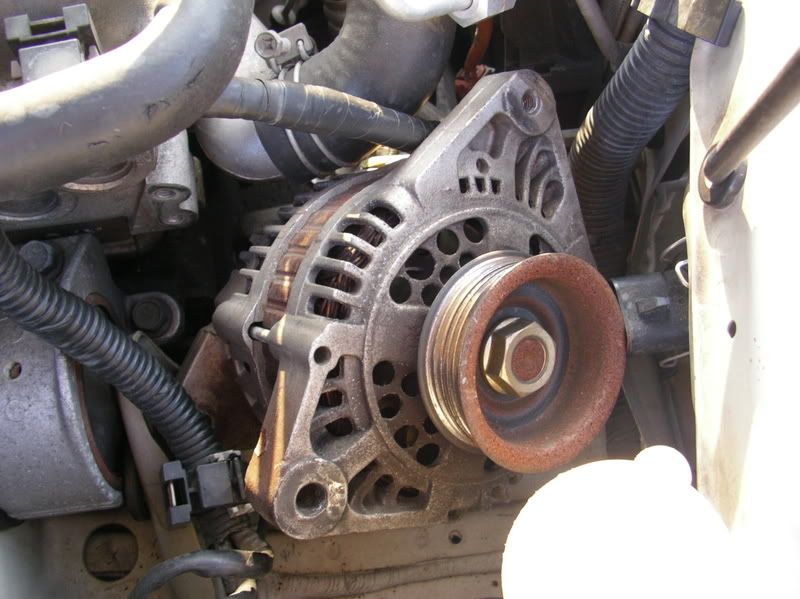
3) With the battery disconnected and the obstructions removed, it is now safe to move on to removing your alternator. The alternator is of course powered by the drivebelt. So we need to remove the belt before we can remove the alternator. To do this you’ll need to adjust the alternator so that the belt becomes slack. The Alternator is really only held in place by 3 key bolts. The bottom bolt will need to be accessed from underneath the car (again, raising the car is helpful). You’ll need a 17mm wrench to remove the pivot bolt nut. Now that the nut is removed, it’s time to slacken the belt by using a 12mm socket. There are 4 12mm sized bolts located on the alternator adjustment bar. 2 of the bolts just hold the adjustment bar to the engine block. The other two bolts allow you to adjust/rotate the alternator. You’ll want to loosen these two up enough that you can rotate the alternator all the way down. As you loosen these up, you’ll notice that the long bolt starts to back out. The alternator isn’t going to rotate on it’s own so this is where the hammer and pry bar are useful. With everything loose… use the hammer and pry bar to tap the alternator down. Repeat until the alternator is down far enough that you can slide the belt off.
(Remove the belt and inspect it. Is it cracked or frayed? If so, replace it with a new belt. There’s little point to replacing the alternator if your belt is going to break and leave you stranded the following week.)
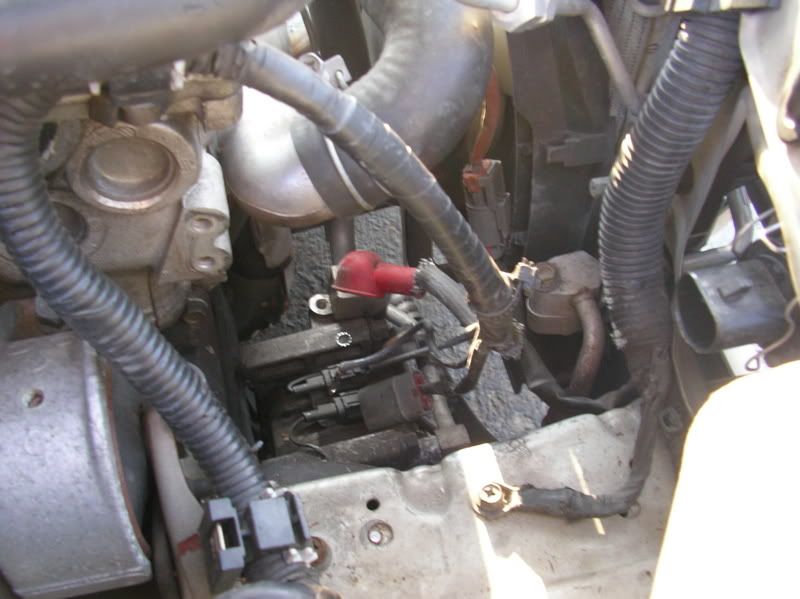
4) With the belt off it’s now time to remove 3 electrical connectors on the alternator itself. The first one is a plug. Simply press the sides of the plug together and pull. The main power wire is held down over a 10mm bolt. Use a 10mm socket and extension to remove the nut. The last connector is located on the side of the alternator and is held down by either a small 8mm or 10mm bolt depending on its manufacturer. Remove the bolt. The Alternator now has all 3 electrical connections removed.
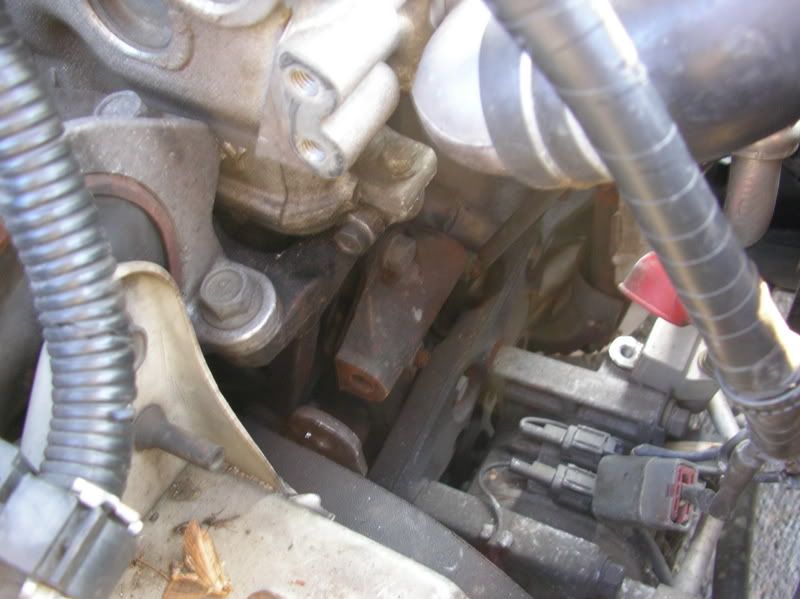
5) If you haven’t already done so, remove the entire alternator adjustment bar by removing the 2 12mm bolts that hold it to the block. These are the 2 bolts referred to in step 3. With the bar removed from the block and disconnected from the alternator. Place it out of the way.
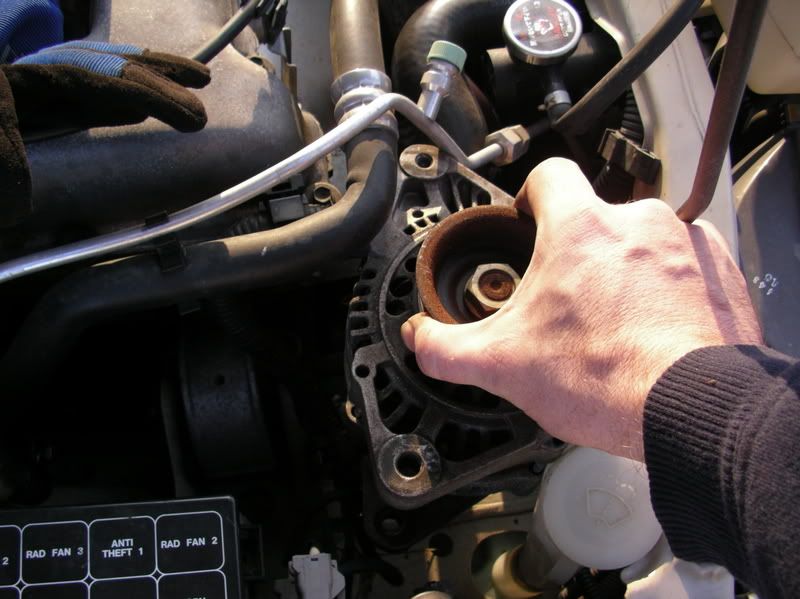
6) Now it’s time to remove the alternator pivot bolt. You’ve already removed the 17mm nut holding the bolt in place (step 3) so you can now push/pull the bolt through. With the bolt removed. The alternator is free to come out. You’ll need to push/pull the alternator up out of its supports and get it free. Gentile use of the pry bar here is very handy. With the alternator released, it can now be removed. You’ll need to pull it up through the space previously occupied by the coolant overflow tank. This is a tight fit, so you’ll need to manipulate and pull the alternator up and out. You shouldn’t have to jack the engine up or remove the upper radiator hose on a B13 or B14. I’ve read reports that the NX does require the hose to be removed, but I have no first hand experience with this. Use your own judgment.
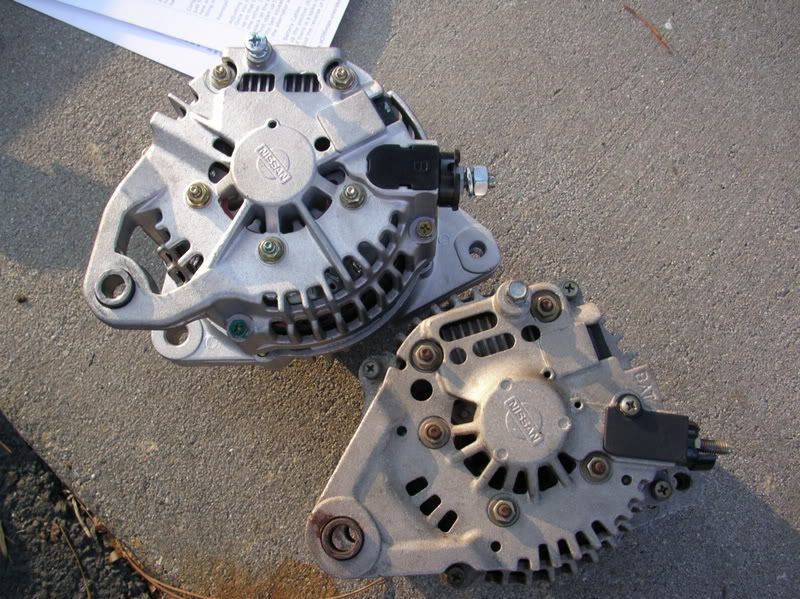
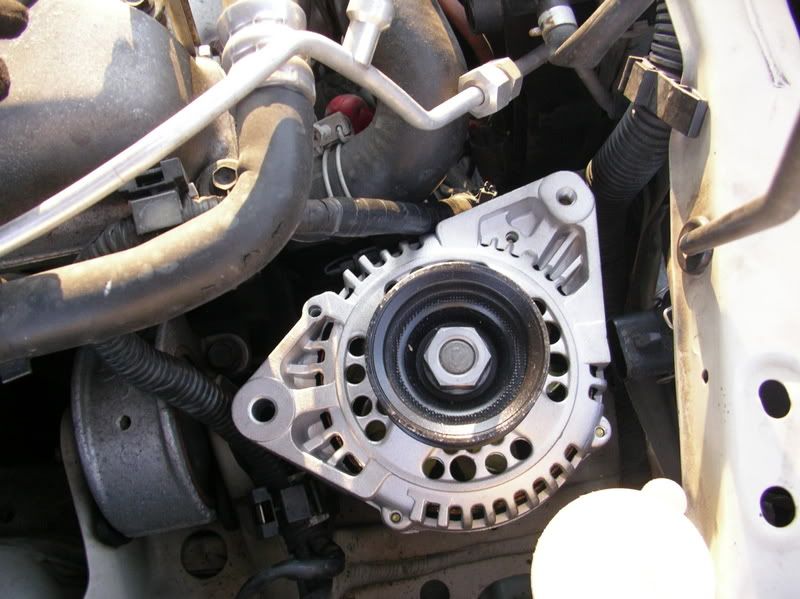
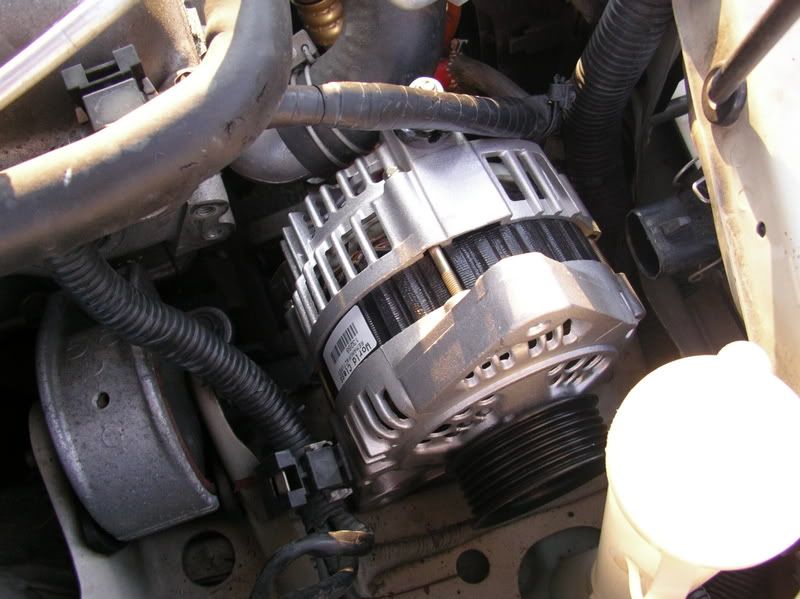
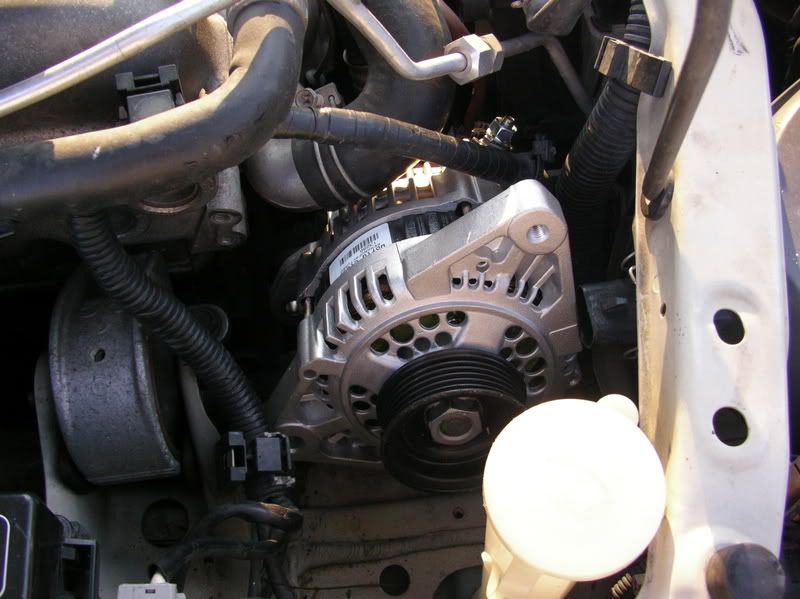
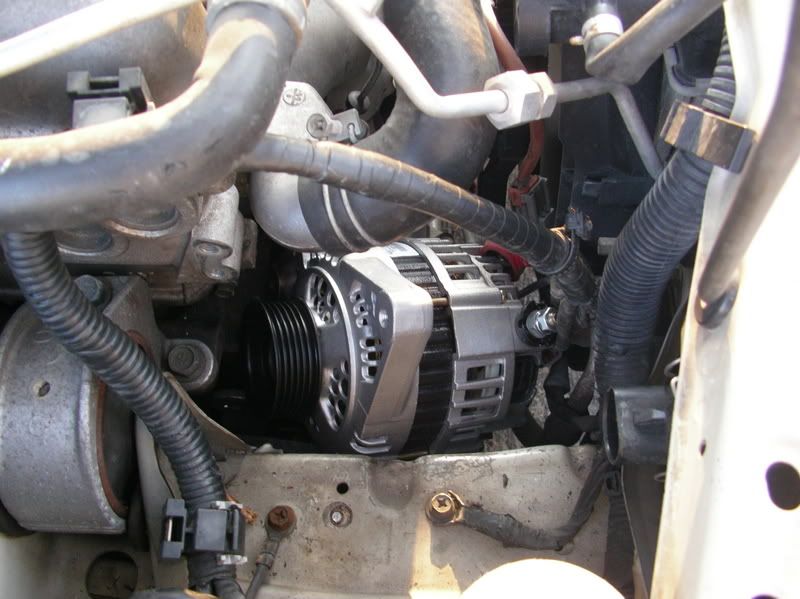
***Oct 08, 2007 - Updating with action photos of process... they say a photo is worth a thousand words, so hopefully these will help. The biggest problem I've run into over the years is trying to get the angle right (and general orentation of the alternator) when sliding it out/in. These pictures were taken earlier in the year when I had to replace my own (again). Note, the car was sitting on level ground on all 4 wheels. There was no need to jack up the engine for additional clearance or remove the radiator hose. I have never found that necessary on any B13/14 I've worked on but your milage may vary. Notice in the pictures that you will probably wind up scraping the paint a little trying to slide the alternator in and out. It's a tight fit and can be a PITA, just be paitient and keep trying until you get it.***

Congratulations. You’ve successfully removed your bad alternator from the car! Now you can just follow these same steps in reverse order to install your replacement alternator. Once the new alternator is installed and everything is hooked up, your warning dash lights should be a thing of the past.
Reinstall Notes:
Adjusting the belt - If this is the first time you’ve replaced a belt it’s a pretty simple process. Once you have the belt back over the reinstalled alternator, you’ll want to adjust the alternator up so that the slack on the belt is removed. This isn’t a hard process, but it isn’t a very exact one either. Just raise the alternator with the adjustment bolt enough so that there isn’t any slack on the belt…but there’s still some deflection (you can still twist the belt a little). When you first start up the car, you may hear the belt squeal/slip. That’s often normal for a new belt. If the belt squeal continues, you have too much slack in the belt and you’ll want to adjust/raise the alternator with the adjustment bolt as needed.
Battery Cables - Remember when reinstalling the battery cables to the battery you want to bolt up the positive (Red) first and the negative/ground (Black) last. Again, you’re doing this so that if there is a spike it flows down the ground wire instead of through your electrical system. This is just the reverse of how you removed them originally.
(Reprinted from a previous post of mine a few years ago on the other board).
---------
Last night when I went out to start up my '96 SE-R, my Battery Light and Brake Light on my dash stayed on. Many of you already know what this means, but in case you don't... I created a write-up for you.
My SE-R started up fine, which was good... but the 2 lights on the dash meant that I had a problem that I needed to get fixed ASAP unless I wanted to be left stranded. The alternator was most likely no longer putting out enough power to charge the battery. I got the car home, broke out my multimeter and found that... sure enough... with the car running and all the accessories off, I was only getting around 12.3 volts. It should have been in the 13-15 volts range (I usually get around 14.3). That meant that the battery was not getting enough of a charge from the alternator. So I checked all the wires from the alternator just to make sure that they were in good repair and connected properly and then I called it a night.
As you know, a car needs electricity to run. Since the alternator was dead, my SE-R was using the electricity stored in the battery as its power supply. If I had continued to drive further, my battery would have eventually had its power drained and my SE-R would of shut down and left me stranded (probably while I was driving it ). So you don't want to ignore these two important dash-warning lights.
The alternator on our cars is kind of hard to get to... but it really looks worse than it is. With only some basic hand tools, anyone can change out the alternator. Here's what you'll need:
- 17mm Wrench (the longer the better).
- 8mm socket.
- 10mm socket.
- 12mm socket.
- A 12in socket extension.
- A suitable Ratchet for your sockets (3/8th is probably best).
- Something to pry with (a Pry bar if you have one).
- A good Hammer (dead blow hammer or a rubber mallet is nice).
Optional: Not absolutely needed, but raising the car does make the job easier.
- Floor Jack and 2 jack stands to support the car. You can substitute Ramps if you don't have the jack/jack stands. As always, level ground and safety is the key. Use blocks behind the rear wheels if you want added safety. ***Never get underneath a car that's only supported with a floor jack.*** Jack stands are a must. People have died making this mistake.
1) The first step is to remove the battery cables from the battery. You always want to remove the Negative (Black) first and then the positive (Red) last. This is so that if there is a short (spark), it travels down the negative (ground) cable and not down your positive cable and through your entire electrical system (which can cause damage, especially to onboard computers). The battery cable nuts take a 10mm socket or wrench.
Now that the battery is safely disconnected, it’s a good time to check that your battery is clean and that the battery posts/cables are free of corrosion. If there is any dirt or water on top of the battery, take a paper towel and wipe it clean. If there is any battery corrosion, clean it up with baking soda or battery cleaner. Remember to clean your hands after you touch the battery… you wouldn’t want to have any battery acid on your hands and then say… wipe your eyes.
2) To gain access to the alternator from above, remove the coolant overflow tank and place it aside. There’s no need to fully disconnect it, simply lift it out of its holding bracket and place it out of your way. The holding bracket must now be removed. Use a 10mm socket to remove the bolt holding the bracket down. You now *may* want to remove the splash guards on the passenger side of the car so you can access the area from below. It's not absolutly necessary but it helps if you have trouble getting the belt on/off the crank pully. To do this, simply use the same 10mm socket to remove the bolts holding these panels on. You now have enough access from above and below that you can get to the alternator and belt. This is also a good time to remove the headlight bulb or at least remove the plug. It'll buy you a little extra room when you are removing/inserting the new alternator. It'll also protect your bulb from being damaged.
3) With the battery disconnected and the obstructions removed, it is now safe to move on to removing your alternator. The alternator is of course powered by the drivebelt. So we need to remove the belt before we can remove the alternator. To do this you’ll need to adjust the alternator so that the belt becomes slack. The Alternator is really only held in place by 3 key bolts. The bottom bolt will need to be accessed from underneath the car (again, raising the car is helpful). You’ll need a 17mm wrench to remove the pivot bolt nut. Now that the nut is removed, it’s time to slacken the belt by using a 12mm socket. There are 4 12mm sized bolts located on the alternator adjustment bar. 2 of the bolts just hold the adjustment bar to the engine block. The other two bolts allow you to adjust/rotate the alternator. You’ll want to loosen these two up enough that you can rotate the alternator all the way down. As you loosen these up, you’ll notice that the long bolt starts to back out. The alternator isn’t going to rotate on it’s own so this is where the hammer and pry bar are useful. With everything loose… use the hammer and pry bar to tap the alternator down. Repeat until the alternator is down far enough that you can slide the belt off.
(Remove the belt and inspect it. Is it cracked or frayed? If so, replace it with a new belt. There’s little point to replacing the alternator if your belt is going to break and leave you stranded the following week.)
4) With the belt off it’s now time to remove 3 electrical connectors on the alternator itself. The first one is a plug. Simply press the sides of the plug together and pull. The main power wire is held down over a 10mm bolt. Use a 10mm socket and extension to remove the nut. The last connector is located on the side of the alternator and is held down by either a small 8mm or 10mm bolt depending on its manufacturer. Remove the bolt. The Alternator now has all 3 electrical connections removed.
5) If you haven’t already done so, remove the entire alternator adjustment bar by removing the 2 12mm bolts that hold it to the block. These are the 2 bolts referred to in step 3. With the bar removed from the block and disconnected from the alternator. Place it out of the way.
6) Now it’s time to remove the alternator pivot bolt. You’ve already removed the 17mm nut holding the bolt in place (step 3) so you can now push/pull the bolt through. With the bolt removed. The alternator is free to come out. You’ll need to push/pull the alternator up out of its supports and get it free. Gentile use of the pry bar here is very handy. With the alternator released, it can now be removed. You’ll need to pull it up through the space previously occupied by the coolant overflow tank. This is a tight fit, so you’ll need to manipulate and pull the alternator up and out. You shouldn’t have to jack the engine up or remove the upper radiator hose on a B13 or B14. I’ve read reports that the NX does require the hose to be removed, but I have no first hand experience with this. Use your own judgment.
***Oct 08, 2007 - Updating with action photos of process... they say a photo is worth a thousand words, so hopefully these will help. The biggest problem I've run into over the years is trying to get the angle right (and general orentation of the alternator) when sliding it out/in. These pictures were taken earlier in the year when I had to replace my own (again). Note, the car was sitting on level ground on all 4 wheels. There was no need to jack up the engine for additional clearance or remove the radiator hose. I have never found that necessary on any B13/14 I've worked on but your milage may vary. Notice in the pictures that you will probably wind up scraping the paint a little trying to slide the alternator in and out. It's a tight fit and can be a PITA, just be paitient and keep trying until you get it.***
Congratulations. You’ve successfully removed your bad alternator from the car! Now you can just follow these same steps in reverse order to install your replacement alternator. Once the new alternator is installed and everything is hooked up, your warning dash lights should be a thing of the past.
Reinstall Notes:
Adjusting the belt - If this is the first time you’ve replaced a belt it’s a pretty simple process. Once you have the belt back over the reinstalled alternator, you’ll want to adjust the alternator up so that the slack on the belt is removed. This isn’t a hard process, but it isn’t a very exact one either. Just raise the alternator with the adjustment bolt enough so that there isn’t any slack on the belt…but there’s still some deflection (you can still twist the belt a little). When you first start up the car, you may hear the belt squeal/slip. That’s often normal for a new belt. If the belt squeal continues, you have too much slack in the belt and you’ll want to adjust/raise the alternator with the adjustment bolt as needed.
Battery Cables - Remember when reinstalling the battery cables to the battery you want to bolt up the positive (Red) first and the negative/ground (Black) last. Again, you’re doing this so that if there is a spike it flows down the ground wire instead of through your electrical system. This is just the reverse of how you removed them originally.
 Be the first to like this post.


")

