Welcome to the SR20 Community Forum - The Dash.
Register
SR20 forum logo

Thread: Project Boosted B13

+ Reply To Thread
Posts: 101-110 of 131
2012-08-11 08:32:22
#101
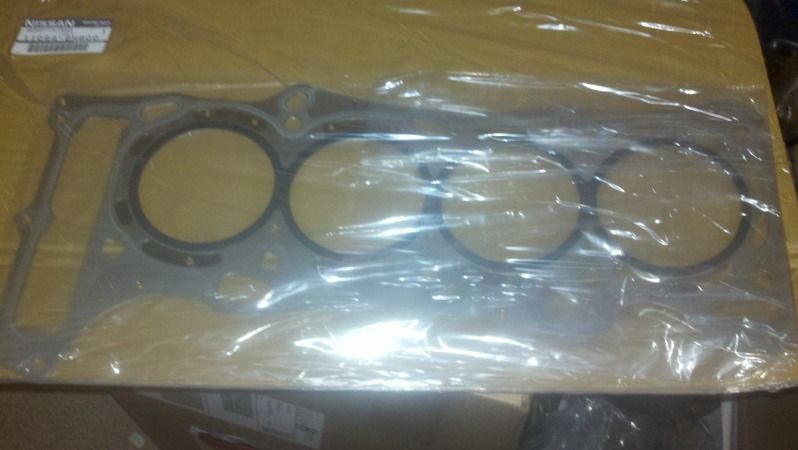
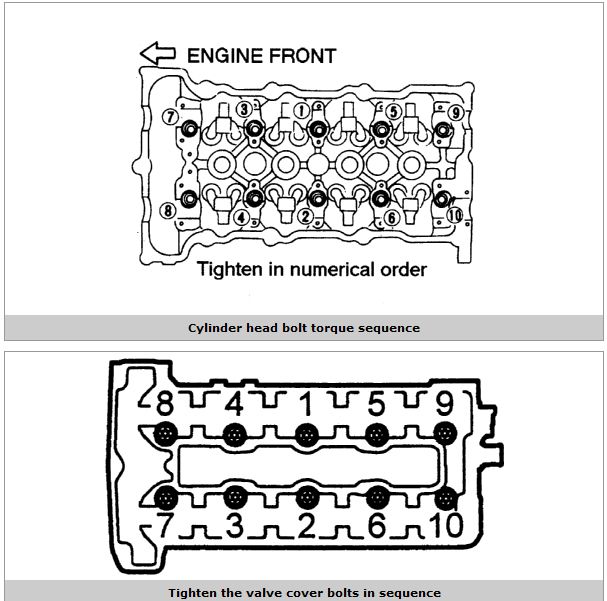
if I had $3k to spend on this project it would have already been done... I have a shit clutch and transmission as well... I'm gonna stay DET, get it running stock and make little upgrades from there
2012-08-12 22:22:10
#102
Confirmed the order with Greg, he's gonna be sending me my ES sway bar and control arm bushings, vvl head gasket, arp studs and 20v valve cover, doesn't have any of the center gasket pieces in for the valve cover but he said that the S14 SR valve cover gaskets are what I need, he may be able to "find one" for me so I can put it on

I gotta clean my garage out because it's a total mess right now, once my package comes in I'll put the bushings in so I can re-install the control arms, throw the wheel hubs on as well as the brakes, might as well but the BMC on for the AD22VF upgrade. Then I need to figure out how to mount the intercooler, and water pump... Shouldn't be too hard. TJ said he would help me do the headgasket so I don't mess anything up I just have to treat him to dinner... Hopefully he won't expect me to put out... besides... I'm sure he can do better... hahaha
2012-08-18 22:40:59
#103
Well I feel dumb... Well... Dumber than usual
So I got the ES Control Arm Bushings from greg today and here's what I have going on...

This is my control arm and the highlighted area is where I need the bushing to go:


And here is where it goes into the car:


Closeup:


Here are the bushings:


Can someone explain where they go?

On the ES info sheet that came with the bushings the control arm that they are showing doesn't look like mine:


It also says Mitsubishi Eclipse on it...


Can someone spread a little light on what's going on? I'm really confused and I need to get the control arms in so I can put the hubs on along with the brakes before I do anything else on the car
2012-08-18 23:36:17
#104
ok so the yellow one sided bushing replaces the one that's squeezed into your subframe.

The ones you highlighted in red replace the front lca to subframe bushing, so you'll need to remove the existing bushing from the lower control arm. this stuff looks like it's energy suspension. You did get the right parts.
Last edited by drunkmunky on 2012-08-18 at 23-37-18. Reason: didn't read the rest of the thread. yes. energy suspension. REMEMBER TO GREASE EVERYTHING
2012-08-19 00:00:23
#105
Excellent. I will see how that part of the sub frame spreads so I can fit the bigger bushings in and then I believe I know where the other bushings go now. Thank you for your reply!
2012-08-19 01:22:47
#106
This is where I got my HG and other things from. JDM Nissan Metal Head Gasket for SR20, from P12 20v Chassis - 11044-8H600 - Nissan
2012-08-19 01:52:50
#107
Wow I paid a lot more for my head gasket
2012-08-19 04:48:43
#108
Well while I'm waiting to be able to put my bushings in here are some pics of the parts that came the other day:


Gotta find a centerpiece gasket before I can put this in


I'm pretty nervous to put the head bolts in!

Here is a pic I grabbed from the FSM, I don't understand what it means by valve cover bolts? The placement of the bolts looks the same as where they say the head bolts are but the torque pattern is different (I'm sure it's something simple just needed it pointed out)


And this is what the torque specs are:

Install cylinder head. Torque the cylinder head bolts in the following sequence:

Step 1: 29 ft. lbs. (39 Nm).

Step 2: 58 ft. lbs. (78 Nm).

Step 3: Loosen all bolts in sequence completely.

Step 4: 25–33 ft. lbs. (34–44 Nm).

Step 5: Plus 90–95 degrees clockwise in sequence.

Step 6: Plus additional 90–95 degrees.

I've never heard of loosening the head bolts but then again I've never done a head gasket by myself

When I loosen the bolts would I loosen them in reverse sequence order or loosen from bolts 1-10?

Also I don't really understand how head studs work, I understand there are nuts (no pun intended) but how do you put them on correctly? (again something very obvious I'm sure) I understand how the OEM head bolts work (there is an actual head on them)

Other than the torque sequence and everything the only thing I'm nervous about is taking the cams out (and putting them back in) and taking the timing chain off :/ any words of wisdom there?

I'm sure a lot of it I won't fully grasp until I get knuckle deep into it but everyone knows how much of a rookie I am so any piece of advice is much appreciated

I don't think TJ is gonna have time to help me which is why I'm asking because it looks like I might have to do this solo!
2012-08-19 05:03:41
#109
Oh and does anyone have blown up pictures of the following? I don't have an "enlarge" option to make everything more visible (I'm using the "Chilton Online Library")


It would be AWESOME if there were another source for these or someway to blow them up (I'd tried to make a vector out of them but the "Autotrace" feature in Illustrator doesn't do a good job and I'm not proficient enough in Illustrator to make my own vector of this)
Last edited by SentraThis96 on 2012-08-19 at 05-05-27. Reason: Added other pic of related engine components for head gasket replacement
2012-08-19 18:25:50
#110
110 Cylinder Block & Oil Pan :: Engine Mechanical :: Genuine Nissan Parts :: Sentra / NX Parts (B13) 1991-1994 :: Nissan Parts, NISMO and Nissan Accessories - Courtesyparts.com

111 Cylinder Head & Rocker Cover :: Engine Mechanical :: Genuine Nissan Parts :: Sentra / NX Parts (B13) 1991-1994 :: Nissan Parts, NISMO and Nissan Accessories - Courtesyparts.com

http://www.courtesyparts.com/sentra-parts-b13-1991-1994/genuine-nissan-parts/engine-mechanical/130-camshaft-valve-mechanism/-c-2490_2491_2492_2501.html
those should help
Last edited by morgans432 on 2012-08-19 at 18-26-44.
+ Reply To Thread
  • [Type to search users.]
  • Quick Reply
    Thread Information
    There are currently ? users browsing this thread. (? members & ? guests)
    StubUserName

    Back to top