


Hey guys.
The Energy Suspension shifter stabilizer bushing is a fantastic and cheap modification that makes your shifts much more crisp and precise in our cars. The OEM bushing is a piece of soft, rubber junk, while the ES bushing is polyurethane. Theoretically on a brand new car, this would be much simpler then what I had to go through due to the rust and having to cut through metal.
Also, if you've ever wanted to install a short shifter kit I recommend doing this at the same time as you are in the same exact area and removing many of the same parts anyway. However, the bushing itself will still make a nice and noticeable difference with the stock shifter.
Tools required: Ratchet, 10mm socket, deep 12mm socket, 13mm open end wrench, 14mm socket, dremel or a preferred cutting tool, safety glasses, new hardware (get a couple stainless semi-long bolts with accompanying nuts of various sizes) & some WD-40/PB Blaster
.
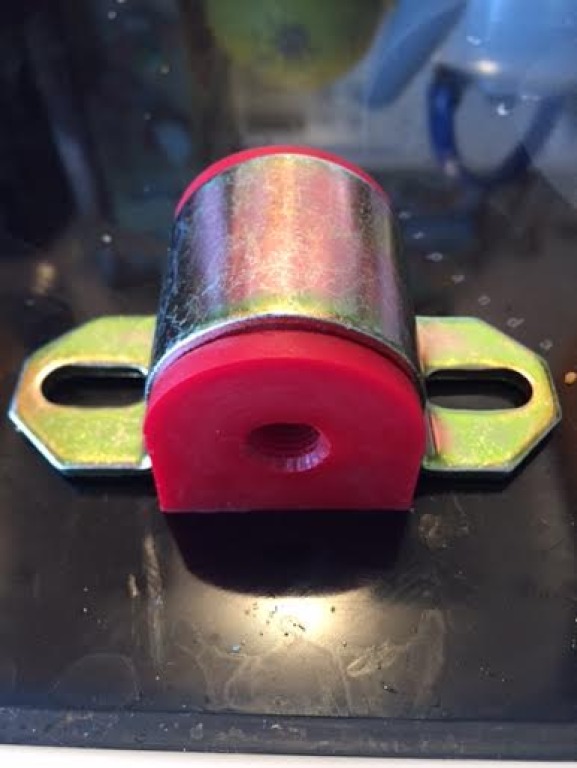
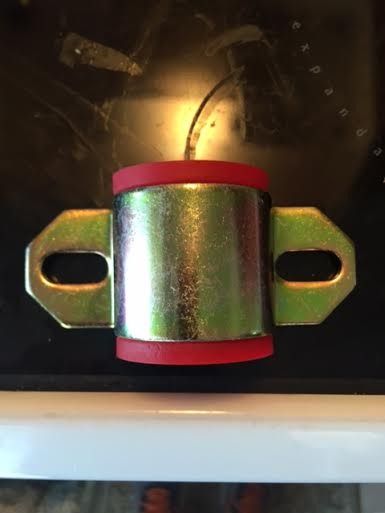
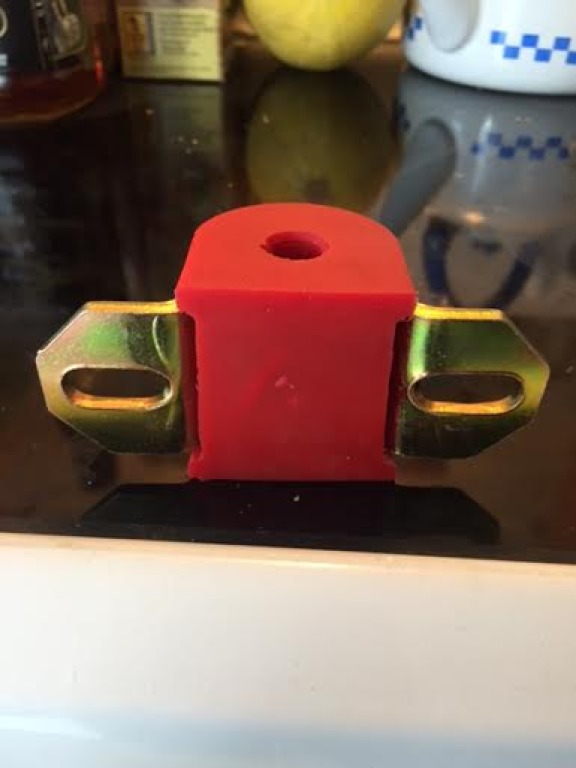
Here is the brand new ES bushing:
.
.
.
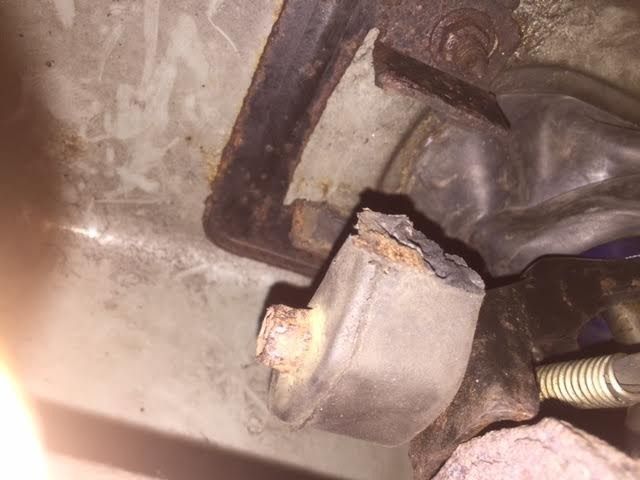
You can get one from Greg Vogel @ G Spec Performance for about $25. The bushing comes pre pressed into its bracket and replaces this entire assembly. After I installed a B&M short shifter, the OEM bushing ripped in pieces and brought the entire shifter assembly down, basically falling apart (perhaps I had put too much pressure from above on the bushing during the short shift install):
.
.
This was not good, and thus why I ordered the new ES bushing. (Side note: if this happens to you, you can temporarily use zip ties to hold the shifter assembly up from inside the cabin along the plastic trim pieces).
.
So let's get started:
1) Get inside the car and pull up on the plastic trim piece that is connected to the shift boot. Pull from the rear side. If you want you can also unscrew and remove the shift knob to get it all out of the way (I recommend this):
.
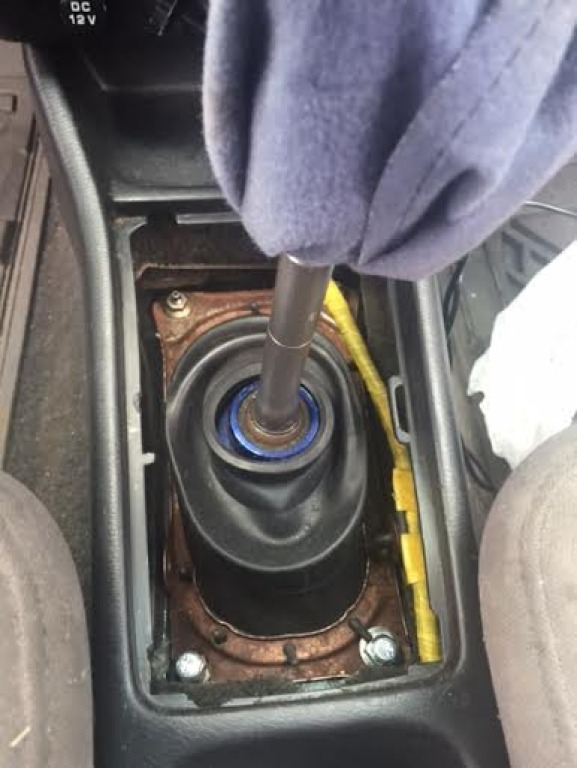
.
2) Use ramps, wheel chocks, or jack up the car on a level surface and use secure with jack stands. NEVER GET UNDER A CAR SUPPORTED ONLY BY A SCISSOR JACK!! In my case I drove the car up ramps and then used a jack on the passenger side to get a little more room under the car. Ramps, a jack stand, and rear wheel chocks is the safest way.
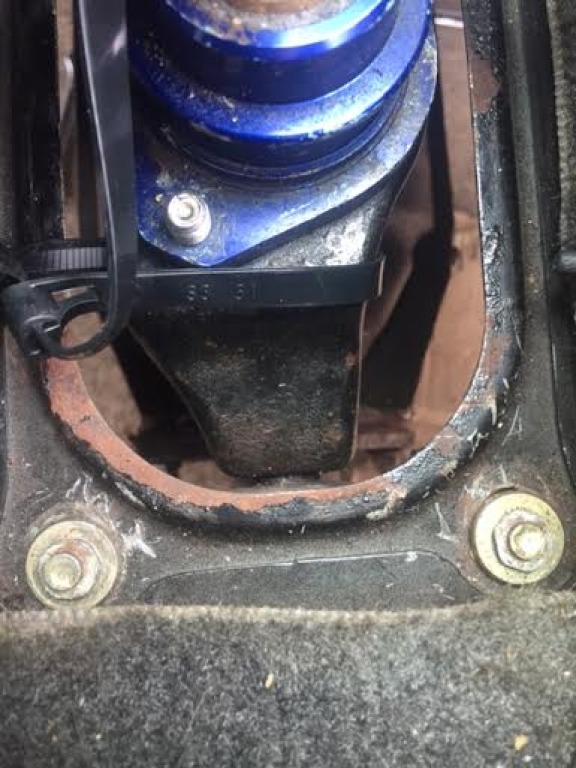
3) Loosen and remove the two 10mm nuts at the top of the metal support (I'm pointing at them with my fingers):
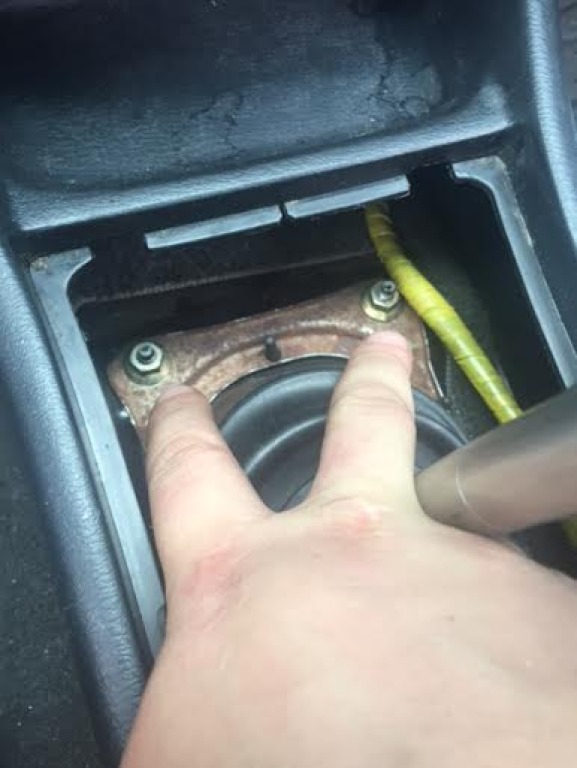
.
Here the two 10mm nuts have been removed at the top, however if you notice, the bottom two are NOT actual nuts, they are actually spot welded from Nissan!
.
(In this photo the shifter had been removed as I was installing a short shifter anyway, don't do this if you're just installing the new bushing).
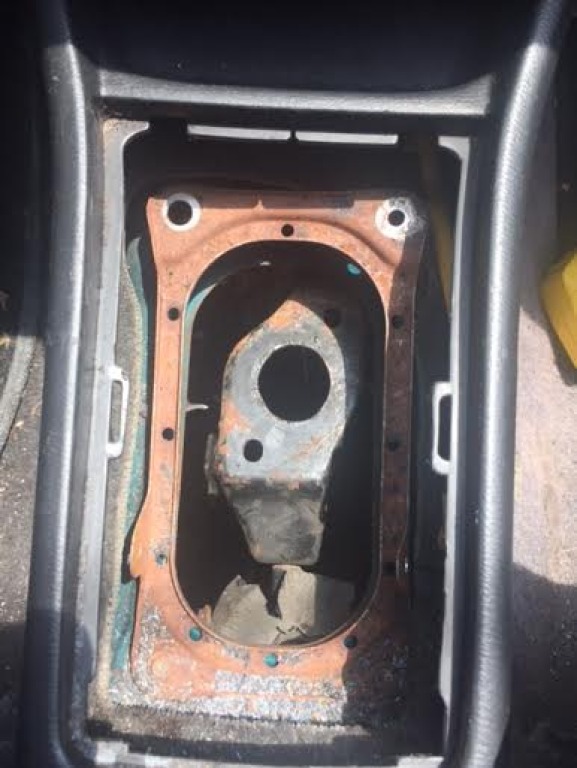
NOW HERE IS WHERE WE RUN INTO THE PROBLEM:
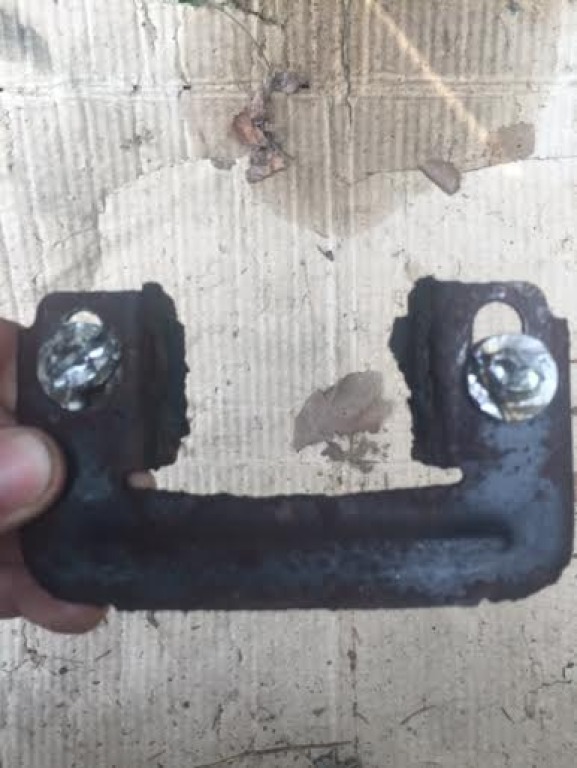
The two "bolts" (if you can even call them that) on the bottom left & right are connected to these two 12mm nuts underneath the car:
.
.
The issue here is that after years of exposure, the nuts underneath become rusted and while trying to loosen them they will just spin the bolts they are on, and there is nothing to grab inside the cabin to hold the bolts still. The tops are flatter than pancakes, even with a second person trying vice grips on the bolts as you trying to loosen them from below. I gave up on this method with a friend helping me; this is the most frustrating part of the relatively simple install, so you have to get creative.
4) Spray the nuts with WD-40 or PB Blaster then get underneath the car and use a deep 12mm socket to loosen the two 12mm nuts, there is one on each side of the bushing.
5) More than likely, the nuts will loosen slightly but then begin to spin the bolts they are tightened on, so it's not possible to get the old assembly off because they can't be removed. If you DO manage to remove the nuts and assembly, you can skip the next few steps (and consider yourself lucky!).
.
.
6) Put on your safety glasses and sit inside the car, and start going to town on those little bolts (bottom left & right in the above photo) with your Dremel. Two notes: 1) You may need to remove the interior plastic trim around the shifter area to get a little better of an angle on the bolts. There are just two Phillips head screws on each side near up front near the ECU and two back at the end behind the emergency brake, once those are removed the assembly will pull up and out, just be careful as it's delicate. 2) Mind the thick yellow wire while using cutting tools around it, that's the air bag sensor wire and you don't want to mess with that.
7) The bolts need to be cut up/broken in anyway possible because they are welded from Nissan. After 10-20 minutes of dremeling or using your cutting tool, the bolts will finally break and the OEM bushing assembly will either fall off from below or you can get under the car and pull it right off. It will look like this once removed (notice the cut up bolts):
.
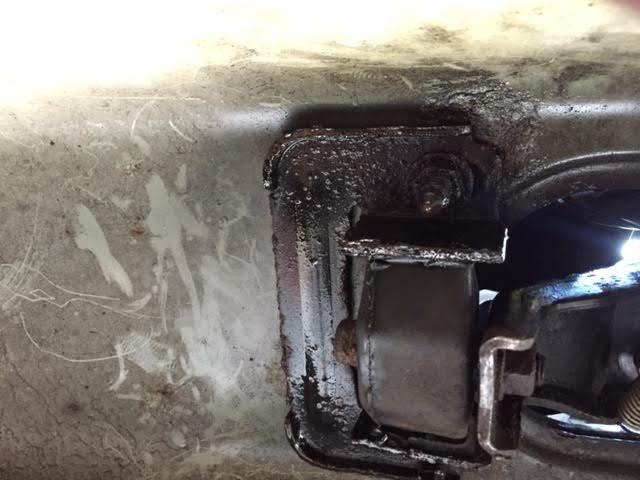
8) Now get back under the car and remove the bolt holding the shift linkage to the old bushing. Use a 14mm socket on the bolt and hold it in place on the other end with your 13mm wrench. Slide the bolt out of the linkage and hold onto it, it will be used in the new ES bushing. In this photo, you can see the bolt just to the right of my thumb:
.
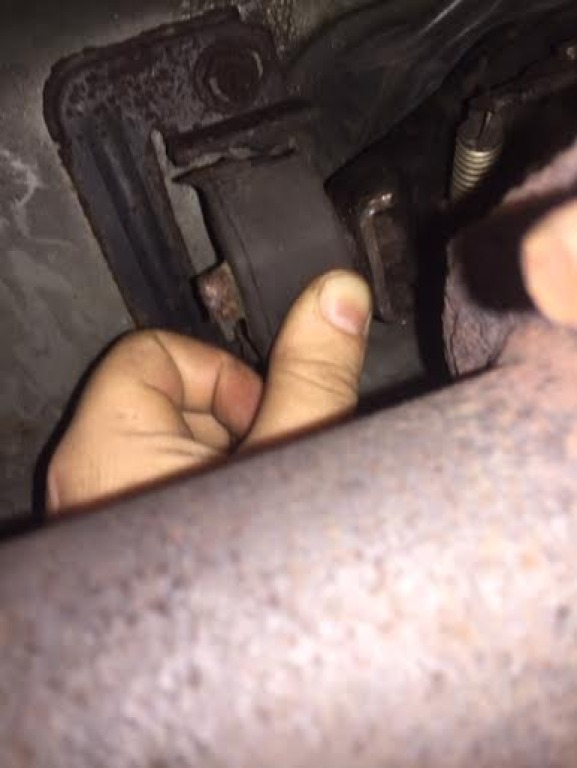
.
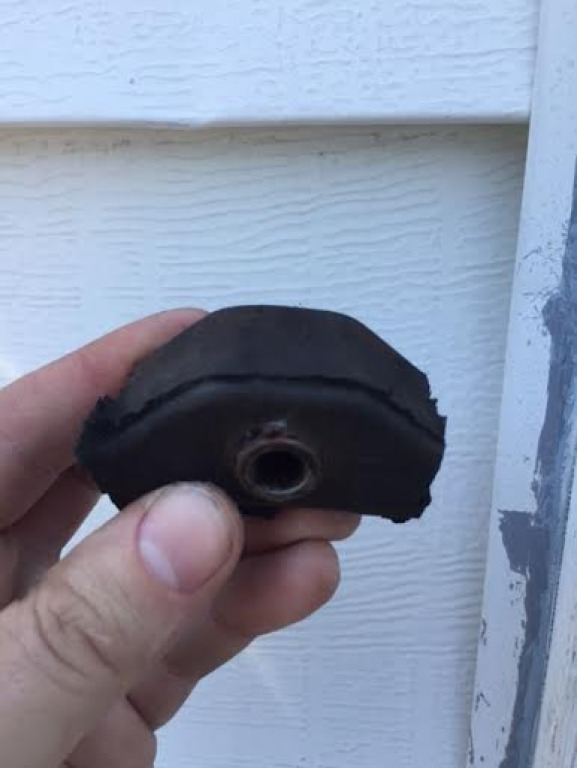
The old bushing once removed will look like this:
.
.
9) So the next step would be to just install the new bushing right? Nope! As it turns out the ES bushing is *slightly* too large and one of the lips must be ground down to fit. Your Dremel should do the trick or use any kind of grinding tool you have. Polyurethane is a pretty tough material so be patient. Here is the section you need to grind away, circled in yellow (it doesn't matter which side you grind):
.
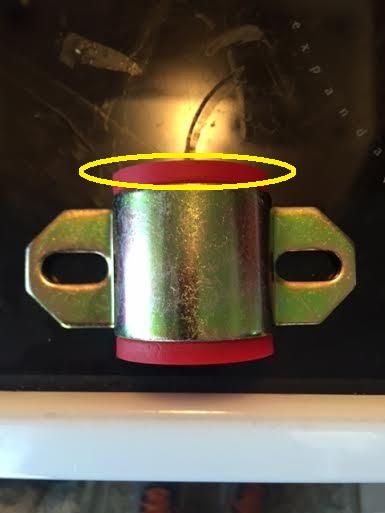
.
10) With the new bushing ground down, get back under the car with the original bolt and go in reverse as in step #8.
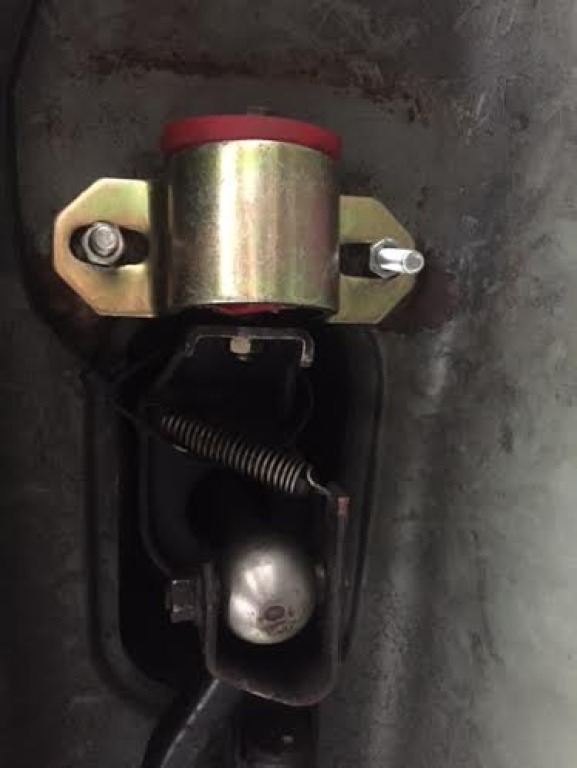
11) Now we need to secure the new bracket. You may need a friend to sit inside the car for this step. Get out your new hardware, choose two bolts of appropriate length and stick them through the new bracket up into the car where the old bolts you cut originally were. It helps if a friend is inside to tighten nuts on the bolts from inside the car while you do this. Once you have your new hardware installed, it should look similar to this:
.
.
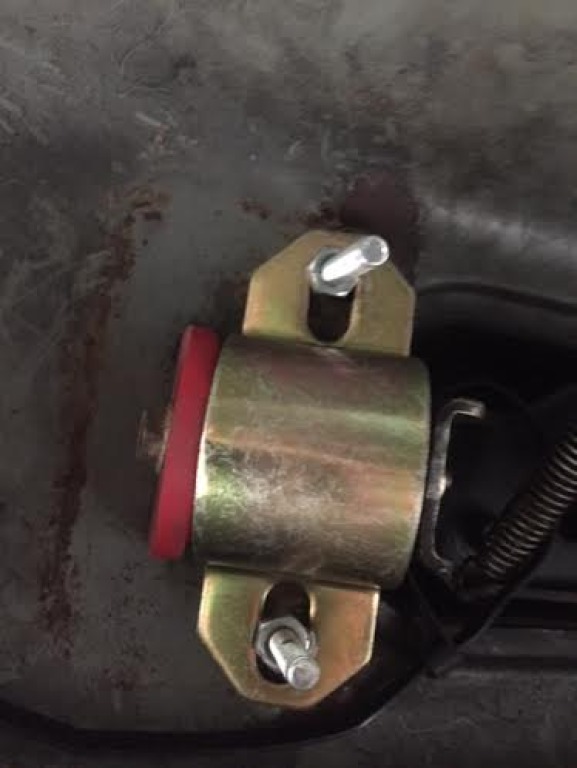
12) Replace the other two 10mm nuts in front of the shifter and double check your work and make sure all the nuts are nice and snug. Put back your interior pieces and the shift boot. It will snap back into place. Get the car off the jack stands and go for a ride!
It should all look like this now:
.
.
.
.
IN THE END: despite it being a semi-pain in the ass with the Dremel/grinding and all, I believe that for the price this is one of the BEST modifications you can make on our cars because you use it ALL the time, every time you drive and of course every time you shift. Shifts will feel more precise and not sloppy like before with that beat and soft rubber bushing.
I highly recommend this cheap little mod, especially the older your car is and I hope this helped!!
(P.S. I *think* this process is quite similar for the B13/NX but I'm not sure as I've never done it on one of those).
")
- Jordan
The Energy Suspension shifter stabilizer bushing is a fantastic and cheap modification that makes your shifts much more crisp and precise in our cars. The OEM bushing is a piece of soft, rubber junk, while the ES bushing is polyurethane. Theoretically on a brand new car, this would be much simpler then what I had to go through due to the rust and having to cut through metal.
Also, if you've ever wanted to install a short shifter kit I recommend doing this at the same time as you are in the same exact area and removing many of the same parts anyway. However, the bushing itself will still make a nice and noticeable difference with the stock shifter.
Tools required: Ratchet, 10mm socket, deep 12mm socket, 13mm open end wrench, 14mm socket, dremel or a preferred cutting tool, safety glasses, new hardware (get a couple stainless semi-long bolts with accompanying nuts of various sizes) & some WD-40/PB Blaster
.
Here is the brand new ES bushing:
.
.
.
You can get one from Greg Vogel @ G Spec Performance for about $25. The bushing comes pre pressed into its bracket and replaces this entire assembly. After I installed a B&M short shifter, the OEM bushing ripped in pieces and brought the entire shifter assembly down, basically falling apart (perhaps I had put too much pressure from above on the bushing during the short shift install):
.
.
This was not good, and thus why I ordered the new ES bushing. (Side note: if this happens to you, you can temporarily use zip ties to hold the shifter assembly up from inside the cabin along the plastic trim pieces).
.
So let's get started:
1) Get inside the car and pull up on the plastic trim piece that is connected to the shift boot. Pull from the rear side. If you want you can also unscrew and remove the shift knob to get it all out of the way (I recommend this):
.
.
2) Use ramps, wheel chocks, or jack up the car on a level surface and use secure with jack stands. NEVER GET UNDER A CAR SUPPORTED ONLY BY A SCISSOR JACK!! In my case I drove the car up ramps and then used a jack on the passenger side to get a little more room under the car. Ramps, a jack stand, and rear wheel chocks is the safest way.
3) Loosen and remove the two 10mm nuts at the top of the metal support (I'm pointing at them with my fingers):
.
Here the two 10mm nuts have been removed at the top, however if you notice, the bottom two are NOT actual nuts, they are actually spot welded from Nissan!
.
(In this photo the shifter had been removed as I was installing a short shifter anyway, don't do this if you're just installing the new bushing).
NOW HERE IS WHERE WE RUN INTO THE PROBLEM:
The two "bolts" (if you can even call them that) on the bottom left & right are connected to these two 12mm nuts underneath the car:
.
.
The issue here is that after years of exposure, the nuts underneath become rusted and while trying to loosen them they will just spin the bolts they are on, and there is nothing to grab inside the cabin to hold the bolts still. The tops are flatter than pancakes, even with a second person trying vice grips on the bolts as you trying to loosen them from below. I gave up on this method with a friend helping me; this is the most frustrating part of the relatively simple install, so you have to get creative.
4) Spray the nuts with WD-40 or PB Blaster then get underneath the car and use a deep 12mm socket to loosen the two 12mm nuts, there is one on each side of the bushing.
5) More than likely, the nuts will loosen slightly but then begin to spin the bolts they are tightened on, so it's not possible to get the old assembly off because they can't be removed. If you DO manage to remove the nuts and assembly, you can skip the next few steps (and consider yourself lucky!).
.
.
6) Put on your safety glasses and sit inside the car, and start going to town on those little bolts (bottom left & right in the above photo) with your Dremel. Two notes: 1) You may need to remove the interior plastic trim around the shifter area to get a little better of an angle on the bolts. There are just two Phillips head screws on each side near up front near the ECU and two back at the end behind the emergency brake, once those are removed the assembly will pull up and out, just be careful as it's delicate. 2) Mind the thick yellow wire while using cutting tools around it, that's the air bag sensor wire and you don't want to mess with that.
7) The bolts need to be cut up/broken in anyway possible because they are welded from Nissan. After 10-20 minutes of dremeling or using your cutting tool, the bolts will finally break and the OEM bushing assembly will either fall off from below or you can get under the car and pull it right off. It will look like this once removed (notice the cut up bolts):
.
8) Now get back under the car and remove the bolt holding the shift linkage to the old bushing. Use a 14mm socket on the bolt and hold it in place on the other end with your 13mm wrench. Slide the bolt out of the linkage and hold onto it, it will be used in the new ES bushing. In this photo, you can see the bolt just to the right of my thumb:
.
.
The old bushing once removed will look like this:
.
.
9) So the next step would be to just install the new bushing right? Nope! As it turns out the ES bushing is *slightly* too large and one of the lips must be ground down to fit. Your Dremel should do the trick or use any kind of grinding tool you have. Polyurethane is a pretty tough material so be patient. Here is the section you need to grind away, circled in yellow (it doesn't matter which side you grind):
.
.
10) With the new bushing ground down, get back under the car with the original bolt and go in reverse as in step #8.
11) Now we need to secure the new bracket. You may need a friend to sit inside the car for this step. Get out your new hardware, choose two bolts of appropriate length and stick them through the new bracket up into the car where the old bolts you cut originally were. It helps if a friend is inside to tighten nuts on the bolts from inside the car while you do this. Once you have your new hardware installed, it should look similar to this:
.
.
12) Replace the other two 10mm nuts in front of the shifter and double check your work and make sure all the nuts are nice and snug. Put back your interior pieces and the shift boot. It will snap back into place. Get the car off the jack stands and go for a ride!
It should all look like this now:
.
.
.
.
IN THE END: despite it being a semi-pain in the ass with the Dremel/grinding and all, I believe that for the price this is one of the BEST modifications you can make on our cars because you use it ALL the time, every time you drive and of course every time you shift. Shifts will feel more precise and not sloppy like before with that beat and soft rubber bushing.
I highly recommend this cheap little mod, especially the older your car is and I hope this helped!!
(P.S. I *think* this process is quite similar for the B13/NX but I'm not sure as I've never done it on one of those).
- Jordan
Last edited by Storm88000
on 2016-07-05
at 03-15-43.
 Be the first to like this post.


