This modification is very time consuming. I spent a good few hours on it. There is no welding required - just lots of measuring, cutting, and grinding. I'd say it is, by far, the best for the bang mod I have done yet. It feels AMAZING.
Parts used:
B15 Clutch Pedal
B15 Clutch Master Cylinder
B15 Clutch Slave Cylinder
B15 Clutch Actuator Arm
B15 Remote Reservoir
1/2" Copper coupler
23" braided stainless steel line (90 degree fitting & Banjo fitting)
3/8" slave cylinder spacing plate
Note:
I did this modification for about $70. I paid $45 to have the braided line made and paid $25 for the pedal, clutch master, and clutch reservoir from a salvage yard. Coheed donated the arm and slave cylinder from one of the B15 transmissions he had lying around. Pretty cool! Thanks, man!
To buy all the parts new will cost somewhere around the $400 mark. I suggest just going to the salvage yard. You can find the parts in great condition if you look.
Enough of that. On with the work!
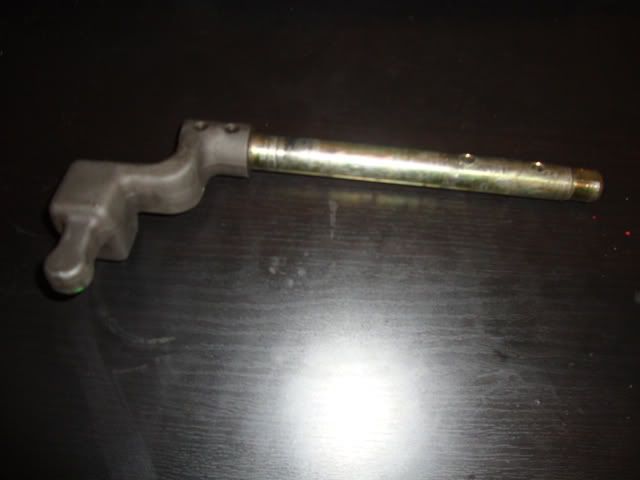
Here is the B15 clutch actuator arm. As you can see it has a "shoulder" at the bottom of the arm. The arm on the B14 (B13 also) doesn't have this shoulder. It is the same size from top to bottom.
I found a simple solution for this. Go to your local hardware store (Home Depot, Lowes, etc...) and get a 1/2" diameter copper coupler. Make sure you don't buy steel or anything. You want to use a metal that is softer than aluminum so it will wear and not the tranny mounting point! That would be an expensive fix.
We need to take this coupler and cut a 1/3 of it off. We will be using the larger portion. After that we need to cut a slit down the side of it to give it room to flex. It should look like so:
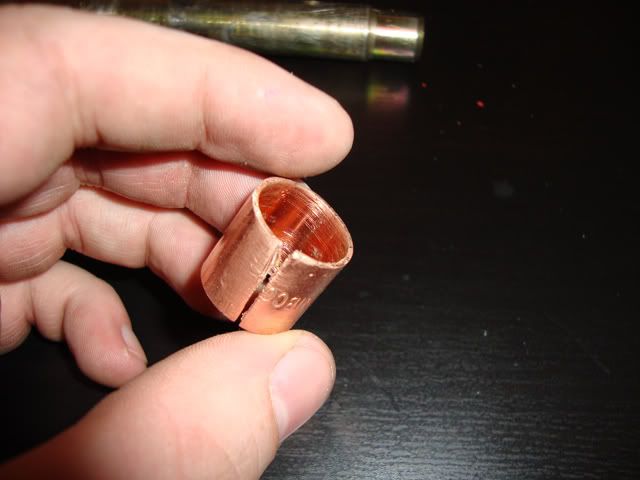
Got that done? Excellent! This is what it should look like. Make sure it doesn't hang over the end. It should be the same size or slightly smaller.
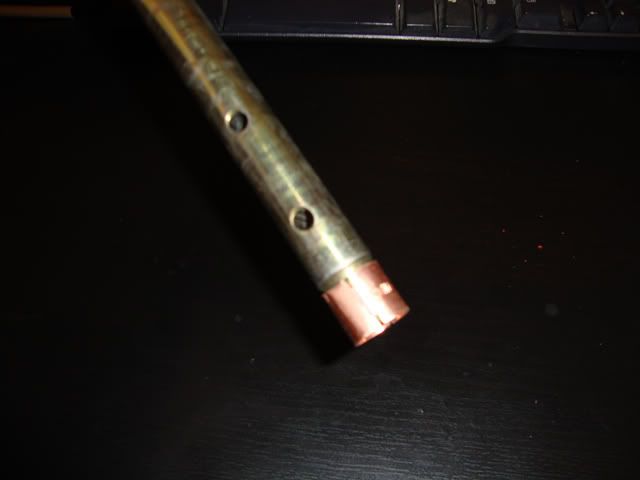
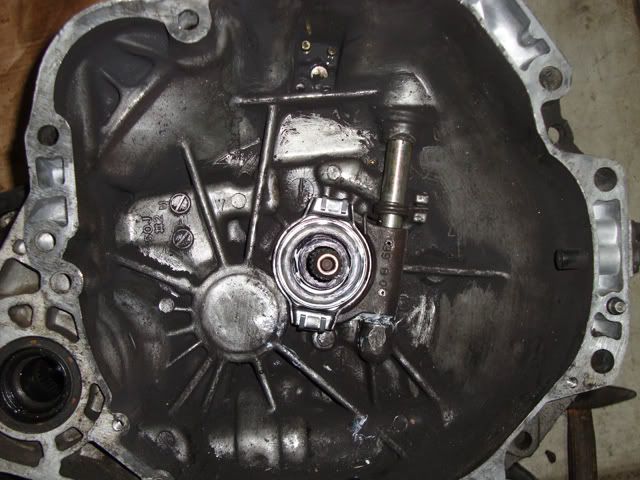
Right. We're done with that. Lets install it. Make sure to use lithium grease between the arm and coupler to reduce wear and make sure it turns smoothly. I used a B14 fork and Throwout bearing. No modification required. Easy work is done!
On to the interior. To make this as easy as possible I recommend removing as much of the interior as possible. I removed the bottom dash cover and my driver seat. Had I removed the entire dash it would have most likely gone a lot smoother.
I've done a lot of the time-intensive work for you. Figuring out what to cut. Here ya go:
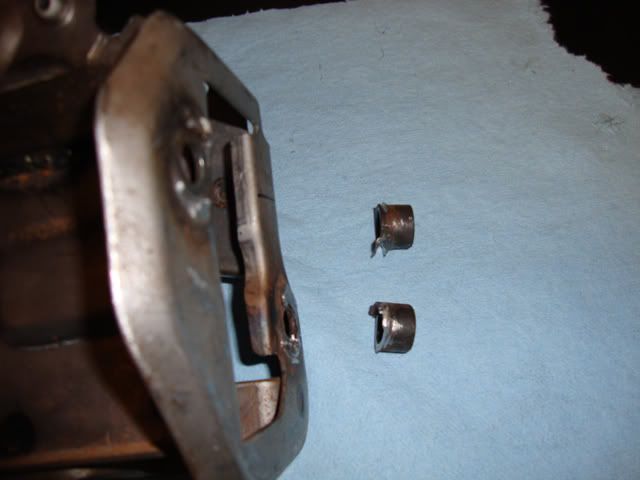
Remove these spacers. They have 2 tack welds on either side. Grind them in half, grab a pair of pliers, and bend them till they snap off. Done.
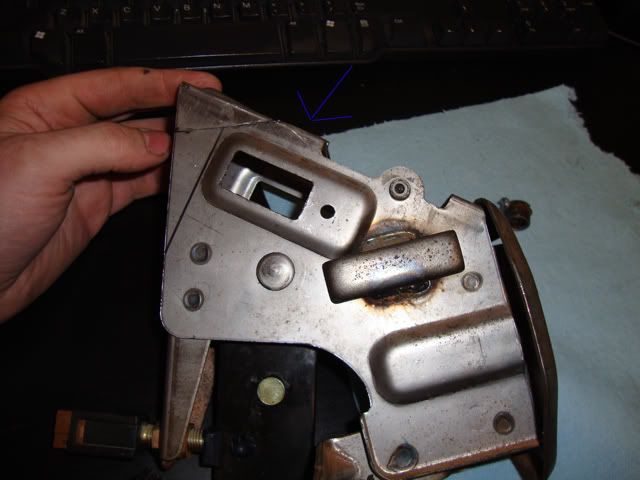
Here you can see what needs to be cut on the clutch assembly. The assembly is about an inch taller and an inch longer than the stock pedal. This just won't fit. You can see the two lines I've marked for cutting. It runs right next to the "window" on either side of the assembly. Mind where the blue arrow points! Leave it as long as you can. This will become the new upper mount!
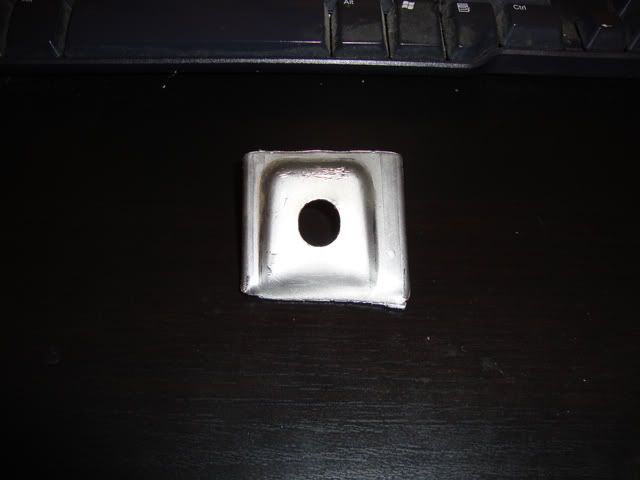
This is the upper piece that we cut from the pedal assembly. It used to be the upper mounting point that was located WAY off from where we want it. You can see that I cut across where it bulges out. This made for a PERFECT fit.
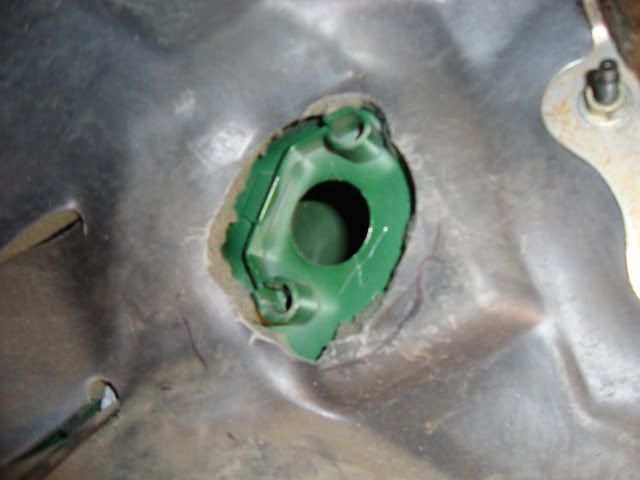
Alright, now we need to remove this spacer off the firewall. It's a bit of a pain because it is a cramped area. I used a chisel to get most of it separated. I then grabbed a pair of pliers and pulled it back and forth until it snapped clean.
Time for the fun stuff now. Mock up the pedal and mark where the new holes will be drilled. You will also need to cut a bit of the fire-blanket. I used a hobby knife. Sliced through it pretty easily. This is frustrating. You have to juggle a pedal (which nows feels like 50 lbs because its over your head) while marking a hole and making sure you didn't move it from where you want the pedal to sit. Enjoy!
(Note: the reason we are making new holes is because the stock holes will cause the clutch pedal to sit ON TOP of the brake pedal. So we need to rotate it clockwise about 30 degrees)
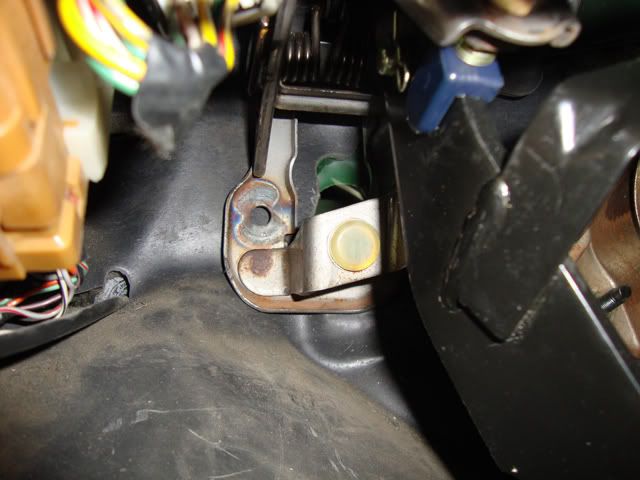
Got that done? Phew. Tough, huh? You'll be happy to know that was the hardest part. If you're drill slipped a bit when making the hole you'll have to grind the center hole out a bit so the slave will fit through. This is a lot of back and forth work - but it is relatively easy.
So, all thats done. Time to mount the pedal! The 3 bolts holding the pedal in are circled in blue. The upper bolt is very wide and if you cut the assembly where I did it will cover over that metal lip (doubles as structural support) Looks are deceiving. That bolt actually has the assembly pressing against it. It isn't going ANYWHERE!.
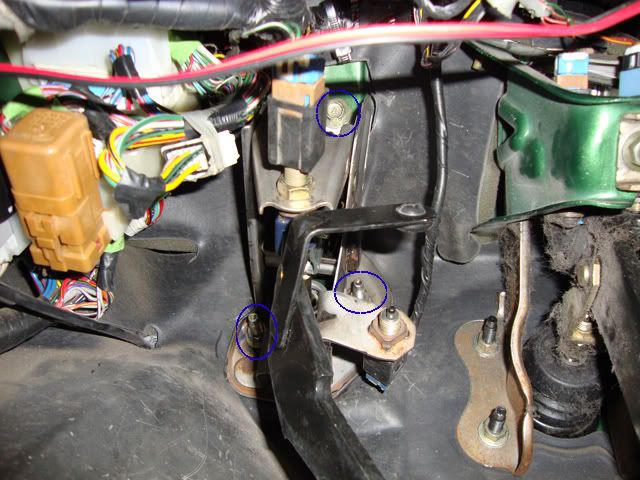
Let's see what it looks like on the other side... woah! It clears perfectly! It's a bit of a pain in the butt to get it in there though. It's definitely a tight squeeze.
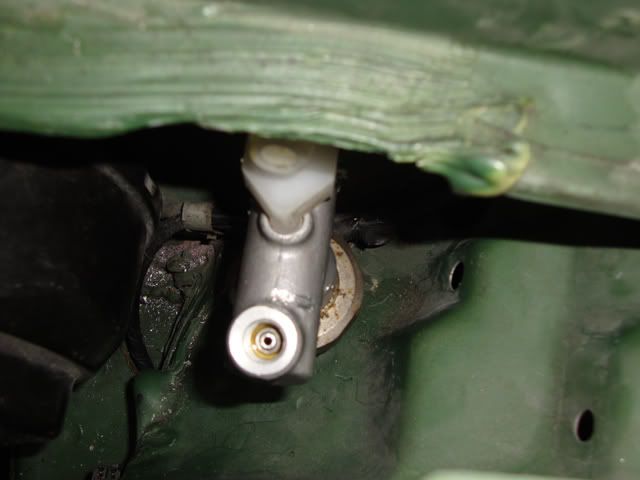
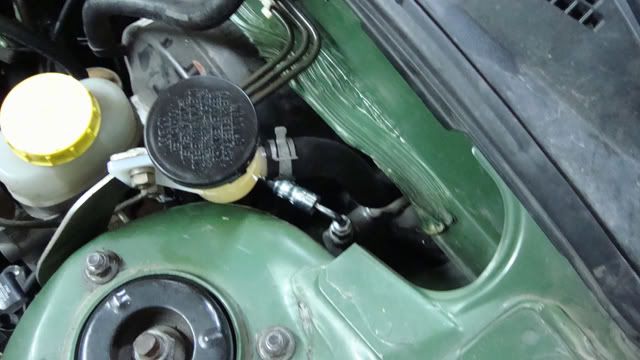
I mounted the remote reservoir to a pre-existing hole in the frame. I had to remove the strut assembly to be able to tighten the nut down on the other side. It's perfect though!
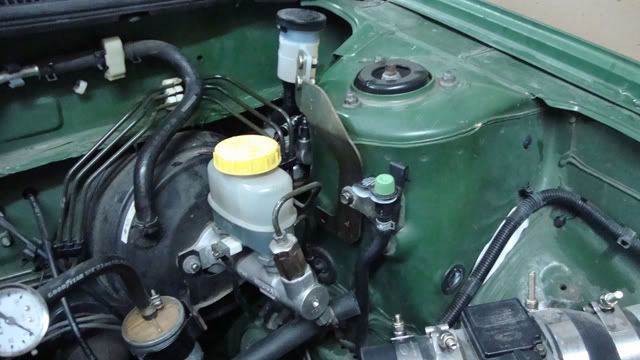
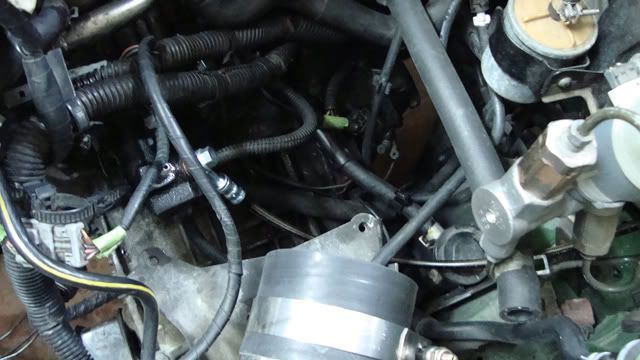
Here is a pic of the reservoir to master and the stainless line to the slave. I used a 23" braided stainless steel line with a 90 degree fitting on one end and a banjo bolt on the other. I run solid mounts so my engine doesn't move much so I don't need much slack on this line. If you are running prothanes all the way around or stock mounts I suggest getting a 25" line. The 23" will give you only an inch of slack.
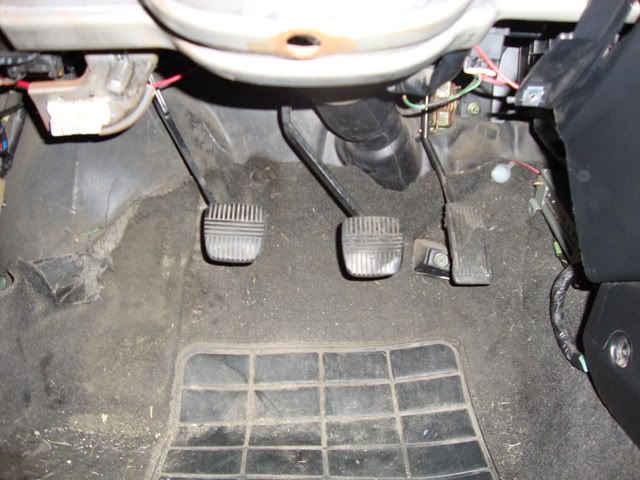
Here's the picture of the pedals. The clutch mounted up flush with them. It feels great. It's in a very natural location and it takes almost no force to actuate the competition clutch in this thing. You'd guess it was stock!
Questions, comments, concerns, complaints? Post em here. I'll answer the best I can. Enjoy!
Parts used:
B15 Clutch Pedal
B15 Clutch Master Cylinder
B15 Clutch Slave Cylinder
B15 Clutch Actuator Arm
B15 Remote Reservoir
1/2" Copper coupler
23" braided stainless steel line (90 degree fitting & Banjo fitting)
3/8" slave cylinder spacing plate
Note:
I did this modification for about $70. I paid $45 to have the braided line made and paid $25 for the pedal, clutch master, and clutch reservoir from a salvage yard. Coheed donated the arm and slave cylinder from one of the B15 transmissions he had lying around. Pretty cool! Thanks, man!
To buy all the parts new will cost somewhere around the $400 mark. I suggest just going to the salvage yard. You can find the parts in great condition if you look.
Enough of that. On with the work!
Here is the B15 clutch actuator arm. As you can see it has a "shoulder" at the bottom of the arm. The arm on the B14 (B13 also) doesn't have this shoulder. It is the same size from top to bottom.

I found a simple solution for this. Go to your local hardware store (Home Depot, Lowes, etc...) and get a 1/2" diameter copper coupler. Make sure you don't buy steel or anything. You want to use a metal that is softer than aluminum so it will wear and not the tranny mounting point! That would be an expensive fix.
We need to take this coupler and cut a 1/3 of it off. We will be using the larger portion. After that we need to cut a slit down the side of it to give it room to flex. It should look like so:

Got that done? Excellent! This is what it should look like. Make sure it doesn't hang over the end. It should be the same size or slightly smaller.

Right. We're done with that. Lets install it. Make sure to use lithium grease between the arm and coupler to reduce wear and make sure it turns smoothly. I used a B14 fork and Throwout bearing. No modification required. Easy work is done!

On to the interior. To make this as easy as possible I recommend removing as much of the interior as possible. I removed the bottom dash cover and my driver seat. Had I removed the entire dash it would have most likely gone a lot smoother.
I've done a lot of the time-intensive work for you. Figuring out what to cut. Here ya go:
Remove these spacers. They have 2 tack welds on either side. Grind them in half, grab a pair of pliers, and bend them till they snap off. Done.

Here you can see what needs to be cut on the clutch assembly. The assembly is about an inch taller and an inch longer than the stock pedal. This just won't fit. You can see the two lines I've marked for cutting. It runs right next to the "window" on either side of the assembly. Mind where the blue arrow points! Leave it as long as you can. This will become the new upper mount!

This is the upper piece that we cut from the pedal assembly. It used to be the upper mounting point that was located WAY off from where we want it. You can see that I cut across where it bulges out. This made for a PERFECT fit.

Alright, now we need to remove this spacer off the firewall. It's a bit of a pain because it is a cramped area. I used a chisel to get most of it separated. I then grabbed a pair of pliers and pulled it back and forth until it snapped clean.

Time for the fun stuff now. Mock up the pedal and mark where the new holes will be drilled. You will also need to cut a bit of the fire-blanket. I used a hobby knife. Sliced through it pretty easily. This is frustrating. You have to juggle a pedal (which nows feels like 50 lbs because its over your head) while marking a hole and making sure you didn't move it from where you want the pedal to sit. Enjoy!
(Note: the reason we are making new holes is because the stock holes will cause the clutch pedal to sit ON TOP of the brake pedal. So we need to rotate it clockwise about 30 degrees)

Got that done? Phew. Tough, huh? You'll be happy to know that was the hardest part. If you're drill slipped a bit when making the hole you'll have to grind the center hole out a bit so the slave will fit through. This is a lot of back and forth work - but it is relatively easy.
So, all thats done. Time to mount the pedal! The 3 bolts holding the pedal in are circled in blue. The upper bolt is very wide and if you cut the assembly where I did it will cover over that metal lip (doubles as structural support) Looks are deceiving. That bolt actually has the assembly pressing against it. It isn't going ANYWHERE!.

Let's see what it looks like on the other side... woah! It clears perfectly! It's a bit of a pain in the butt to get it in there though. It's definitely a tight squeeze.

I mounted the remote reservoir to a pre-existing hole in the frame. I had to remove the strut assembly to be able to tighten the nut down on the other side. It's perfect though!

Here is a pic of the reservoir to master and the stainless line to the slave. I used a 23" braided stainless steel line with a 90 degree fitting on one end and a banjo bolt on the other. I run solid mounts so my engine doesn't move much so I don't need much slack on this line. If you are running prothanes all the way around or stock mounts I suggest getting a 25" line. The 23" will give you only an inch of slack.


Here's the picture of the pedals. The clutch mounted up flush with them. It feels great. It's in a very natural location and it takes almost no force to actuate the competition clutch in this thing. You'd guess it was stock!

Questions, comments, concerns, complaints? Post em here. I'll answer the best I can. Enjoy!


 Back to top
