First, if you do not agree with stance, a.k.a. form over function, please do not post on this thread. I understand that the stance movement is not for everyone but please have respect for those that want to modify thier cars in a way that is different from your own ideas for modifications. Trolling here will not be appreciated as you will not be saying anything here that has not already been said dozens of times.
Second, and most important, is a disclamer;
This is not an instruction manual. This is what I have done for my own car. I only take responsibility for my own modifications to my own cars. I will not tell you to modify your cars in such a manner as I have done. I will not take responsibility for the modifications that you have done to your car. I cannot be responsible for shoddy workmanship on your part. If you attempt to modify your car in such a manner as I have done, you must own your decision to do so and any consequences that arise as a result of your choice.
Because of this, please DO NOT ask me to modify a set of control arms for you as I will have to decline. I cannot afford the liabilty of producing a modified control arm that may or may not be weaker than the factory control arm. If your modified control arm should break while you are driving down the road causing your death or the death of others, It must be known that it was YOUR choice to modify your contol arm. What I offer here is ONLY a suggestion as to a direction you may or may not want to go with regards to modifying you car.
Third, what an extended control arm will and will not do for your car;
An extended front contol arm will NOT:
-Fix any suspension geometry issues that may arise from excessive lowering of your car
-Improve roll centers.
-Help bump steer.
-Improve handling.
-Make you a better driver.
An extended front contol arm WILL:
-Allow you to lower your car to extreme levels without binding your axels.
-Add negative camber to the front wheels
-Add track width to the front axel.
PLEASE READ ALL OF THE ABOVE BEFORE MOVING ON!!!!!!!
THEN READ IT AGAIN!!!!!
I have recieved a lot of interest in my extended front control arms which is why I am posting this.
Here is my post from the "Calling B13s that are LOW..." thread:
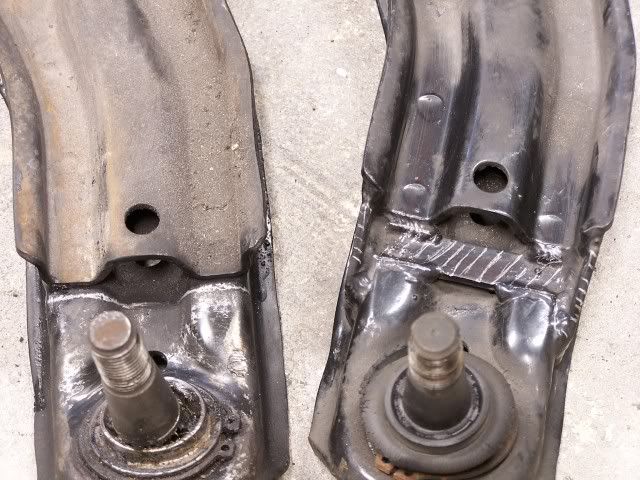
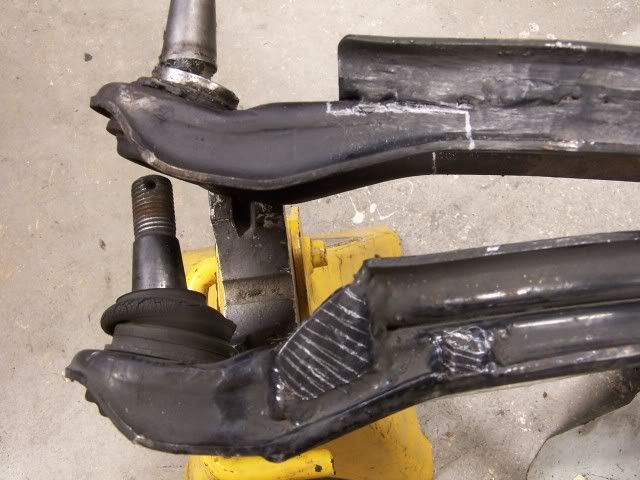
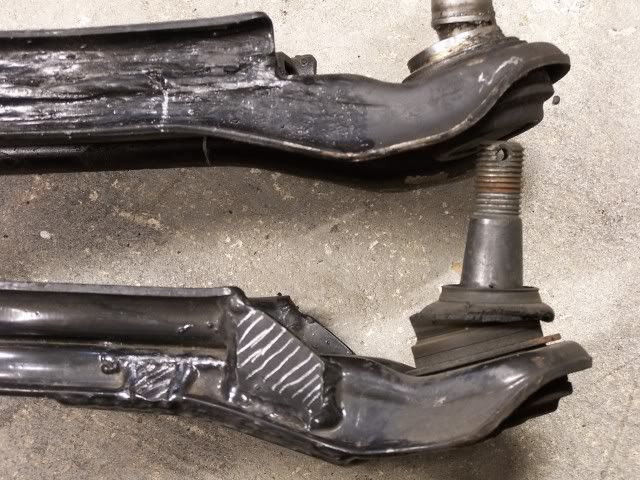
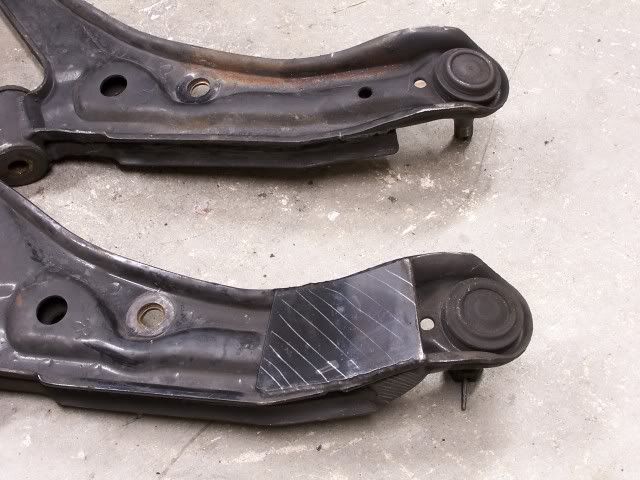
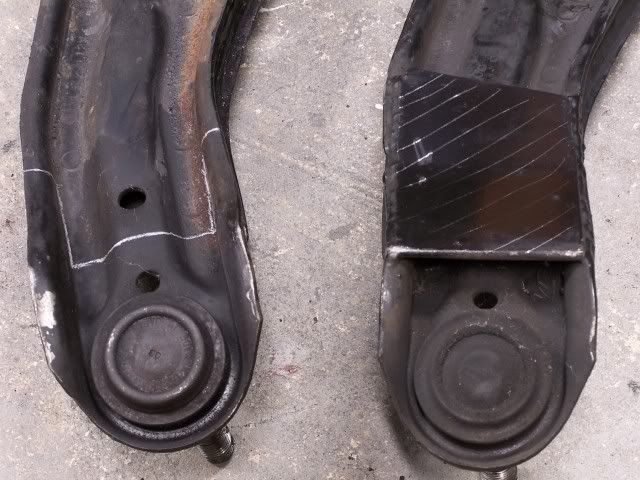
"Hey guys, I just caught this thread. Thanks to Snail for posting. I have extended the front control arms on my green car by 1/2" to relieve the axle bind issue. I then had to extend the rear arms just so the car did not look goofy. I extended the rears by 3/4" which actually made the front and rear track pretty much equal. In case you have not noticed, the front track is wider than the rear on the B-13 from the factory.
I discovered the axle bind issue with my race car (92 SE-R) by running too low at Daytona. Going around the banking causes the suspension to compress further than just riding down the road. Throw in a few dips for good measure and presto chango you now have dumpster fodder for an axle. I destroyed and axle in 3 laps one time!!!! Needless to say, my race car is only about an inch lower than stock right now and I had the axles shortened by 1/2".
When you are shortening an axle, it is the shaft between the inner and outer joints that needs to be shortened. The company I sent mine to took the axle apart, machined a new "c" clip groove on one end and then took 1/2" of material off that same end. Apparently the splines for the joint are long enough for them to remove that much material and be able to put it all back together.
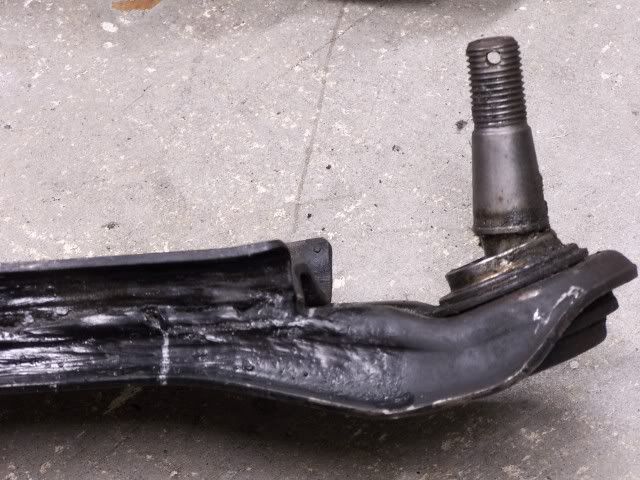
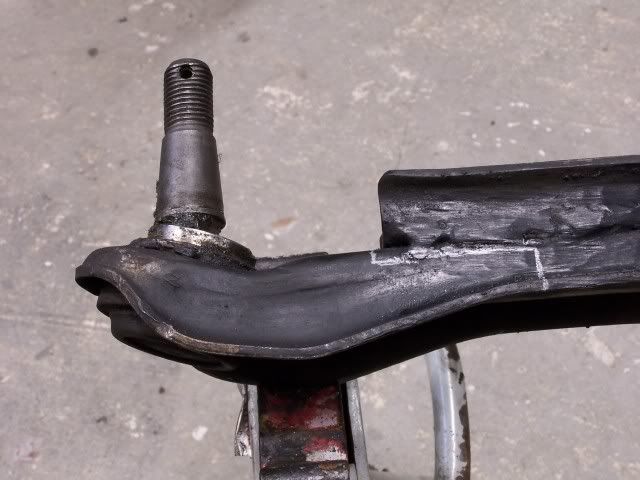
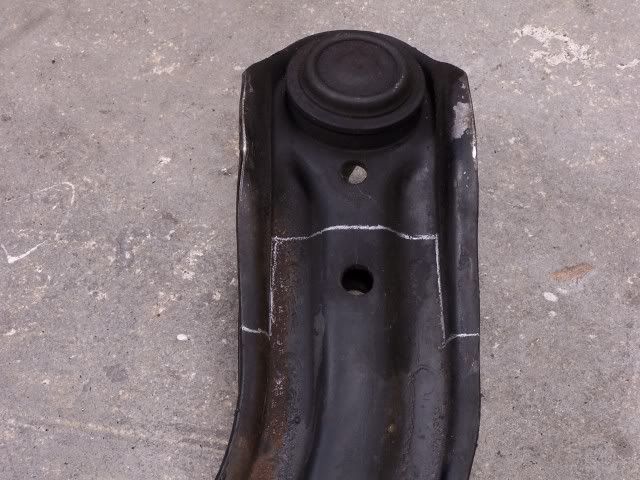
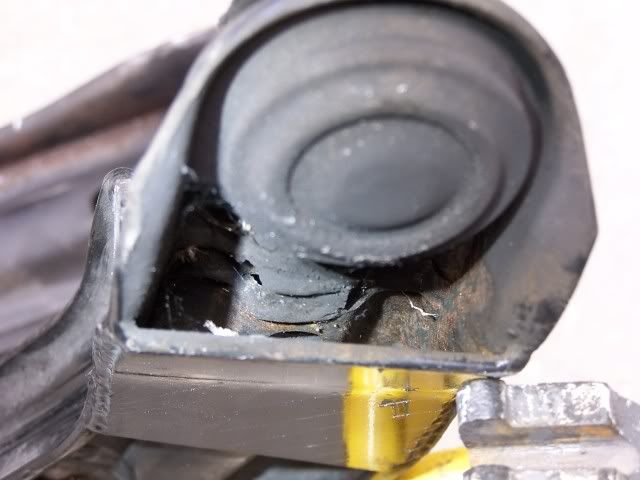
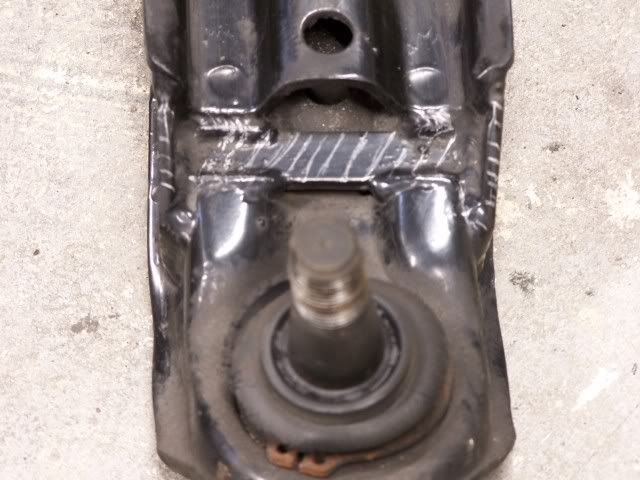
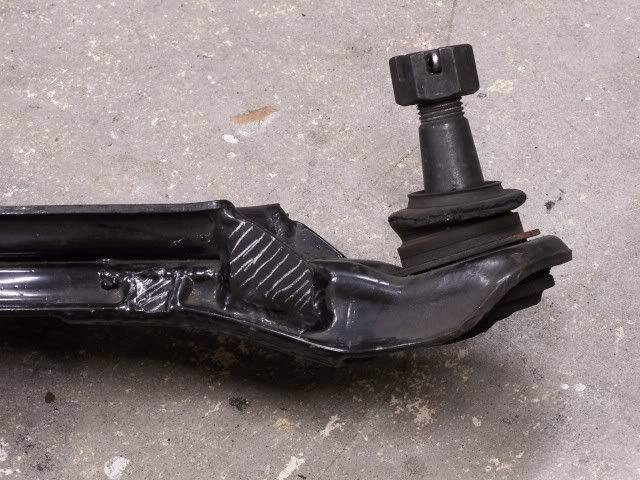
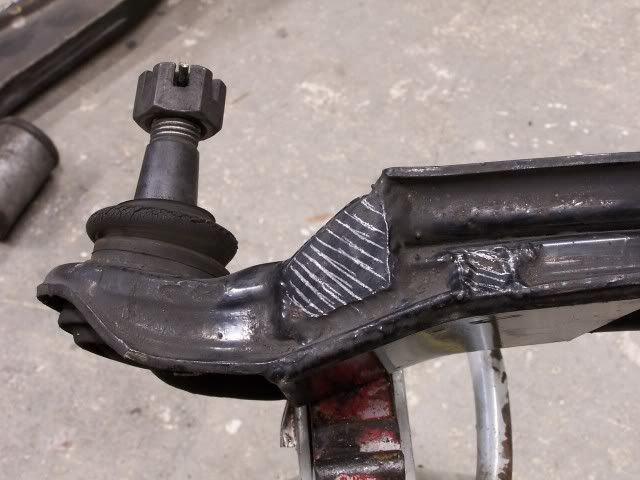
I did not go that route with the green car. I opted to extend the control arms instead. Either way will get the job done. None of this has anything to do with roll centers or proper suspension geometry. It will just allow you to drive your car at a low ride height without destroying your axles. Just remember, the extreme angle that the axles have to operate under will also accelerate wear on the joints and the boots. Your mileage may vary....
Quote:
Originally Posted by nismonx2000
is there a way to test for axle bindage with the wheels on the ground at ride height? example: grab the axle and see if theres inward/outward travel? im assuming no travel would mean it will bind? little travel would mean it will bind under suspension travel and cornering, and lots of travel would pretty much mean ur good? my nx is pretty low, but my axles dont make noises or appear to bind, but id like to check somehow. lemme know if u think my idea is headed in the right direction.
Yes, you can test this, I did on my race car and on my green car.
YOU DO NOT WANT TO DO THIS WITH THE WHEELS ON THE GROUND!!!!
1, Measure your ride height from axle to fender while the car is on level ground and the suspension is settled.
2, Put the car on jack stands and remove the wheels.
3, Remove the front strut assemblies.
4, Remove the springs from the struts.
5, Replace the struts without the springs back in the car.
6, Remove the axle nut
7, Use your jack to compress the suspension to the measurement you took in step 1.
8, See if you can move the axle in and out (plunge depth). Measure how much travel you have.
9, Move the suspension through a range of motion and see the difference in plunge travel at different suspension heights. It is fun to see how it all works!
If you don't have any travel in step 8, congratulations! You have axle bind, and if you have been driving like that, chances are your axle is pretty unhappy. Especially if you have a turbo monster under your hood!!
At the very minimum, I would say you want at least 1/8" of plunge at ride height, more would be better since you will run out of plunge as the suspension compresses further. Think about going around a turn at speed and then hitting a bump. What happens? You need room for that.
The modifications I made gave me a significant amount of plunge to play with at my chosen ride height.
I hope that this helps.
Please understand that, to the dismay of some, I went for stance over performance on my green car. However, I was running the shortened Koni coilover set up from my race car. I had 650lbin springs in front and 600lbin springs in the rear. The high spring rate allowed me to run that low without bottoming out over bumps. I drove from Orlando, Fl to Austin, Tx like that without any issues!!! Don't try this on cheapo ebay coils that don't have spring rates on them!!! I speak from experience here as I tried a set of those cheapo shit springs and they are garbage!!!"
Also, from that same thread, here is Shawn B's post with several links to VERY good information that you MUST READ!! (thanks Shawn for posting it):
Here is your answer:
http://www.sr20-forum.com/suspension...formation.html
Mike Kojima (Choaderboy2) did some custom stuff to lower his car beyond the normal limits.
Here you go. All of this is pretty much waaaaay beyond most enthusiasts skills, knowledge, or checkbook.
Dog 2 front suspension for SRX - SR20 Forum
Finaly drove my front suspension mods - SR20 Forum
Built and Tested 2006 legal toe steer tie rod ends - SR20 Forum
More Dog III - SR20 Forum
Good luck.
Ben will probably be able to decipher those conversations. Most of it flies right over my noggin. Whoosh.
More to follow......
Second, and most important, is a disclamer;
This is not an instruction manual. This is what I have done for my own car. I only take responsibility for my own modifications to my own cars. I will not tell you to modify your cars in such a manner as I have done. I will not take responsibility for the modifications that you have done to your car. I cannot be responsible for shoddy workmanship on your part. If you attempt to modify your car in such a manner as I have done, you must own your decision to do so and any consequences that arise as a result of your choice.
Because of this, please DO NOT ask me to modify a set of control arms for you as I will have to decline. I cannot afford the liabilty of producing a modified control arm that may or may not be weaker than the factory control arm. If your modified control arm should break while you are driving down the road causing your death or the death of others, It must be known that it was YOUR choice to modify your contol arm. What I offer here is ONLY a suggestion as to a direction you may or may not want to go with regards to modifying you car.
Third, what an extended control arm will and will not do for your car;
An extended front contol arm will NOT:
-Fix any suspension geometry issues that may arise from excessive lowering of your car
-Improve roll centers.
-Help bump steer.
-Improve handling.
-Make you a better driver.
An extended front contol arm WILL:
-Allow you to lower your car to extreme levels without binding your axels.
-Add negative camber to the front wheels
-Add track width to the front axel.
PLEASE READ ALL OF THE ABOVE BEFORE MOVING ON!!!!!!!
THEN READ IT AGAIN!!!!!
I have recieved a lot of interest in my extended front control arms which is why I am posting this.
Here is my post from the "Calling B13s that are LOW..." thread:
"Hey guys, I just caught this thread. Thanks to Snail for posting. I have extended the front control arms on my green car by 1/2" to relieve the axle bind issue. I then had to extend the rear arms just so the car did not look goofy. I extended the rears by 3/4" which actually made the front and rear track pretty much equal. In case you have not noticed, the front track is wider than the rear on the B-13 from the factory.
I discovered the axle bind issue with my race car (92 SE-R) by running too low at Daytona. Going around the banking causes the suspension to compress further than just riding down the road. Throw in a few dips for good measure and presto chango you now have dumpster fodder for an axle. I destroyed and axle in 3 laps one time!!!! Needless to say, my race car is only about an inch lower than stock right now and I had the axles shortened by 1/2".
When you are shortening an axle, it is the shaft between the inner and outer joints that needs to be shortened. The company I sent mine to took the axle apart, machined a new "c" clip groove on one end and then took 1/2" of material off that same end. Apparently the splines for the joint are long enough for them to remove that much material and be able to put it all back together.
I did not go that route with the green car. I opted to extend the control arms instead. Either way will get the job done. None of this has anything to do with roll centers or proper suspension geometry. It will just allow you to drive your car at a low ride height without destroying your axles. Just remember, the extreme angle that the axles have to operate under will also accelerate wear on the joints and the boots. Your mileage may vary....
Quote:
Originally Posted by nismonx2000
is there a way to test for axle bindage with the wheels on the ground at ride height? example: grab the axle and see if theres inward/outward travel? im assuming no travel would mean it will bind? little travel would mean it will bind under suspension travel and cornering, and lots of travel would pretty much mean ur good? my nx is pretty low, but my axles dont make noises or appear to bind, but id like to check somehow. lemme know if u think my idea is headed in the right direction.
Yes, you can test this, I did on my race car and on my green car.
YOU DO NOT WANT TO DO THIS WITH THE WHEELS ON THE GROUND!!!!
1, Measure your ride height from axle to fender while the car is on level ground and the suspension is settled.
2, Put the car on jack stands and remove the wheels.
3, Remove the front strut assemblies.
4, Remove the springs from the struts.
5, Replace the struts without the springs back in the car.
6, Remove the axle nut
7, Use your jack to compress the suspension to the measurement you took in step 1.
8, See if you can move the axle in and out (plunge depth). Measure how much travel you have.
9, Move the suspension through a range of motion and see the difference in plunge travel at different suspension heights. It is fun to see how it all works!
If you don't have any travel in step 8, congratulations! You have axle bind, and if you have been driving like that, chances are your axle is pretty unhappy. Especially if you have a turbo monster under your hood!!
At the very minimum, I would say you want at least 1/8" of plunge at ride height, more would be better since you will run out of plunge as the suspension compresses further. Think about going around a turn at speed and then hitting a bump. What happens? You need room for that.
The modifications I made gave me a significant amount of plunge to play with at my chosen ride height.
I hope that this helps.
Please understand that, to the dismay of some, I went for stance over performance on my green car. However, I was running the shortened Koni coilover set up from my race car. I had 650lbin springs in front and 600lbin springs in the rear. The high spring rate allowed me to run that low without bottoming out over bumps. I drove from Orlando, Fl to Austin, Tx like that without any issues!!! Don't try this on cheapo ebay coils that don't have spring rates on them!!! I speak from experience here as I tried a set of those cheapo shit springs and they are garbage!!!"
Also, from that same thread, here is Shawn B's post with several links to VERY good information that you MUST READ!! (thanks Shawn for posting it):
Here is your answer:
http://www.sr20-forum.com/suspension...formation.html
Mike Kojima (Choaderboy2) did some custom stuff to lower his car beyond the normal limits.
Here you go. All of this is pretty much waaaaay beyond most enthusiasts skills, knowledge, or checkbook.
Dog 2 front suspension for SRX - SR20 Forum
Finaly drove my front suspension mods - SR20 Forum
Built and Tested 2006 legal toe steer tie rod ends - SR20 Forum
More Dog III - SR20 Forum
Good luck.
Ben will probably be able to decipher those conversations. Most of it flies right over my noggin. Whoosh.
More to follow......